Archibus SaaS / Space / Move Coordinator / Move Console / Plan Move Scenario tab
Space / Moves / Move Console / Plan Move Scenario tab
Space / Moves / Move Scenario Planner / Develop Move Scenario / Plan Move Scenario tab
Edit and View Selected Rooms and their Assigned Teams and Employees
When working with the floor plan, you may want to view the details of a set of rooms, and the employees and teams assigned to these rooms. For example, you might want to select a set of rooms and verify that all the employees assigned to these rooms are of the same department. Or, if placing an executive, you might want to check the room standard to see if the room is an executive office.
Editing room properties is supported only for layout scenario drawings; for inventory drawings, you can only view the room properties.
Accessing room data from the floor plan is handy because:
- You can select a set of rooms based on their visual representation in the floor plan; you do not need to know the room number or other properties of the room. For example, by working with the floor plan, you can choose a room based on its size or location on the floor.
- Once you select a set of rooms in a scenario drawing, you can edit their properties all at once, as described below.
Select a Set of Rooms for Viewing, Exporting, or Editing
- Load the Plan Move Scenario tab
- Load the layout (inventory drawing or scenario drawing) that you want to work with.
- If necessary, highlight the floor plans by a specific property. For example, if you want to work with departmental assignments, you may want to highlight the floor plans by department.
- If you want to work with multiple assets, set to Select Multiple Assets mode by clicking the Select Multiple Assets button in the floor plan's icon list on the left. The button turns red when in this mode.
- Create a selection of rooms by clicking on each room in the floor plan that you want to include in your selection set. You can also use the CTRL-key+Click-Drag-Release mouse action. If you want to work on one room, simply click on it.
- As you select rooms, Archibus outlines their borders in gray.
- If you accidentally select a room, you can remove it from the selection set by clicking on the gray outline.
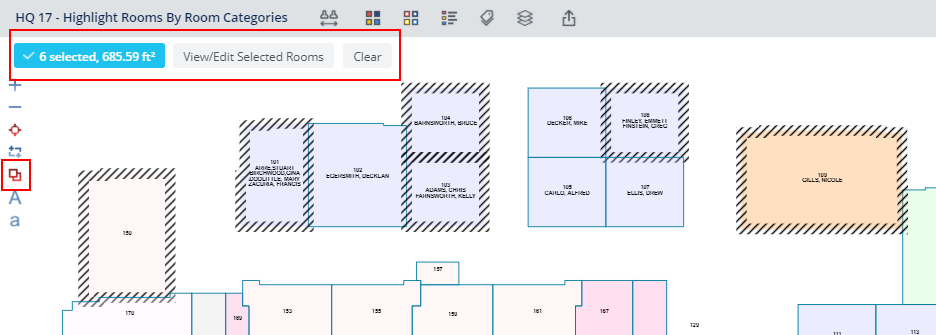
- Archibus reports on the number of selected rooms and their total square footage in the area above the floor plan.
- If you want to cancel the selection set and start over, click the Clear button, located above the floor plan.
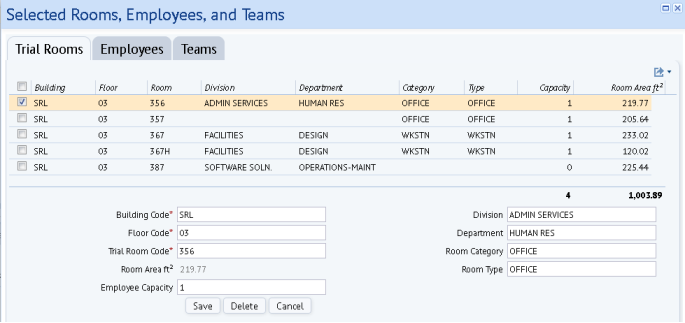
- When you are satisfied with the selection set, choose View/Edit Selected Rooms located in the floor plan ribbon. Archibus displays the Selected Rooms, Employees, and Teams form listing key information about the rooms. If you are working with a scenario drawing, the form lists the rooms from the Room Trials table; if working with an inventory drawing, it lists the rooms from the Rooms table.
- You can now:
- review the list of teams and employees assigned to this set of rooms.
- export the selected rooms to a Word document or Excel by choosing the appropriate command from Export button in the upper right corner of the form.
- edit a room (for scenario drawings only). Select a room's check box, and Archibus lists the current values for this record in the area beneath the room list. You can edit any of these values as necessary. When through with your edit, click Save and Archibus save the changes and removes the edit fields from the form.
- edit multiple rooms, by selecting their check boxes. This is described in the next section.
- When you finish reviewing, editing, or exporting your rooms, click the Close button. Archibus returns you to the floor plan and cancels your selection set.
Edit Multiple Rooms at Once (Scenario Drawings only)
An advantage of selecting rooms from the floor plan is that you can edit multiple rooms at once time. To do so:
- Follow the above procedure through step 5 to select your rooms and access the Selected Rooms, Employees, and Teams form.
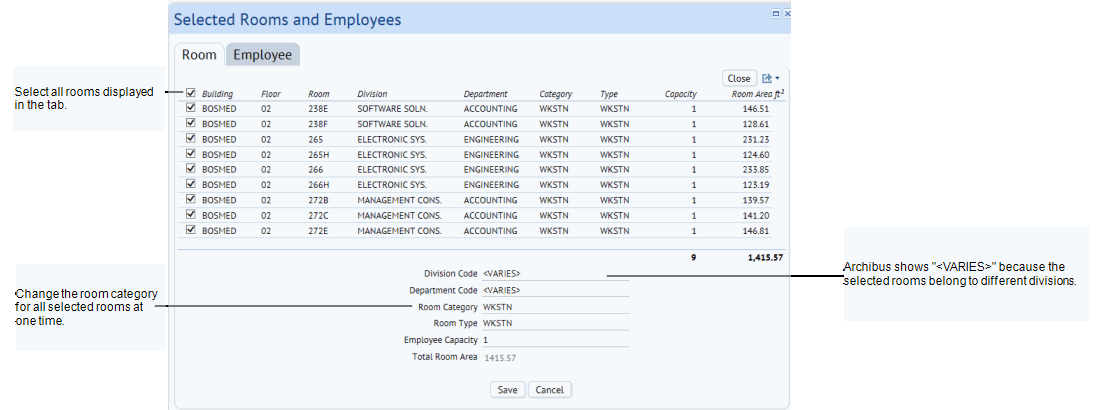
- On the Selected Rooms, Employees, and Teams form, click the boxes for the rooms that you want to edit. To select all the rooms listed on the form, click the top selection box next to the field titles.
- Archibus displays the fields and their current value in the bottom of the form. If the selected records do not have the same value for a field, Archibus enters "<varies>" as the value.
- Edit the appropriate fields and click Save.
- Close the Selected Rooms, Employees, and Teams form.
- Archibus returns you to the floor plan. If your edit affects the current highlights or labels, Archibus updates the floor plan's highlights and labels to reflect your change.
For example, suppose you highlight the floor plan by room type and notice that several workstation rooms appear to be over-sized. These rooms are classified incorrectly and really should be offices. You can re-categorize these rooms in one procedure.
- Highlight the floor plan by room category.
- Review the floor plan and look for workstations that appear to be oversized.
- Select the oversized workstations and click View/Edit Selected Rooms.
- In the resulting form, select all the rooms in the form by clicking the selection box next to the field titles.
- Click the ellipses button for the Room Categories field and choose Office as the room category.
- Click Save.
- Click Close.
- For the rooms that you selected, Archibus updates the highlight to reflect that these rooms are now categorized as offices.