Archibus SaaS / Reservations / Reserve / Create Bookings task
Workplace Services / Hoteling / Create and Review Bookings/ Create Bookings task
Step 2: Booking a Seat
When running the Create Booking task to a book a seat, you first to search for available seats that meet your criteria. The system presents the search results in the Select Seats tab. From this tab, you can view the available seats that match your search criteria, and then select seats to book.

Basic Procedure for Booking a Seat
- After you search for available seats, the system present the search results in the Select Seats tab. The left panel will present a tree view, so that you can drill down through buildings to select a floor on which there are rooms with available seats.
Note: If the system does not list any floors, then there are no available seats matching your search criteria and matching the security and configuration options set for your site. Choose the Back button to return to the search tab so that you can enter a new search.
Note: Text next to the floor name indicates the number of available seats on the floor. If there are not enough open seats on this floor for the number of people that you need to book, there is no need to select this floor and open the floor plan drawing; instead, you should proceed to another floor.
Note: For information on how the system determines search results, see How the Hoteling Features Search for Available Seats.
- Select a floor from the list.
- In the lower left pane the system displays a list of employees or visitors for which you can book a seat. (If you are booking a seat for yourself, proceed to step 4.) Select a visitor or employee.
- Visitors' profiles determine whether or not they are available in the selection list. For example, some visitors are established so that only a certain employee can create bookings for them. Thus, these visitors will not appear in everyone's list. See Defining Visitors.
- Typically, a business process owner will have already entered authorized visitors into the system. However, if the visitor is not yet entered in the system, you may be able to enter it while booking a seat by choosing the Add New Visitor button.
- The system makes all employees available for selection, but may not be able to display them all in the panel. To see additional employees, use the Smart Search console.
- The system displays its floor plan drawing in the right panel, highlighting in green the rooms with available seats on this floor that meet the search criteria.
- Review the rooms on the floor plan and determine the room that you would like to book. To help you determine room properties, you can redisplay the drawing with different labels, as explained below.
- To choose a seat to book, click on the room in which it is located; the room turns yellow to indicate it is selected, as shown in the above image.
- The system lists it in the Selected Bookings pane at the bottom of the screen. If you select another room at this point, the system replaces the existing entry with the newly selected room.
- You can check is resources are available for the selected room. See Specify resources for a booking, later in this topic
- If you are booking seats on this floor for multiple visitors or employees, you can return to the Visitors or Employees pane to select another employee or visitor and book another seat.
- If necessary, review and edit your bookings. The Selected Bookings pane lists all of your bookings. From this pane, you can review and edit a booking:
- Change the departmental assignment for chargeback purposes.
- For bookings made on behalf of another employee or outside visitor, you can change the associated employee from yourself to another employee.
- If you are not satisfied with a booking, cancel it by choosing the Clear button in the Selected Bookings pane. The system removes this booking from the Selected Bookings panel.
- When you are satisfied with the details of your bookings, book the seats listed in the Select Bookings frame by selecting them and choosing the Book button at the top of the screen.
- The system creates a record in the Workspace Transactions (rmpct) table, so that the system can track the percentage of time that a room is used and percentage of space within a room that is used. If you specified a recurring pattern, the system creates one Workspace Transaction record for each occurrence of the meeting.
- The system moves you to the Review Booked Seats tab.
Specifying Resources for the Booking
Some sites make unlimited resources available to staff booking seats. For example, when booking a seat, you might want to specify that snacks or a networking cable should be available. The list of available resources is determined by the site or building to which resources are assigned. See Define Resources.
When deciding between rooms in different buildings, users can check the available resources that they might require and choose the room that has the resources that they need. Specifying resources is also handy for staff servicing bookings, who may find it useful to know which resources were requested.
Procedure
-
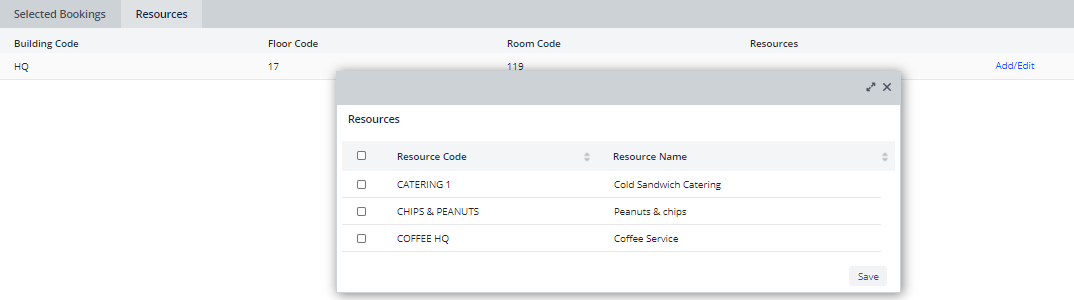
Once you select a room in step 6 above, click the Resources tab (next to the Selected Bookings tab).
-
Select the Add/Edit button to access the list of available unlimited resources associated with this building and from which you can choose to add one or more resource.
-
Click the check boxes for the desired resources, and click Save.
-
The view adds these values to the Hoteling Resources Required field of the Room Transactions table.
Note: If you book a seat with Workplace, you can also search for seats by fixed resources (amenities).
Note: If you work with the meeting space reservations, you may be accustomed to its robust resource request system. Hoteling uses only a portion of the resource features that are available to meeting space reservations.
Changing the Departmental or Account Assignment
Since departments are billed for their use of booked seats, it is important that booking be accurately assigned a division and department. If you are booking a seat for yourself or a visitor, the system will automatically complete the booking with your department assignment. Similarly, if you booking for another employee, that employee's department assignment will be stored with the booking.
In some cases, you may want to change the booking's default departmental assignment. For example, suppose you are booking a seat so that you can work on a project for another department; you would want to charge the use of this seat to the other department. Similarly, if an employee or visitor does not have a departmental assignment, you can enter one so that the booked seat will be appropriately charged.
Depending on your security group setting, you may have authorization to change the department and division associated with the booking; otherwise, these fields may not be editable.
In addition to departmental assignments, some sites associate costs with accounts. If your site associates costs with accounts, you can enter an account. (Note that the chargeback system is based on departmental assignment, not an account assignment.)
To change departmental assignments or associate the booking with an account, do the following:
- In the Selected Bookings form located at the bottom of the screen, choose the Edit button for the desired booking.
- The dialog displays the current departmental assignment. Change this as necessary.

- If desired, specify an account.
- Choose Save.
- The system closes the dialog, and redisplays the data in the Selected Bookings frame with the updated data.
Changing the Employee Assignment
If you are creating a booking for another employee or for an outside visitor, the system will automatically complete the Employee Name field with your name.
However, there may be situations in which you want to associate the booking with another employee in the system. For example, as a department manager, you may be booking a seat for a visitor who will be working with an employee in your department. You may prefer to have this employee, with whom the visitor will be closely working, associated with the visitor rather than yourself.
To change the employee assignment:
- In the Selected Bookings form located at the bottom of the screen, choose the Edit button for the desired booking.
- The dialog displays the current employee assignment. Change this as necessary.
- Choose Save in the upper right corner.
- The system closes the dialog, and redisplays the data in the Selected Bookings frame with the updated data.
Changing the Drawing's Labels
When you are determining the seats to book, you may require further information about the room in which the seat is located. You can have the system display room information within the room polyline or in a pop-up when you mouse over the room. To determine the information that the drawing displays, you set its labels.
You can have the drawing display the following labels:
| Label | Description |
|---|---|
| None | No labels will display. |
| Employees | You may want to know the employees that occupy the rooms near the seat you are booking. For example, if you are booking a seat for a contract software engineer, you may want to have this person sit near other engineers. The employee labels will help you find seats near the appropriate personnel. |
| Room Capacity-Availability | Since rooms can be defined to house multiple people, you may want to examine a room's availability in terms of its capacity. For example, if a room is defined to house a maximum of three, and two bookings have been made for this day, the room may still accept one more booking. If the person who will occupy the room will work best if in a room by themselves, you may wish to look for rooms for a capacity of 1. Similarly, if are booking a group of people who need to work together, you will want to look for rooms with a capacity that will support this group. |
To change the drawing's labels:
- Choose the type of label in the Labels option in the upper right corner.
- Click on the drawing. The drawing redisplays with the changed label.
Next
After you book the seats, the system will move you to the Review Booked Seats tab.
Note that your security group and how Hoteling has been configured for your site will determine such factors as whether:
- you will receive email notification about the booking
- an approving manager must approve the booking request.
Note: For details on the actions that they system takes to book seats, see How Bookings are Created.
Back
Back to Create Bookings Task Overview.