Archibus SaaS / Maintenance / Background Data - Maintenance / Define Craftspersons
Maintenance / Corrective Maintenance / Background Data / Define Craftspersons
Maintenance / Preventive Maintenance / Background Data - Maintenance / Define Craftspersons
Define a Craftsperson's Daily Schedule
After you define basic information about craftspersons using the Define Craftspersons task / General tab, you can develop the craftsperson's daily schedule using the view's Daily Schedule tab.
- If the craftsperson follows a standard shift, you can assign the shift to the craftsperson.
- For standard schedules that do not follow a shift definition, you can establish a daily schedule, which defines for each day of the week (Sunday-Saturday), which hours a craftsperson is available, and under which hourly rate (Standard, Overtime, Doubletime). A daily schedule assumes that a craftsperson's regular daily schedule is consistent from week to week.
- Record any variations to the regular daily schedule and assigned shifts with the Define Craftsperson Schedule Variances task.
For information on the scheduling tables, see Concept: Tracking a Craftsperson's Daily Schedule.
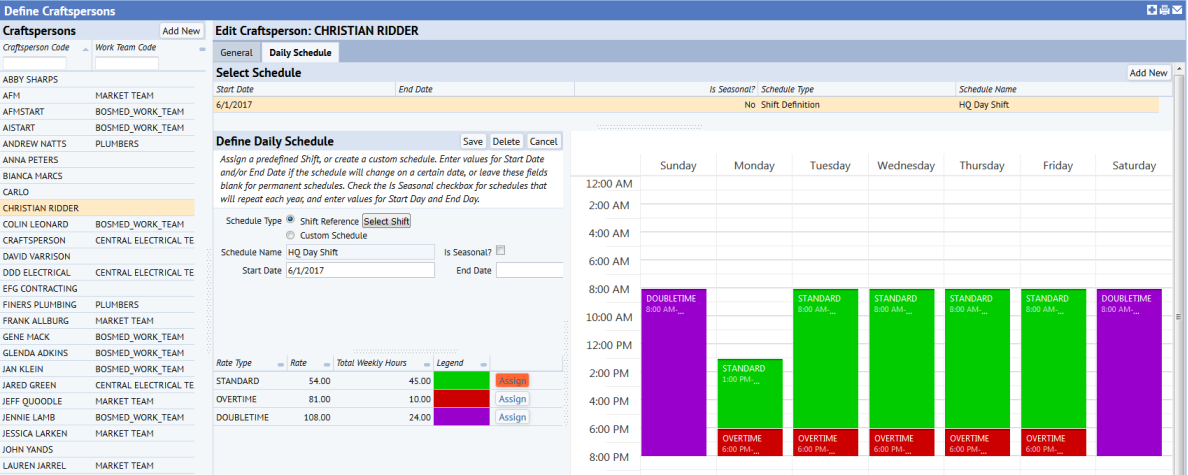
Daily Schedules tab
From the Define Craftspersons task (the ab-cf-edit.axvw view), select a craftsperson on the General tab, and use the Daily Schedule tab to:
- review the craftsperson's schedules
- edit the craftsperson's currently assigned schedules
- assign a shift to the craftsperson
- create and assign to the craftsperson a custom schedule that does not follow a shift definition
The Daily Schedule tab's upper panel, Select Schedule, lists all existing schedules, both shift schedules and custom schedules, for the craftsperson. You can select a schedule to edit, or create a new custom schedule by choosing the Add New button.
The lower panel, Define Daily Schedule, contains a 7-day weekly calendar with blocks indicating this craftsperson's schedule; the blocks are colored according to the rate (standard, overtime, double overtime) that applies to the time period. For example, in the below image, Christian Ridder has been assigned the a pre-defined shift (HQ Day Shift), and no custom schedule.
Specifying a date range and seasonal schedules
When assigning both shifts and custom schedules, you can specify a date range to which the schedule applies by completing the Start Date and End Date. If the schedule repeats each year for a specific time frame , complete "Is Seasonal?" and the start and end days. Note that you do not provide a year for a seasonal schedule because the schedule repeats each year.
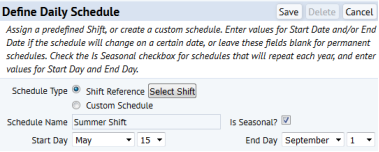
Complete these fields as follows:
| Schedule | Description | Complete these fields |
|---|---|---|
| Permanent schedule | A single year-round schedule that has no planned changes | Leave all fields blank |
| Seasonal schedule | A craftsperson might work until 7:00 PM in the summer months, but work until 5:00 the rest of the year. |
Start Day, End Day, and check the Seasonal Schedule option Note that you do not supply a year as part of the time frame , as a seasonal schedule applies to all years. |
| Date-Based Schedule Changes |
A craftsperson does not work seasonal schedules, but has a permanent change to their schedule happening sometime in the near future. |
Define that schedule change with a future Start Date, and apply an End Date to the existing schedule. These schedules are not denoted as Seasonal, and do not apply to any date after the End Date. |
Overlapping schedules
The Define Craftsperson view does not restrict you from creating both seasonal and non-seasonal schedules (either shifts or custom) for a single craftsperson. However, it does prevent you from adding schedules (shifts or custom) with overlapping dates. Specifically, no two seasonal schedules can overlap, and no two non-seasonal schedules can overlap.
Other views that calculate a craftsperson's total working hours determine which schedule applies based on the selected date.
- A schedule with no Start Date and End Date takes precedence over all other schedules.
- The calculations look at non-seasonal schedules to see if the selected date falls between the Start Date and End Date. If so, then that schedule will apply.
- If there are no non-seasonal schedules that apply, then any seasonal schedules will be used. Again, the system check to see which seasonal schedule applies during the selected date.
Assigning a predefined shift
The maintenance manager may have defined shifts and assigned them to the craftsperson using the Manage Craftsperson Shifts task. You can also assign a predefined shift to the craftsperson from this task. To do so:
- In the Define Craftspersons task / General tab, select a craftsperson and choose the Daily Schedule tab. The view shows any existing shift and custom schedules assigned to the craftsperson. Choose the Add New button.
- In the Define Daily Schedule section of the view, select Shift Reference and click the Select Shift button.
- In the resulting form, the view presents a list of pre-existing shifts.
- Select a shift, and the view updates the calendar with the blocks representing this shift. If you had already drawn some time blocks onto the calendar, the system replaces these with the blocks for the selected shift.
- If necessary, set a date range, as described above.
- Click the Save button.
Note: If you choose a shift for a craftsperson, and then wish to alter those hours for this craftsperson schedule, you can change the Schedule Type from Shift Reference to Custom Schedule. This enables the Assign buttons so that you can makes changes to the schedule. In this case, the schedule will be saved as a custom schedule.
Assigning a custom schedule
For craftspersons whose working pattern does not follow a defined shift, you can create a custom schedule. Similar to defining shifts, you draw time blocks on the calendar for the different rate types (Standard, Overtime, Doubletime). You can optionally create a name for the custom schedule by completing the Schedule Name field.
Creating time blocks
Time blocks can only exist in a single day; that is, you cannot start a time block on Monday and extend it to Tuesday. If a craftsperson is working from 8:00 PM Monday to 6:00 AM Tuesday, then you must create two separate time blocks to represent this.
- In the Define Craftspersons task / General tab, select a craftsperson and choose the Daily Schedule tab. The view shows the shift and customized schedules, if developed, for the selected craftsperson. Choose the Add New button.
- Choose Custom Schedule.
- If necessary, set a date range, as described above.
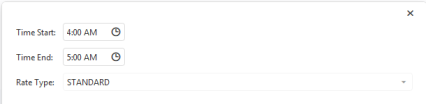
- For the for a desired rate (standard, overtime, double-time) to which you want to assign a time block, click on the Assign button.
- Double-click on a time block to which this rate applies. The system presents an edit form with the time frame of the block you picked.
- You can use the edit form to change the time slot by changing Time Start and Time End.
- As another option, you can confirm the time slot that the form presents and process the form. Next, in the calendar, stretch the time block to represent the desired time. For example, you might have first completed a 60-minute time block from 8:00 to 9:00. You can now select this block and stretch it to fill the time blocks of the entire day.
- Time blocks can only exist in a single day; for example, you cannot start a time block on Monday and extend it to Tuesday. If a craftsperson is working from 8:00 PM Monday to 6:00 AM Tuesday, then you must create two separate time blocks.
- Repeat for any time blocks that require other rates.
- Provide a name for your custom schedule.
- Click Save in the upper right corner when through.
Editing time blocks for a custom schedule
You can manipulate time blocks by moving them to different days or times or resizing them.
To access an edit form for changing the time block
- Click on the time block.
- The system presents a pop-up form listing the details of the time block.
- On the pop-up form, click Edit to access an edit form for changing the time frame.
To delete a time block:
- Click on it.
- In the resulting pop-up form, click the Delete (trash can) button.
To move a time block:
- Click on a time block.
- Drag it higher or lower in the current day, or move it side to side to move to another day.
To resize a time block:
Suppose you have created a time block and then realize that the job will take longer.
- Click on the bottom edge or top edge of a time block.
- Move up or down with the mouse to drag the time block to a new size.