System / Archibus Administrator - Application Configuration
Enable or Disable Workspace Transactions
The first step in using the Space applications is to determine whether you want to use the Archibus workspace transactions feature set, or the non-transactional Space feature set. For information on these two methods, seeTransactional vs. Non-Transactional Methods.
Use the Enable or Disable Workspace Transactions task to:
- Set the
UseWorkspaceTransactionsapplication parameter to activate or deactivate the workspace transactions feature set. - Turn on the data change events that track transactions as you edit rooms and employees in the Smart Client, the Smart Client Extensions for AutoCAD and Revit, and in Web Central.
- Update the Navigator to display either:
- the non-transactional Space processes and tasks
- the workspace transaction-based Space processes and tasks
Note: This setting affects the processes and tasks displayed by the Space Inventory, Occupancy, and Space Chargeback applications of the Space domain.
Note:The transaction-based space inventory method is not available in Archibus SaaS deployments.
Enabling Workspace Transactions
If you want to use the transaction-based feature set, follow this process.
Step 1: Run the Enable task.
- Select System / Archibus Administrator - Application Configuration / Enable Workspace Transactions
- In the resulting form, choose the Enable button.
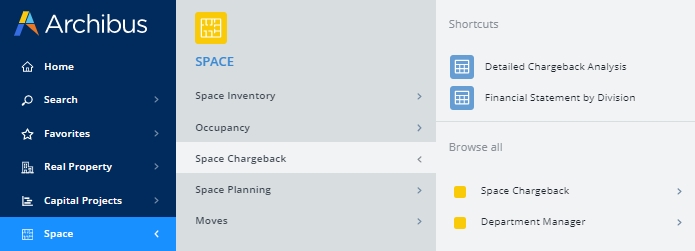
- The system displays this Navigator:

- Choose the Reconcile Workspace Transactions button so that the system can create Workspace Transaction records for each existing Room record
Step 2: Assign the Service Desk and Client Processes to the Occupancy Application
The Service Desk Manager and Client processes do not automatically appear in the Navigator for the transaction-based Occupancy application; you must explicitly assign these processes to the appropriate roles.
To show the Client process on the Navigator:
- Select the System / Archibus Administrator - User and Security / Assign Processes to Roles or Users task.
- In the left panel, choose the Roles tab and use the Smart Search console to search for the roles to which users requiring the Client process are assigned. For example, you may wish to assign the Client process to the Self-Service role and to the Process Owner role (who sees all roles and processes and all tasks).
- In the Available Applications and their Processes panel, use the Smart Search console to search on "Client" in the Process or Role Title field. From the resulting list, choose the
Client RmTransprocess.
- Click the Assign button, which moves the process from the Available Applications and their Processes pane to the pane which lists the processes assigned to the selected role.
- Navigate to the Space / Occupancy application, and you will see the Client role.
To show the Service Desk Manager role on the Navigator:
- Select the System / Archibus Administrator - User and Security / Assign Processes to Roles or Userstask.
- In the left panel, choose the Roles tab and use the Smart Search console to search for a role to which users requiring the Service Desk Manager process are assigned. For example, you may wish to assign the Service Desk process to the Service Desk Supervisor role and to the Process Owner role (who sees all roles and processes and all tasks).
- In the Available Applications and their Processes panel, use the Smart Search console to search for "Service Desk Manager" in the Process or Role Title field. From the resulting list, choose the
Service Desk Manager RmTransWeb process. - Click the Assign button, which moves the process from the Available Applications and their Processes pane to the pane which lists the processes assigned to the selected role.
- Navigate to the Space / Occupancy application, and you will see the Service Desk role.
Step 3: Set the Data Change Events Workflow Rule for Workspace Transactions
In order for the workspace transaction features to properly function, you must verify that the RoomTransactionRecorderForDataChangeEvent workflow rule is enabled.
- Navigate to System / Add-In Manager / Define Workflow Rules.
- Select Application
AbSpaceRoomInventoryBAR, and then select Rule NameRoomTransactionRecorderForDataChangeEvent”. - Change the field Active? to Yes and click Save.
Step 4: Make your changes take effect.
You must do one of the following in order for the change to take effect:
-
Select the System / Archibus Administrator - Application Configuration / Configure Application Parameters view. Choose the Reload All Parameters button, located at the top of the left panel.
--or --
- Restart the application server
Disabling Workspace Transactions
If you want to use the non-transactional Space processes and tasks:
- Select System / Archibus Administrator - Application Configuration / Enable Workspace Transactions.
- In the resulting form, choose the Disable button.
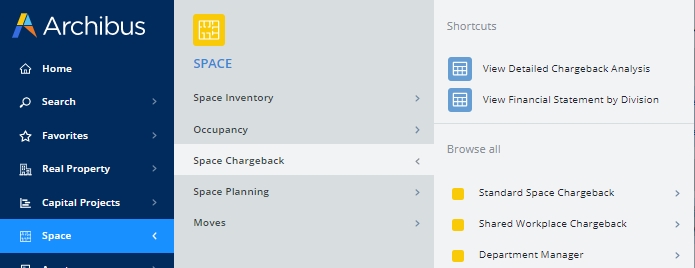
- The system displays this Navigator:

- You must do one of the following in order for the change to take effect:
- Select the System / Archibus Administrator - Application Configuration / Configure Application Parameters view. Choose the Reload All Parameters button, located at the top of the left panel.
-- or -- - Restart the application server
See Also