Workplace Services / Reservations / Reserve Rooms and-or Resources / Reservations Calendar Console
Archibus SaaS / Reservations / Reserve / Reservations Calendar Console
Create a One-Time Reservation for a Meeting Room and Optionally Resources
Note: Rather than providing general staff with the Reservations application, your site might provide general staff with Archibus Workplace on a tablet, kiosk, or smart phone. You can also access Workplace from Workplace Services / Reservations / Reserve Rooms and-or Resources / Workplace. With Archibus Workplace, general staff and guests can reserve meeting space on a one-time or recurring schedule, and a manager can manage the reservations using the Reservations application. For information, see Using Archibus Workplace.
As another option, your site may provide general staff with the Workplace Services Portal mobile app, so that they can make one-time reservations from their smart phones.
To create a new reservation from the Reservations Calendar Console task, you can:
- Create a room reservation for a single unique event that will occur on one day.
- Reserve resources at the same time that you create the reservation for the room. These resources can include equipment and services and catering. These resources are linked to the room reservation so that you can manage them together.
- View attendees' availability based on their Outlook calendars if you have the Archibus Extension for Microsoft Exchange. If Exchange integration is not configured, you view attendees availability based on the other reservations they have in Web Central.
- For information on creating a room reservation for a recurring event that occurs on a regular schedule over a specific time period, see Create Recurring Reservations for Rooms and Resources.
This topic includes the following information:
Procedure: Create a single room reservation with or without resources
To set up a single room reservation, and reserve resources at the same time:
- Select the Reservations Calendar Console task. For an overview, see Explore Reservations Calendar Console.
- Search for a room to reserve
Use the filter to enter the building or buildings in which you want to reserve a room. You can further restrict the list of rooms by entering other fields in the filter. See Search for Rooms.
The Rooms pane updates to show available rooms. Room arrangements are ordered first by Building Code, then by default arrangement, and finally by capacity.
Review the details of a room by clicking on the room's "i" button.
- Select the room and specify the time
- Click on a room in the left pane. Any confirmed reservations for the rooms are shown on the calendar. Find a room that has availability.
- Optionally, use the View Employee Schedules button to check availability. See Attendee Schedules and Meeting Space Reservations.
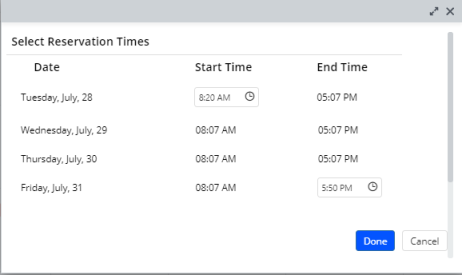
- You can now use the calendar to specify the reservation time. You cannot create a reservation that overlaps an existing reservation for that room.
- Click and drag your mouse over the desired time period. Click the mouse on the desired start time, drag, and release the mouse on the desired end time.
- If the room that you selected has a room arrangement that calls for setup or cleanup times, the time block on the calendar will reflect these additional minutes. For example, if an arrangement calls for a 30-minute setup time and a 30-minute cleanup time and you drag the mouse from 10:00 to 11:15, the calendar will draw the block from 9:30 to 11:45 to reflect the setup and cleanup times. This ensures that another reservation does not occur during the time that workers are cleaning up the meeting room.
- If you are making a continuous reservation (for example, a room for a training class that extends multiple days), drag the time block over the desired days. You can start and end the continuous reservation on a partial day. For example, you may wish to end a week-long training class at noon on Friday. To set a partial time:
- When you drag the time block on a weekly view, release the mouse at the desired end time. Likewise, you can start a continuous meeting at any time by starting the drag-and-release at the desired time.
- Optionally, enter the desired start and end times in the resulting form once you release the mouse. Use this method if you have the calendar set to monthly view.
- Optionally, add reservable equipment and services
- Once you select the time on the calendar for the selected room, the Reserve Resources button in the Reservation Summary pane on the right becomes available.
- Click Add Resources.
-
The Add Reservable Resources form shows the equipment and services, such as chairs, IT support, projectors, and IT cables. The form gives the quantity that are available for the selected time frame.
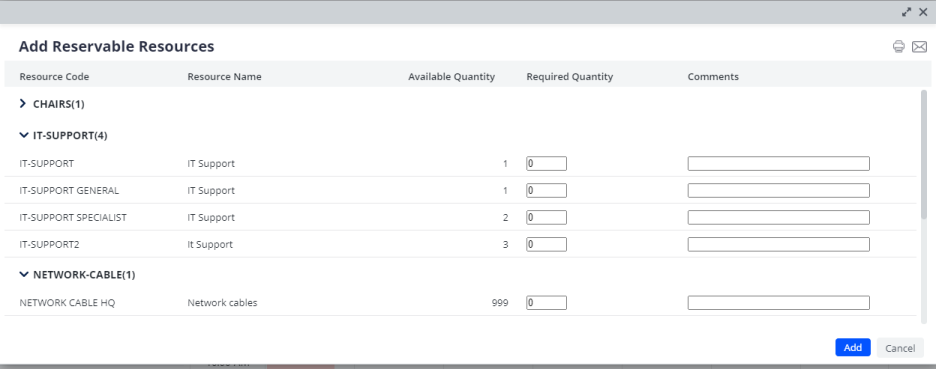
As with rooms, if you do not enter a From and To time in the Filter, the application shows all resources matching the criteria you enter, and shows the existing confirmed reservations for the resource. This enables you to assess what is the best time to set up your reservation based on the available time slots for the resource.
- For each resource you want to reserve, enter the quantity in the Required Quantity column and click Add.
- The Reservation Summary panel now lists the resources you added. If you need to remove a resource at this point, you can click its "X" icon.
Note: If you change the time in the calendar for the room, the resource's time is automatically updated, as long as the resource is available. If the resource is not available during this time, then it is removed, and a Selection changed message appears at the top of the pane. Mouse over this message to see the IDs of the removed resources.
- Reserve the room and resources
- If you are satisfied with the requested room, requested resources, and meeting date and time, click Reserve in the Reservations Summary panel.
- The Reservations Calendar Console displays the Confirmation form. From here, you can add catering and add attendees.
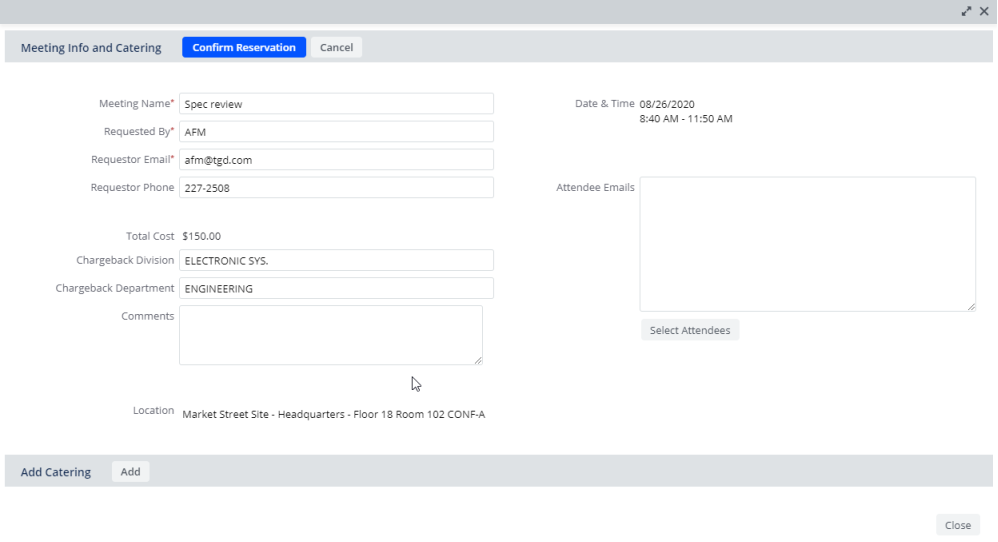
- Optionally, add catering services
- In the Meeting Info and Catering form, locate the Catering pane at the bottom of the form. Click Add Catering.
The Add Catering form appears showing the available catering resources.
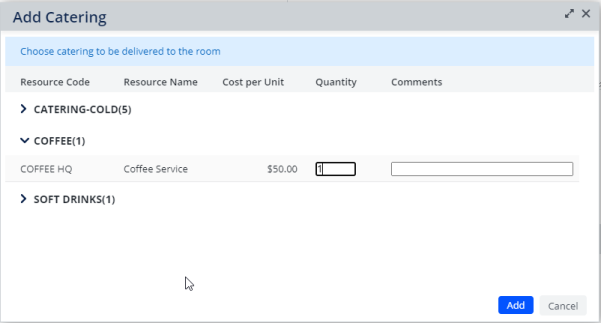
- If you need details about a catering item, click its entry and you can review the details in a pop-up form. For example, in the above image, click "Coffee-HQ" for details on what is included in the catering selection.
- In the Quantity column, enter the quantity you need for that catering item.
- Add comments in the Comments field.
- Click Add.
The catering resource is added for the same time frame as the meeting and is listed at the bottom of the Meeting Info and Catering form..
- To adjust the time frame for the catering, click Edit in the row for the catering item. In the resulting Edit Catering Reservation form, enter the start and end time for which you need the item, and click Save.
Note: If you change the time from PM to AM or from AM to PM, be sure to include the AM and PM when entering the time in the Start and End Time fields.
- To remove a catering item, click Edit in the row for the item. In the Edit Catering Reservation form, click Remove .
Note: If you change the room reservation time on the timeline, the catering resources are adjusted if the catering time you specified is no longer within the room reservation time.
- In the Meeting Info and Catering form, locate the Catering pane at the bottom of the form. Click Add Catering.
- Optionally, add employees and visitors to the meeting
- In the Confirm Reservations form (pictured above), you can type the email addresses in the Attendee Emails box. If you used the View Employee Schedules button when starting the reservation, the Attendee Emails list will already be completed with your selections. You can edit this list as needed.
- Alternately, you can choose attendees from a list by clicking the Select Attendees button, beneath the employee email list.
From the subsequent form, you can select employees or visitors to add to the meeting using the appropriate tab.
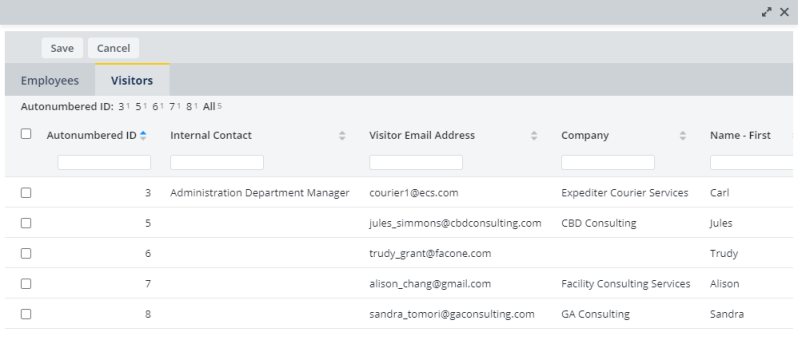
- From the Employees and Visitors tabs, select the check boxes for people who should attend the meeting and click Save. Note that you define visitors using the Background Data / Define Visitors task. See Defining Visitors.
The attendees' emails are listed in the Attendee Email list, separated by a semi-colon.
Note: The application permits you to add more employees to a meeting than specified by the capacity of the room housing the meeting (the Maximum Capacity field of the Room Arrangements table). For example, if a room has a capacity of 3, the system enables you to add more than 3 employees to the meeting. This behavior considers the fact that some employees may be attending the meeting using remoting services and will not be physically present in the meeting room. Thus, you do not need to consider the physical space they would occupy and the capacity of the room.
- To remove an attendee from a meeting, remove their entry from the Attendee Email list.
- Confirm the reservation
- The system checks that the reservation's start time is later than the site's current time. It also confirms that the room arrangement's or resource's announcement time is later than the site's current time
- The Console moves you to the My Reservations tab, which lists the new reservation. Note that the reservation's Status is Confirmed if the room or resource reservation does not require approval. If the room arrangement or resource does require approval, the Status of Reservation value is Awaiting Approval.
You can add attendees to the meeting and send them email notifications of the meeting.
When satisfied with the details on the Meeting Info & Catering form, click Confirm Reservation.
Note: Outlook Plugin and Exchange. In the Confirm Reservation screen, the Requestor’s Email (reserve.email) is used by the Outlook Plugin and for Exchange integration. The non-integration sending of emails retrieves the email address from the Employees table. For this reason, reserve.email should be equal to the requested_by employee email. If you change the default email presented in the form, by entering a different email than the employee’s email, the Plugin and Exchange use the new value, but the .ics invitations will continue to use the em.email value. For reservations created via the Plugin, the Plugin fills in the user_requested_by and user_requested_for fields based on the reserve.email field.
Attendee availability
Note the following about attendee availability:
- If you add an attendee and they have a conflicting meeting, they are added to the new meeting despite the conflict. All selected attendees are added to the reservation, even if they have conflicting meetings. To avoid attendee conflicts, you can view employee schedules when creating the reservation.
- If your organization has configured Exchange integration:
- to avoid performance issues, the application limits the number of dates it checks for attendee availability. By default, this is set to 10, but your application administrator can change this as needed.
- the application warns you that it cannot retrieve availability for non-Exchange users, as it only searches in the Exchange server.
- if the Exchange server is unavailable when you are adding attendees to a room reservation, the top of the Attendees timeline panel includes the message "No information." Mouse over that message to see the list of emails for which information could not be retrieved. You can make the reservation without knowing the attendees' availability, or you can wait for the Exchange server to be available before making the reservation.
Create Appointments with reservations on Shared Calendars working from the Reservations Plugin for Outlook
Managers often have assistants responsible for their calendar, for sending meeting invitations and updating meeting information. These assistants have access to the manager’s calendar via Exchange Shared Calendars, which can be accessed in Outlook. As an assistant, you are able to book room reservations on your manager’s calendar, and on any calendar you are allowed to edit, according to the permissions configured in Exchange. Anytime you open a meeting from the organizer’s calendar, and you, as the current user, are allowed to change the meeting, the Room Reservation Panel is enabled.
Note these requirements must be met:
- For each email account, shared calendar, or shared mailbox used to create reservations, an employee must exist in Web Central with that email address. The primary email address defined in Outlook is used for the initial connectivity check in the Reservations Plugin for Outlook.
- A user and employee must exist in Web Central with the Plugin user’s Windows user name. The Web Central user’s email usually corresponds to the primary email configured in Outlook, but this isn’t required.