Real Property / Portfolio / Buildings, Structures, Land processes
Manage Buildings / Structures / Land: Map View
The Manage Buildings / Structures / Land tasks include a geospatially-enabled map view that merges your Archibus data with Esri maps, resulting in maps that show your Archibus information laid over dynamic views of streets, satellite images, topography, and a rich variety of other geographic data. This view is a standard map view that is enabled by default; it is not necessary to set an application parameter to use this map view. See Working with Standard Map Views
You select the type of map by clicking the Base Map button at the top of the map.

By default, the World Imagery map is shown, but you can select to view other types of maps, including topographic maps, street maps, or a light gray canvas.
You select the portfolio items to view on the map. For the selected items, you can view:
- Tooltips that provide item details. See Tooltips.
- Highlights that dynamically segment and color-code the items shown on the map using the parameter you select. See Highlights.
- Any of the following reports for the items shown on the map by clicking Reports at the top of the map. See Generating Reports.
- Leases and Suites by Building
- Leases by Structure / Land
- Selected Buildings / Structures / Land Grouped by location
- Selected Documents grouped by building or lease
- Selected Contacts grouped by buildings or lease
The following sections provide more details:
Placing Portfolio Items on the Map
An item requires latitude and longitude to be placed on the map. If the latitude and longitude information are missing, use the Geocode button at the top of the map to automatically calculate the latitude and longitude. If an item has not been geocoded (that is, it has not had its latitude and longitude calculated), when shown in selection lists, it has the following icon to indicate this.

The map view uses the complete street address entered in the Address 1 field (such as 18 Tremont Street), the City Code, and the State Code entered for a portfolio item (building, structure, or land) to calculate the latitude and longitude used to place the item on the map. When entering data for any item that will be placed on the map, you will get better results by entering full words rather than abbreviations. For example, enter "Street", not "St."
To calculate the latitude and longitude for the item:
- Click the Geocode action button at the top of the map.
The application calculates the longitude and longitude, the selection list refreshes, and the icon indicating that the calculation has not been done is removed.
- If you get the message 'No Data Found', check the accuracy of the address and ensure that the complete street address is entered in the Address 1 field, and that the City and State Codes are entered in the City and State fields for the portfolio item. Also, check that you have not used any abbreviations for the address data.
Selecting the Data Layers to Show on the Map
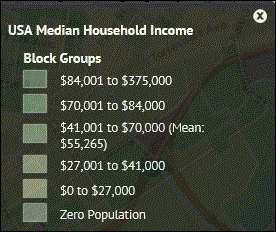
You can show data on the map, such as median household income, population density or other demographic data.
To show data layers on the map:
- Select the Layers button at the top of the map, and then select the data layer you want to review from the list that appears.

When you select a layer, the map refreshes and color-codes the map by the data you selected.
- To see the legend that describes the color coding for the data, click the Legend button at the top of the map.

- The Legend explains the range associated with each color.
Information Pop-up Windows
When you select items to show on the map , you can mouse over the marker for the item to view a tooltip that shows the Building Code. Click on a marker to see total areas (both manually entered and areas derived from CAD drawings), total leased out area (only for buildings), and the number of associated leases and costs.
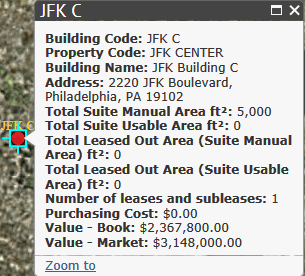
You can zoom to the location on the map by clicking the Zoom to link.
Highlights
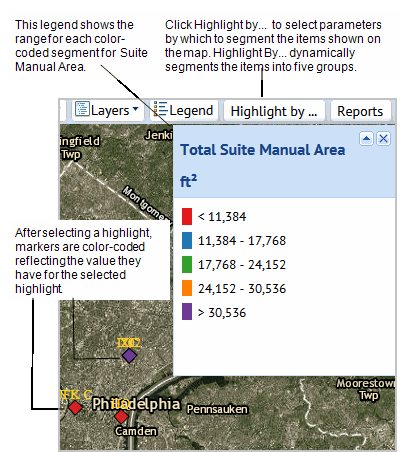
The Map view can show highlights that color-code the portfolio items you select into five dynamically-generated segments based on area, market value, book value, or purchasing cost:
To generate highlights:
- In the selection tree, select the portfolio items you want to compare.
- Click Show Selected to place them on the map. See "Selecting Portfolio Items."
- Click Highlight by... at the top of the map .
The Highlight by... pop-up window appears.
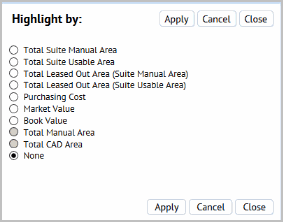
- Select one of the following parameters by which to segment your portfolio items:
Total Suite Manual Area (only for buildings)
Total Suite Usable Area (only for buildings)
Total Manual Area (only for structures or land)
Total CAD Area (only for structures or land)
Purchasing Cost
Market Value
Book Value
- Click Apply.
The Map view shows the portfolio items with a color -coded marker. A legend explains which range the color corresponds to.The following screen shot shows the map with highlighted portfolio items.
- Reports. To generate the following reports for the selected portfolio items, click the Reports button and select the report:
- Leases and Suites by Building
- Selected Buildings by Location
- Selected Documents Grouped by...
- Selected Contacts Grouped by...