Space & Occupancy Survey mobile app
Conducting Space and Occupancy Surveys
To determine how space is actually being used, discover inconsistencies, and monitor project progress, facility managers conduct space surveys -- site visits in which space auditors in the field note current space and occupancy use.
While in the field, auditors can use the Space & Occupancy Survey mobile app to access and update key space and occupancy information directly from their mobile devices. With the Space & Occupancy Survey mobile app, they can:
- access the site's floor plan drawings, room information, employee information, and refer to this information as they visit each room.
- compare what they see in the field to the documented space inventory on the mobile device and note any changes using forms on the mobile device.
- directly update the space and employee electronic inventory with the current field conditions. If working with a workspace transaction inventory, auditors can record the percentage that a department, employee, or room category uses a room.
Procedure
- Prerequisite: Either by email or verbally, the facility manager instructs the field auditor on the floors that they must visit and assess. From the mobile device, the field auditor will generate a survey for these floors.
- Prerequisite:The facility manager must ensure that the field auditor is a member of the SPAC-OCCUP-MOB security group. See Space & Occupancy Survey Mobile App: Facility Manager Tasks.
- Prerequisite: If the site has a non-transaction inventory, they must decide if they want to use the Space & Occupancy Survey mobile app (which supports employee occupancy) or the Space Book mobile app (which supports survey projects but not occupancy data). For information, see Space Surveys and Mobile Apps (Concept) and Transactional vs. Non-Transactional Space Inventory.
- If they haven't already, the auditor runs the Download Data and Download Plans actions so that they have basic facility data on their mobile device. For information, see Download the Space and Occupancy Inventory to the Mobile Device.
- On the mobile device, the auditor drills down through sites and buildings and locates the floor for which they want to generate a survey. The floor plan loads, showing room boundaries and room numbers.
- If they wish, the auditor can search for sites, buildings, and floors using the Search pane in the upper left corner of the Sites, Buildings, and Floors screens. If a site map has been included as part of the survey, the field auditor can choose the building from the site map.
- If they wish, the auditor can work with a list of rooms rather than a floor plan. Use the Room List and Floor Plan buttons to toggle between the two.
- The auditor taps Survey and the system displays the Start Survey button in the upper right corner. The auditor taps Start Survey, and the auditor enters a name for the survey.
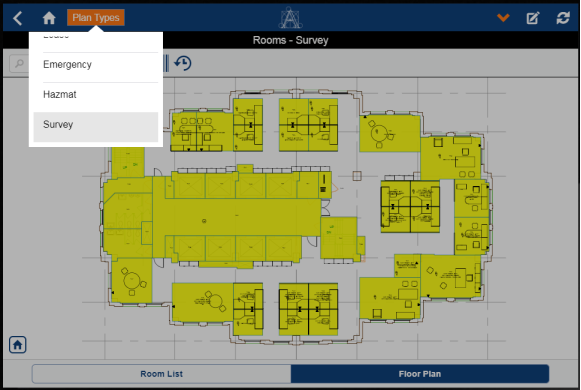
- The auditor taps the Plan Types button in the upper left corner and scrolls through the list to choose the plan type that the floor plan should display. Choose the Survey plan type so that you can see rooms highlighted by their survey status. For example, in the below image all rooms are highlighted in yellow because they have not yet been surveyed.
- The system displays the survey commands in the drop-down menu in the upper right corner of the Rooms Survey screen.
- If the auditor wants to assign rooms from other floors to this survey, they load the appropriate floor plan drawing and choose Add to Survey.
- On the mobile device, the floor plan lists the occupants of each room. If there are more than three occupants in a room, the floor plan lists an ellipses (...). The auditor can tap this to access a list of all occupants in the room.
- On the mobile device, the floor plan highlights the rooms as follows if you are using the Survey plan type:
- Orange indicates rooms that have already been surveyed as part of this survey.
- Yellow indicates rooms to be surveyed for this survey. The auditor clicks on the room outline and receives a list of the room's attributes, such as department assignment, use, room name, and so on. At the bottom of the form, the auditor can use the Workspace Transactions button to examine the details of f multiple divisions, departments, or room categories using the room.
- No highlight indicates survey is being used to develop the initial inventory; that is, you have a floor plan with room numbers and you are now going into the field to see how these rooms are used (room category, room type, room standard) and how they are allocated to departments and employees. In this case, you tap the room number to access a form for entering the room attributes.
- The auditor pulls up the room information for a room that they will visit with one of these methods:
- taps the room representation in the floor plan drawing
- searches for a room using the Search Rooms button in the upper left corner of the floor plan
- selects the room from the room list
-
The auditor visits the room, observes conditions, and compares actual conditions to those listed on the form. The auditor can then take the following actions:
If the room ... The auditor can ... matches the data on the device tap Complete in the upper right corner. The system returns the auditor to the floor plan or room list so that they can select another room. does not match the data on the device and workspace transactions are not being used make the correction by changing the data on the mobile device. For example, if the room actually has a different capacity or department then recorded in inventory, the auditor can correct the values in the top part of the Room Survey form. has a different employee occupancy than listed on the device change this using the Survey Employee section of the Room Survey form. See Surveying Occupancy. for a particular time period or a particular portion of the space, has a different room category, room type, division, or department than listed on the device (transaction-based inventory, only) change this using the Survey Departments and Survey Categories sections of the Room Survey form. See Surveying Rooms with Multiple Category and Department Assignments. requires further text notation enter comments about the room in the Survey Comments field. requires notation in the form of a picture capture an image of the room using the Photo button in the top left corner.
Once the image is captured, the system prompts the auditor to attach it to the survey. The system then updates the Documents button at the bottom of the from to show that a photo is attached. For more information, see Viewing Documents and Saving Photos as Documents.

requires notation in the floor plan drawing. For example, you want to indicate on the drawing a room that has no department assignment. add notes about it directly to the floor plan drawing by using the redline feature. This entails: - Selecting the Redline button to access the floor plan for the current item.
- Using the redline tools (located on the left-hand side of the drawing) to add notes to or mark up the floor plan.
- Saving the changes. The system prompts you for the room to which to attach the floor plan, saves the floor plan with edits as a PNG file, and stores this in the Survey Redline field of the room record. You can view the PNG file using the Documents button (shown above).
- If the surveyor finds they need to note additional information for this item, they can use the Documents button to access the PNG file. When the system displays the PNG file, it includes the redline tools so that the surveyor can further notate the floor plan drawing.
- Once the auditor is satisfied that the data on the form matches the conditions in the room, they tap Complete in the upper right corner.
- The system returns the auditor to the floor plan or the room list, where they will see that the room that they just surveyed is highlighted in orange. The auditor can now choose another room to survey.
- At any time during the survey, the auditor can run the Sync Survey action to upload to the server their survey changes and documents to date. The system will update information displayed in Survey plan type when you sync.
- The survey plan type reflects the data that you sync in the process of surveying. Therefore, after they sync, the surveyor can use the Plan Type feature to access the occupancy plan (which shows the data before the survey), and compare the survey (updated with survey information after a sync) to the occupancy plan.
- The surveyor can compare before and after information and, if necessary, correct any mistakes made during the survey by changing the data back to what is displayed in the occupancy plan.
- Note: Occupancy and Survey plan types display a maximum of three employees.
- When the auditor has visited all rooms on this floor (that is, when all rooms on the floor plan or room list are highlighted in orange), they choose the Close Survey action. The system then:
- updates the Room, Employee, and Workspace Transaction tables on the server (that is to say, the official room inventory) with the values from the mobile device.
- sets the status of the survey to "Audit Completed."
- removes the survey from the mobile user's device.
Note: In Web Central's Space Console (non-transaction inventories), facility managers can check for unsurveyed rooms using the "Rooms Not Surveyed" highlight, which highlights on the floor plan the rooms that do not have a value for Date Last Surveyed.