Archibus SaaS / Assets / Asset Manager / Equipment Systems Console
Assets / Assets / Equipment Systems Console
Assets / Enterprise Assets / Equipment Systems Console
Assets / Telecom Assets / Equipment Systems Console
Define Equipment Systems (Asset Relationship Assignment tab)
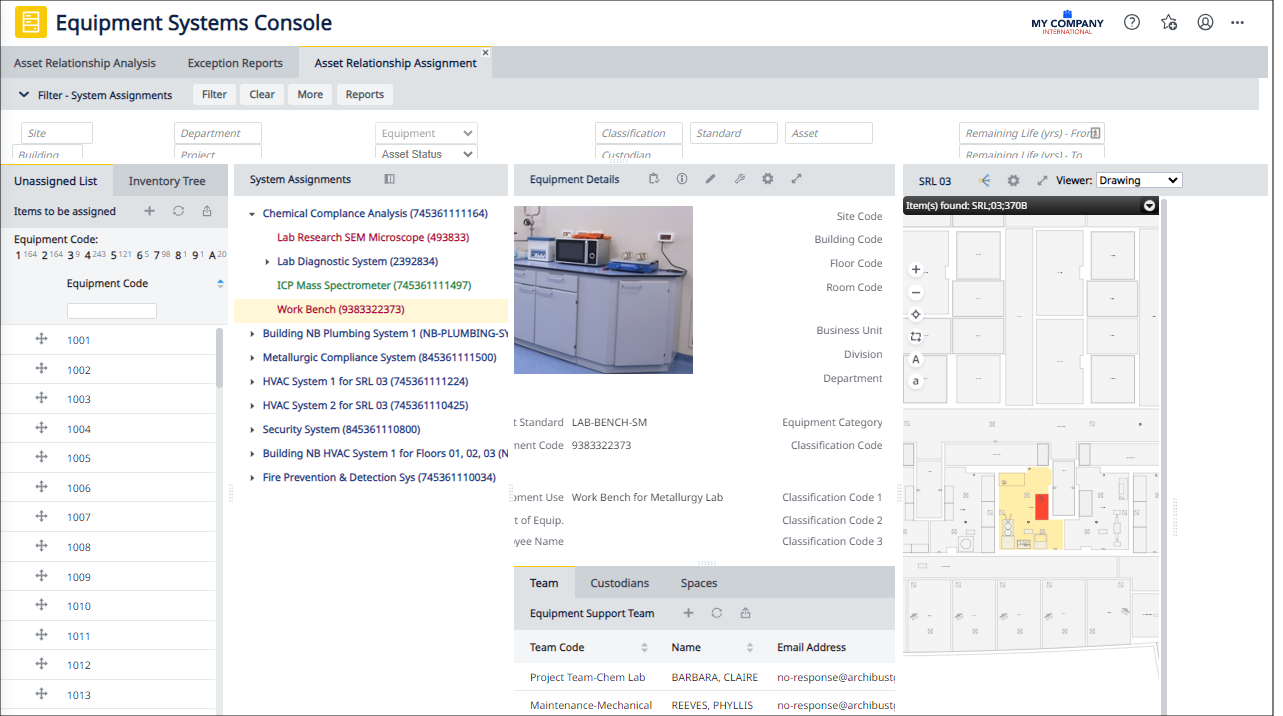
From the Equipment Systems Console, you use the Asset Relationship Assignment tab to assign equipment to an equipment system. This tab is also available from the Asset Registration Console
Note: This topic focuses on assigning equipment to equipment systems. For information on working with the other features of this tab, such as tracing dependencies, highlighting rooms served, using the 360 viewer, and so on, see Equipment Systems Console: Overview.
Note: You can also use the Background Data - Assets / Define Equipment Systems task to define records in the Equipment Systems (eq-systems) table. These records define the relationship between two assets. You can create multiple records to link different assemblies to the same equipment system, or to link different components to assemblies. See Defining Equipment Systems (Background Data).
Tips for Defining Equipment Systems
- When you define an equipment system record, you are defining the relationship between two equipment records: a master equipment and a dependent equipment.
- The one exception is when you define the highest level of the tree, that is the record for the system itself; in this case, the master and dependent have the same value.
- When dragging an equipment record to the tree, the selected equipment record is the dependent record, and the master is automatically assigned by the drag and drop feature (that is, the location that you drag the item to.)
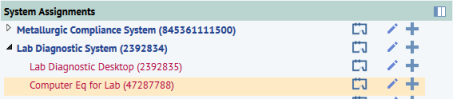
- The System Level value (system, assembly, or component) is manually assigned. The system level is associated with the dependent equipment. The color in the tree identifies the level:
- Blue = System
- Green = Assembly
- Red = Component
- There is one record in the Equipment System mapping table for each entry in the System Assignments tree. The same Equipment record can appear multiple times in the tree. For example, a piece of equipment may be shared between two or more equipment systems.
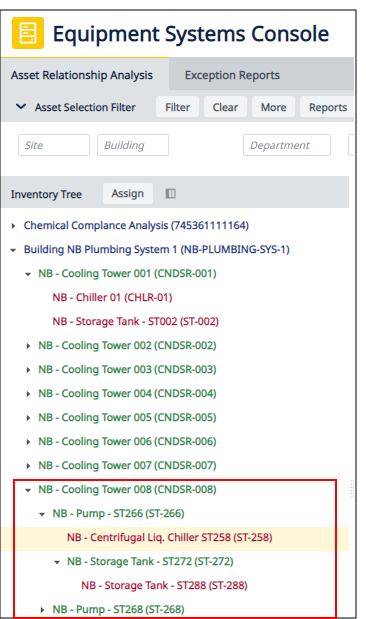
- An equipment system hierarchy can be as deep as you desire. For example, Cooling Tower 008, below, has two pumps. One of the pumps has a component storage tank and chiller; the storage tank, in turn, has its own component. Compare this to Cooling Tower 001 (at the top of the list). This item has a chiller and storage tank, both of which have no further components.
Copying an Existing Equipment System to Another System
You do this by copying the system to aanother location in the System Assignments tree.
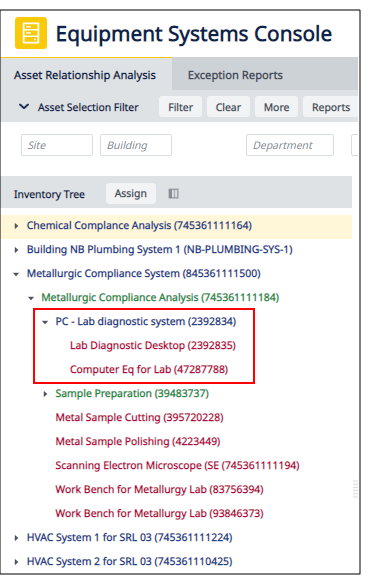
You can copy an entire system from the Inventory Tree to the System Assignments hierarchy. This is handy when creating hierarchies for different stakeholders who will want the system positioned differently in their hierarchy of asset. For example, the PC Lab Diagnostics System is a system within the Metalurgic Compliance Analysis system.
To copy an entire system and place it in a new location:
- From the Asset Relationship Assignment tab, click the Inventory Tree tab. The Inventory Tree lists all the equipment systems that are currently defined.
- At the top of the Inventory Tree, click the Gear icon, and then click Copy from the menu. When the Copy action is active, it has a check mark.

- From the Inventory Tree, click the system you want to copy, and drag it to the position you want it to have in the System Hierarchy. The icon turns to a green check mark when you are in a position where you can place the copied system.
- Hover over a heading , and wait until the heading expands to see the assets under that item.
- Move to the position you want this system to have in the hierarchy.
- To place the item on the same level as another item, drag the mouse over an item until you see the blue bar above it. If you release the mouse when you see the blue bar, the item is placed in the same location as the blue bar.
- To place the item below an item, hover over it and release the mouse when the item is highlighted. The item is placed below the highlighted item.
Assigning an Equipment Item to a System
If an equipment asset has not yet been added to the system hierarchy, it is listed in the Unassigned list under the Items to be Assigned section of the console. You can click and drag it to add it to a system. This is a way of expanding on existing assemblies by adding additional components, or of creating new assemblies from assets.
To add unassigned assets to the System Hierarchy:
- From the Asset Relationship Assignment tab, click the Unassigned List tab. The Unassigned List shows all assets that are not in any of your current equipment systems.
- Locate the asset you want to add to the hierarchy. Use the Index at the top of the Unassigned List to restrict the list of asset's shown.
- When you have located the asset, click its move button
 to drag it to the desired position in the System Hierarchy. The icon turns to a green check mark when you are in a position where you can add it to the hierarchy.
- Hover over a listing, and wait until the heading expands to see the assets under that item.
- Move to the position you want this asset to have in the hierarchy.
To place the item below an item, hover over it and release the mouse when the item is highlighted. The item is placed below the highlighted item.
To place the item on the same level as another item, drag the mouse until you see the blue bar above the dragged item. If you release the mouse when you see the blue bar, the item is placed in the same location as the blue bar.
Editing or Deleting Equipment in the System
If you want to undo a placement you have made, or to edit a system assignment, you can do so using the Edit icon.
To delete or edit an equipment system from the hierarchy:
- In the System Hierarchy pane, click the edit icon
 in the row for the equipment item you want to delete or edit.
The Equipment System edit form appears,
- Do one of the following:
- To delete the item, click Delete.
The equipment system and all its assemblies and components are deleted from the hierarchy,
- To edit the item, change information, such as the Criticality, Stakeholder Type, or System Name, and click Save. Enter a System Name if you want the label in the tree for this dependent item to be different than the Tree Label that the system generates.
- To delete the item, click Delete.
Adding Equipment to the System (using the plus sign to create a record)
You can also add an equipment item to the hierarchy by creating a record for it from the console. To do this, you select an item in the tree that has the master equipment for which you want to add another item.
Note: These steps describe adding an item under an existing item. For the steps to add a top-level item, see Creating a master equipment system by adding a top-level item to the System Assignments tree.
Note: You might need to expand the System Assignments panel to see the buttons referenced in this section.
To add an equipment system to the system assignment tree:
- In the System Assignments tree, click the plus sign button in the row for the equipment item that has the same master item as the asset you want to add.
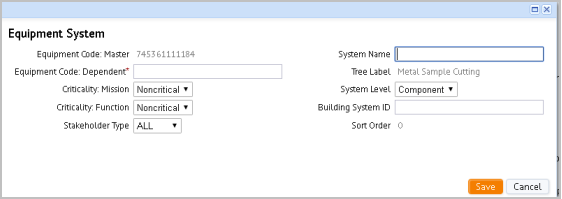
The Equipment System form appears.
-
Complete the form as follows:
Field Description Equipment Code Master Is filled in with the code for the master for the equipment item for which you clicked the plus sign. Equipment Code Dependent Click the ellipsis to access the Select Value form and select an asset from the list. Criticality Mission By default, this is set to Noncritical, but you can select Support or Critical for this dependent asset. Criticality Function By default, this is set to Noncritical, but you can select Support or Critical for this dependent asset. System Name If you want the label in the tree for this dependent item to be different than the Tree Label that the system generates, enter the value here. Otherwise, leave blank. Stakeholder Type If you do not want all stakeholders to see this assignment, select a specific from the list. Otherwise, keep the selection to All. Building System ID Building systems are the critical systems of your facility, such as the Electrical, HVAC, Security, Life Safety, Lighting, Utilities, Telecom, and Energy. You define building systems using the Define Building Systems task. If you wish to associate this equipment component with a building system, you can select one from the list. - Click Save.
The dependent asset defined in this form appears in the System Assignments tree at the same level as the item you selected.
Creating a New Master Equipment System
When you want to create a new equipment system to which you will add component equipment items, you add a top-level item in the System Assignments tree.
Note: You can also use the Background Data - Assets / Define Equipment Systems task to define records in the Equipment Systems (eq-systems) table. See Defining Equipment Systems (Background Data).
Note: You might need to expand the System Assignments panel to see the buttons referenced in this section.
- In the System Assignments tree, click the plus sign button in the row for any of the top level systems.
The Equipment System form appears filled in with the Equipment Code Master for the item you selected.
- In the Equipment Code Dependent field, select the item that you want to be the top level, and click Save.
- Expand the top level entry for which you clicked the plus sign to show the new entry.
- Click and drag the new entry and release it when the blue line appears above a top level entry.
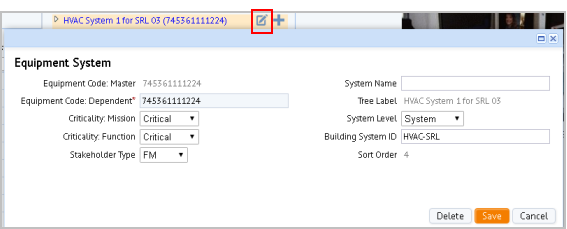
- Click the pencil button in the row for this new top level entry.
The Equipment System form now shows the item as both the master and dependent. This is how a top-level entry is defined.
- Change the System Level to be System. You must always manually set the System Level.
- Click Save.
The new entry now appears at the top level.
You can now add components to this equipment system.