Assets / Enterprise Assets / Project Proposal Console
Creating Asset Requirements
Working from either the Space Requirements or the Asset Requirements tabs of the Project Proposal Console, you can create a baseline inventory and requirements for all the assets for a selected list of floors for a project. When you run the Create Requirements action from either the Space Requirements or the Asset Requirements tab, and save the requirement, a workflow rule creates the space requirement (record in the Space Budget table) and corresponding asset requirement items (records in the Space Budget Items table). Note these fields:
- Baseline and Period 1: The baseline inventory (Period 0) is based on your current asset inventory for the locations you select. The baseline inventory includes the counts and costs for your current equipment and furniture. This same value is copied to the Period 1 Count field.
- Period 2 through Period 12 fields Once your requirements are generated, you can complete the Period 2 through Period 12 fields to reflect the various forecast periods you require. For example, if you would like to enter a yearly forecast for the next four years, you would complete Period 2,3, 4 and 5 with the projected value for each year.
These records are created for space, equipment, or furniture depending on your selections.
Equipment and Furniture Standard fields used to summarize asset requirements
When you run the Create Requirements action, the application uses the following fields from the Equipment Standards or Furniture Standards tables for the asset to calculate the asset requirements:
| Asset | Fields in Calculations |
|---|---|
| Equipment |
|
| Furniture |
|
| Furniture and Equipment |
|
How the cost and area value are derived for individual assets
The area and cost values in the List of Individual Assets table are derived in the following ways:
- If the individual asset represents an existing asset, the Unit Area (unit_area) value comes from eqstd.area; if it represents a proposed asset, the area is based on your manual entry.
- For an existing asset, the Cost - Est. - Baseline (cost_est_baseline) comes from the Purchase Price (eq.cost_purchase); if Purchase Price has no value, then the Standard Price (eqstd.price) is used.
- If you are adding a new asset that does not exist in your Equipment table, then area and cost will come from your entries.
Manually adding and editing space and asset requirements
You can also add space requirement items manually to the space requirement, and you can edit any space requirement item as needed. When manually entering or editing space requirement items you work from the Space Requirements tab. See Adding and Editing Space Requirement Items.
This also applies to asset requirements: When manually adding or editing asset requirements, you work from the Asset Requirements tab. See Adding individual assets as needed
Procedure: Automatically creating space and asset requirements
Typically, you would add project locations and their actions before creating space requirements. By first defining locations and their actions, these locations are automatically included in the space and asset requirement when you create it. See Adding Project Locations and Actions.
To automatically create the space and asset requirements for the project:
- From the Project Proposal Console, select the project for which you want to generate requirements.
- Select the Space Requirements or the Asset Requirements tab, and click Create Requirements.
The Create Requirements form appears, so that you can create space and asset requirements for the project.
Requirements Name. This will automatically default to the Project Name (
project.project_name), and will be read-only. This ensures that the Space Requirements and the project are linked. The Project Name is copied to the Space Requirements Name field in the Space Budgets table (sb.sb_name) field for this new space requirement record.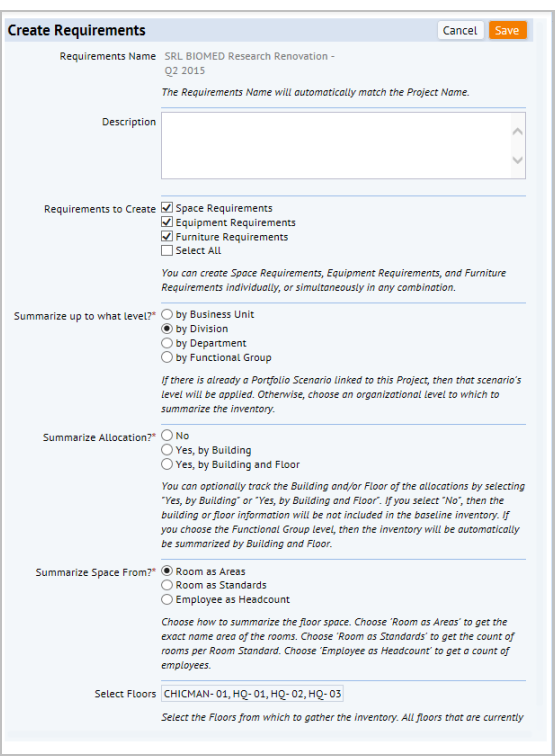
- Enter the following information to create the space requirement:
Description: In the Description box, enter a description to help you distinguish this requirement. For example, you could enter a value such as: "These are the projected space needs for the next 6 quarters, assuming that employee headcount is gradually increased by 20%. Projections created by James Smithfield, Engineering."
Requirements to Create: Select any combination of space, equipment, or furniture requirements for your project. All generated items will be stored in the Space Budget Items table and grouped under one requirement record in the Space Budgets table.
Summarize up to what level? You can set the organizational level by which to group these requirements by selecting an option in the “Summarize up to what level” field. The system will first check to see if a portfolio scenario already exists for this project, that is, if a Portfolio Scenario field equals the Project ID; if yes, then the system will complete the option with the value for the portfolio scenario (
portfolio_scenario.scn_level), and the field will be read-only.Summarize Allocation?: The workflow rule that creates the requirements uses this selection to group the data. For example, if you set Summarize to What Level to division and you set this option to Building, the system will create a space and asset requirement items for each division in each building. You can choose to group the inventory of assets by building and /or floor, or to not group the assets, in which case the requirements do not include building and floor information. If you selected to summarize by the Functional Group level, then inventory will always have the building and floor data, so the “Yes, by Building and Floor” option will be selected automatically, and no other option can be selected.
Summarize Space From: You can choose to have the baseline inventory generated from a summary of room areas, a count of room standards, or a count of employees. Asset requirements are based on equipment standards or values you enter manually. The application groups the sums by the organizational unit you choose for the Summarize to what level? field.
You choose one of the following ways to have the application generate the requirements:
Note: For information on how the workflow rule calculates counts and costs for assets, see Getting Started with Asset Requirements.
- Rooms as Areas. This selection creates space allocation records based on actual room areas, and sets the Room Standard to "SQFT” (square feet) or “SQM” (square meters), depending on the Base Units that are set for your project.
- These standards (SQFT or SQM) are “dummy” standards that exist in the Room Standards (RMSTD) table and have a standard area of 1.
- The workflow rule populates the sum of the
rm.areafor the selected locations into the Period 0 field (baseline), and enters 1 into therm_std_areafield. - All Room Standards from the Rooms (RM ) table will be ignored.
- These sums are grouped by the selected organizational level, and also by building and floor if you selected this in the Summarize Allocation? section of the form.
- Rooms as Standards. This selection creates space allocation records based on the count of each Room Standard type from the rooms of the selected buildings and floors. The actual Room Area values for any room that contains a Room Standard will be ignored. The application gets the cost and area values from the room standards. All rooms that do not have a room standard are represented by the SQFT or SQM dummy room standard, and follow the same procedures for the 'Rooms as Areas' for these rooms. These room standard counts are grouped by the selected organizational level, and also by building and floor if you selected this in the Summarize Allocation? section of the form.
- Employees as Headcounts. This selection creates space allocation records based on the count of employees from the Employees (EM) table who are assigned to the selected buildings and floors, and sets the Room Standard to PEOPLE. The “PEOPLE” standard is a “dummy” standard that exists in the Room Standards table and has a standard area to represent the amount of floor space an employee can be expected to require. The application uses the PEOPLE standard to get the area, and cost values. The workflow rule will populate the count of employees into the Period 0 Value (baseline) and copy this value to the Period 1 Value field. The actual Room Area values and Room Standards for any room that contains an employee will be ignored. These sums are grouped by the selected organizational level, and also by building and floor if you selected this in the Summarize Allocation? section of the form.
Select Floors: By default, the application uses the buildings and floors that are associated with the project, and that have an action item associated with the location (that is, project locations include all the buildings and their floors that exist in the Action Items (activity_log) records for the project.) You only need to select any additional locations you are adding.
When you click the Select Values button, you are presented with a multi-selection drill-down list of all the Buildings and Floors in the database.
- Rooms as Areas. This selection creates space allocation records based on actual room areas, and sets the Room Standard to "SQFT” (square feet) or “SQM” (square meters), depending on the Base Units that are set for your project.
- Click Save.
The application creates requirement items (equipment assets, furniture assets, and space), completes the baseline inventory (Period 0) for each requirement item, and copies this value to the Period 1 Value field. You can additionally complete the Period 2 through Period 12 fields if you want to forecast future requirements. Complete these fields with the value required for the period.
See also: