Archibus Web Central
Console Views
Console views present several types of data and actions in one view. Rather than load multiple views to enter data, move an item through its workflow, or analyze results, you can work with a console view to perform multiple actions from one view.
Console views include the Space Console, Maintenance Console, Moves Console, Asset Lifecycle Console, and so on.
They typically have a filter at the top of the view, records grouped by category, and offer several actions.
Grouping Records by a Category
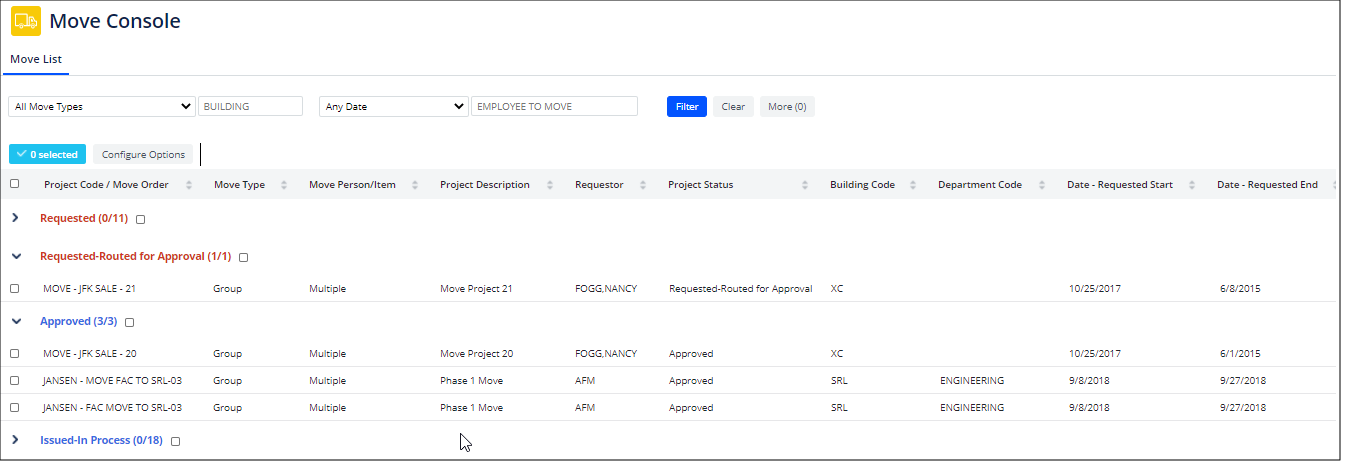
Console views such as the Maintenance Console and Move Console group together records under a category, such as the Move Console grouping moves by status.
When you expand a category, it loads up to 100 records. If there are more records available, the view displays a "Load next 100 button."
Note: For the Maintenance Console, this behavior is controlled by application parameters that control the bands: AbBldgOpsOnDemandWork.BldgOpsConsoleExpandOnOpen controls whether or not the category bands are open or collapsed upon opening, and AbBldgOpsOnDemandWork.BldgOpsConsoleMaxRequestsPerBand controls how many items are loaded at a time.
The category headers provide a count of the number of records of this category, such as: Requested 0/11. The first number is the number of records loaded into the view. Until you expand a category, this is 0. Thus, "Requested 0/11" means that 0 records have been loaded; 11 are available. Once the records are initially loaded, the header text updates, such as "Requested 11/11."
Depending on the Console view, the category headers may display in various colors; for example, a console may use red header text for a category that requires immediate action.
If the view has features for exporting, the records will be exported in their category groupings.

Selecting Records
Often you will have multiple items to process at once. By selecting multiple items that have the same category, you can act on all the selected items at once. To select items, use these methods:
- If a status list is expanded (such as the Approved status in the above image), click on each item's checkbox
- Select the box next to a band's header (such as the box next to "Approved" in the above image) to select all items in that band. If you then expand the band, you will see that all items are checked; you can then deselect individual moves on which you do not want to act.
The button at the top of the grid conveys the number of selected records. In the above image, this is "0 Selected."
Editing Records
Click on the record to access a pop-up form for editing its values.
Some consoles provide the pencil-shaped icon for accessing the edit form.