Archibus SaaS / Maintenance / Corrective Maintenance / BIM Viewer
Maintenance / Corrective Maintenance / Supervisor / BIM Viewer
Assets / Assets / Asset Manager / BIM Viewer / BIM Viewer
Assets / Enterprise Assets / Facility Asset Manager / BIM Viewer
Review and Edit Room Details from the BIM Model
Directly from the BIM model you can see room details and change details if necessary. To review and edit details about rooms, you select the item in the BIM model. For example, you might search for a set of rooms and see their location in the BIM model. You can then click on a room in the model and review its details in the Room Details form. If necessary, you can edit these details and display and create additional fields.
Review the Room Profile for a Selected Room
Follow this sequence to receive details on an equipment item depicted in the model.
-
Load the BIM Viewer and use the Buildings command to load a model.
-
Move to the Rooms tab.
-
In the Rooms pane, click the checkbox for a floor and click View Rooms.
-
In the viewer, the model displays a floor plan, which includes labels.
-
You can turn off the labels if desired.
-
-
Click on a room. The viewer displays it in a lighter shade of blue.
-
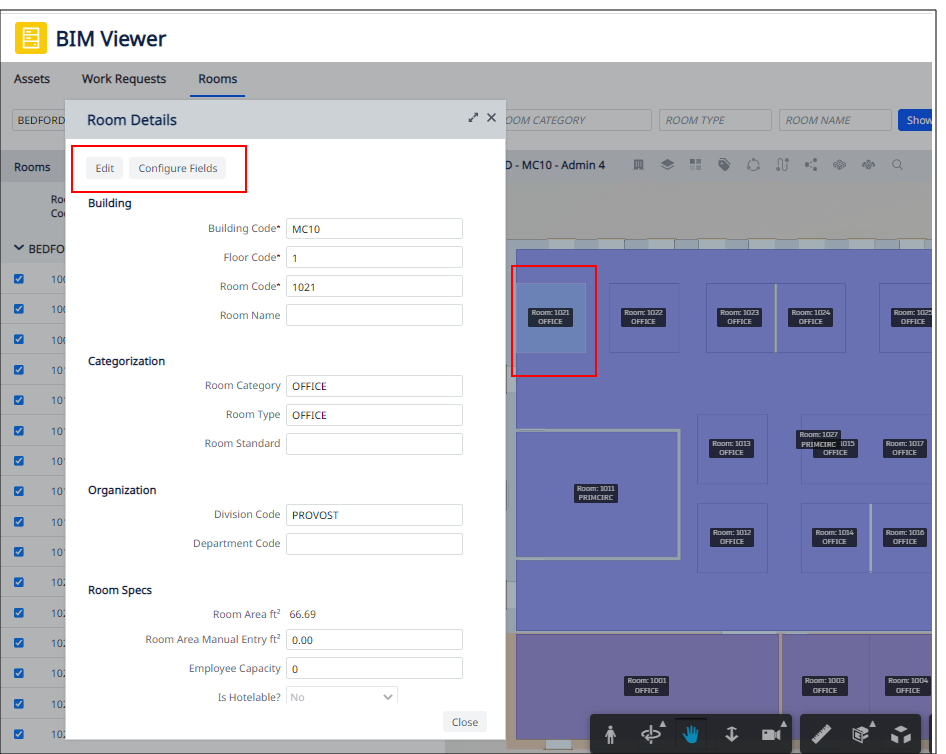
The view presents the Room Details pop-up form, listing summary information about the selected room. Click Close on the Room Details form when through.
-
You can continue to review rooms in this manner by selecting each room in turn. You do not need to deselect the selected item before selecting a new one; instead, close the Room Details form and click on the next room. The Rom Details form will redisplay with each selection you make.
-
When through viewing room details, you must unselect the current room . Unselecting the room frees the cursor so you choose other commands and actions.
To unselect the room, right-click on the room and then choose Clear Selection from the pop-up menu
Edit Room Details
Note: Editing the room information from the BIM Viewer updates only room records in Archibus; it does not automatically push the information to the Revit model. To update information in the Revit model from Archibus, you must work with the Archibus Smart Client Extension for Revit.
-
Follow the above procedure to select a room from the BIM model and display it in the Room Details form.
-
Click the Edit button at the top of the Rooms Detail form to activate edit mode.
-
You can now edit any of the fields displayed on the form. For information on the fields of the Rooms form, see Defining Locations / Rooms.
-
When you have completed your edit, click Save on the Room Details form.
Display Additional Fields in the Room Details Form
The Room Details form presents a small set of the fields of the Rooms table. If you would like to display additional fields on the Room Details form, use the Configure Fields feature.
-
Follow the above procedure to select a room from the BIM model and display it in the Room Details form.
-
Click the Configure Fields button at the top of the Rooms Detail form.
-
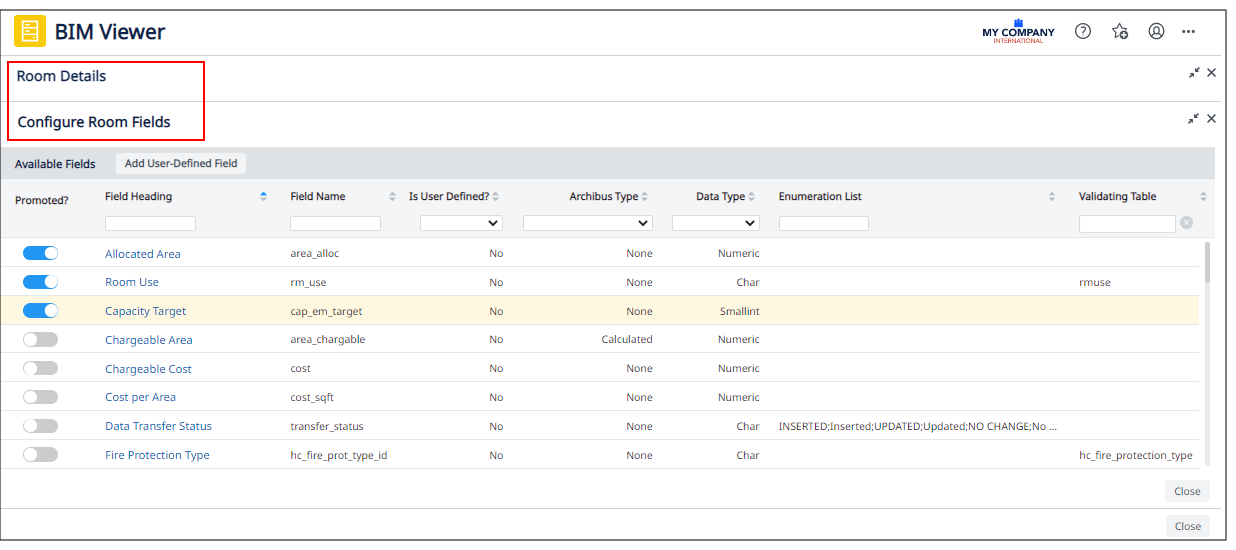
The Configure Fields form displays within the Room Details form. Expand the Room Details form so that you have room to work with the Configure Fields form.
-
To add a field of the Rooms table to the Room Details form, activate it using the Promoted? slider.
-
When you have completed your changes, click Close on the Configure Room Fields form. You return to the Room Details form, where you can see the activated field displayed under the Other Fields heading.
Create New Fields for the Room Details Form
The Configure Fields form also offers the ability to create new fields.
-
Follow the above procedure to select a room from the BIM model and display it in the Room Details form.
-
Click the Configure Fields button at the top of the Rooms Detail form.
-
The Configure Fields form displays within the Room Details form. Expand the Room Details form so that you have room to work with the Configure Fields form.
-
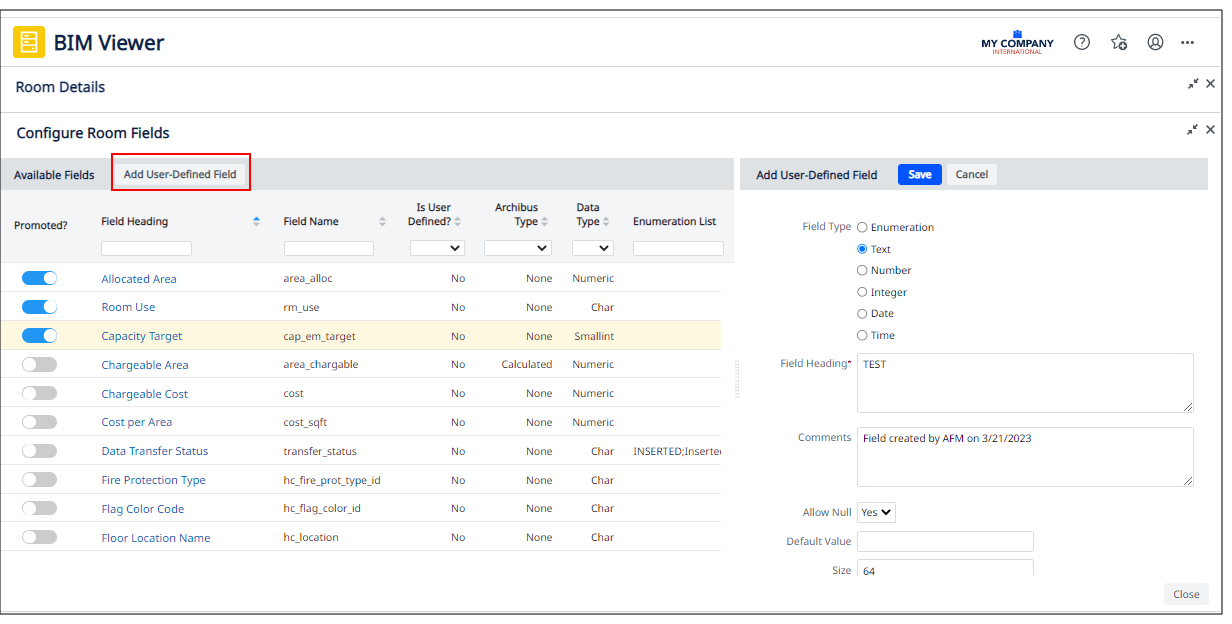
To add a new field to the Rooms table and display it the Room Details form, click the Add User-Defined Field button.
-
The Add User-Defined Field panel displays in the right portion of the Configure Room Fields form.
-
Define your new field. For details, see User-Defined Fields / Create a New Field.
-
When you have completed your field definition, click Save on the Add User-Defined Field panel.
-
Click Close on the Configure Room Fields form. You return to the Room Details form, where you can see the new field displayed under the Other Fields heading
-