Mobile Apps
Installing and Getting Started with Archibus Mobile Apps - General Staff
As a user of the Archibus mobile apps, you may need to get started by downloading the Archibus Mobile Client and the Archibus mobile business apps to your device and registering your device.
This topic has the following sections:
- Install the Archibus mobile client on your device or Web browser
- Register your mobile device
- Access the Archibus mobile apps
- Clear data
- Log out (unregister your device)
- Change languages
- Set and review mobile preferences
Install the Archibus Mobile Client on your device or Web browser
iPhone or iPad
- Search for the Archibus Mobile Client on the Apple Store. There may be different versions for different Archibus releases (such as Archibus Smart Client V.21.1, Archibus Smart Client V.21.2). Select the release on which your organization has standardized and install it.
- The Archibus Mobile Client application will appear on your Home Screen.
Android
- Search for the Archibus Mobile Client on the Google Play store. There may be different versions for different Archibus releases (such as Archibus Smart Client V.23.2, Archibus Smart Client V.24.1). Select the release on which your organization has standardized and install it.
- The Archibus Mobile Client application will appear on your Home Screen.
Alternately you can install the file directly
- Use a file manager to copy the Archibus Mobile Client 2x.x.apk file to your Android. Your system administrator will provide you the location on the file system where the .apk file resides.
- Browse to the .apk file, select it, and follow the installation prompts.
Web browser
If your account permits, you can use the mobile apps in your Google Chrome Web browser -- from a mobile device, laptop, or desktop. If you use the apps in a Google Chrome Web browser, you do not need to install the Archibus Mobile Client on your mobile device.
Typically, your system administrator will send you an email with a link to the Archibus server for mobile. This URL will be similar to:
http://yourservername:8080/archibus/schema/ab-products/common/mobile/src/AppLauncher/index.html
Click on this URL to load it in your Web browser, and bookmark it for later access.
Note: If you are running the mobile apps in a Web browser and using a tablet, you may wish to take advantage of Archibus home pages. See Using the Web Central Home Pages on a Tablet.
Note: Without the Mobile Client, you are not able to use some features of the hardware, such as the camera.
Note: You cannot have multiple users access the Archibus mobile apps from the same web browser. See Shared Mobile Devices and Multiple Devices per User.
Note: When using a web browser, you may be able to sign in as guest. See Step 5 in the below procedure.
Register your mobile device
To get started, you must register the mobile device. Archibus supports users sharing devices and users working with multiple devices. You can register a single device at a time.
- Start the Archibus Mobile Client. For instance, on the iPhone or iPad, tap the Archibus icon on your Home Screen to start the Mobile Client.
- The first time the device is connected to Web Central, the Mobile Client presents a form requesting the Web Central URL of your Archibus installation. Enter the URL that your Archibus Administrator provided, such as
http:\\archibusserver:8080.
Note: Step 2 is required only the first time that you register the mobile device. In subsequent logons, you will not be prompted for the URL. Instead, you will enter your user name and password, as described in Step 4.
Note: Depending on your network settings, your mobile device might resolve server names differently than desktops and laptops. You may need to use the IP address rather than the machine name to connect to your server. For instance, you might need to specify a URL in the form "http:\\10.1.76.23:8080\archibus" rather than in the form "http:\\archibusserver:8080\archibus". You can find the IP address of a machine by typing "ipconfig" at a command prompt on that machine or by pinging the machine name, e.g. by typing "ping archibusserver" at a command prompt on a networked computer.
- Tap OK
- The system presents the device registration screen. Enter:
- your Archibus user name
- your Archibus password
- Tap Register Device.
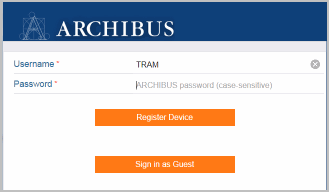
Note: Some system administrators enable the GUEST - MOBILE account for kiosk-style use on a Web browser. If your site has enabled this account and you are working on a Web browser, you can sign in by selecting the "Sign in as Guest" button and leaving User Name and Password blank. The guest account typically has limited access to features. Note that the guest login is only available in browser mode.
- The Mobile Client loads the menu of Archibus mobile apps. This is known as the App Launcher. Not all organizations deploy all mobile apps. If your organization has deployed a single app (such as Maintenance), the Archibus Mobile Client will load that app by default.
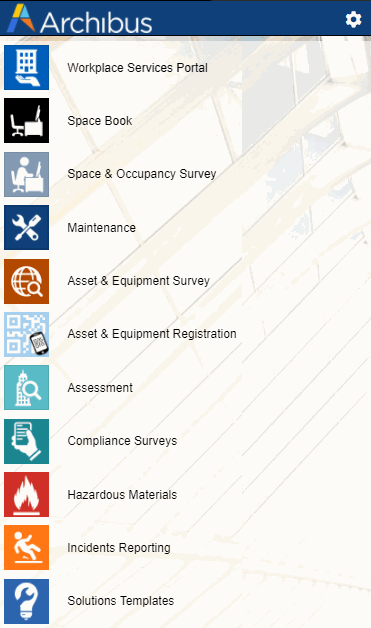
If you are not sharing devices or using multiple devices, you only need to register your mobile device once. Thereafter, to access the menu of Archibus mobile business apps, just start the Archibus Mobile Client. (For instance on the iPhone or iPad, tap the Archibus icon on your Home Screen to start the Mobile Client.)
Connecting to Web Central
The first time you load the Archibus Mobile Client, prior to you registering your device, the Mobile Client downloads the Archibus mobile apps so that they are always available, even when you aren't connected to Archibus Web Central.
Note: With iOS 14, the first time that you connect to Web Central, the device operating system asks for permission to access resources on your local network. This change causes the initial Web Central connection attempt to fail until you grant permission to access the network resource. Once you grant permission, you do not need to do so again if you reconnect to the same server. This issue does not apply when working with a cloud server.
The Mobile Client connects you to Archibus Web Central when you use one of the actions to sync your device. When it connects, it does so in one of two ways:
- If your site is using personal certificate security on its mobile devices, the Mobile Client will sign into Web Central using that certificate. The single sign-on authentication will map your mobile Web session to the correct user account.
- Otherwise, the Mobile Client signs into Web Central using your Device ID. When you register your mobile device, Archibus records your Device ID in your record in the Archibus Users table. When you sign in with the Device ID, the action acts the same as if you had signed into Web Central; that is, the Mobile Client will sign you in with the same permissions that you have when you sign in with a user name and password via a Web browser.
Clear data
When you log out (described below), the device data is not removed.
The Clear Data action removes the user database file and other user-specific application files from the device. Before logging out, execute the Clear Data action if you are sharing the device and you will no longer be using the device.
You should also clear data if run you will be connecting to a different project on the same Web Central server.
To clear data:
- Click the gear-shaped icon in the upper right corner.
- The system presents the Preferences form.
- Choose the Sync menu from the left pane.
- Tap the Clear Data button.
- On the resulting confirmation message, confirm that you do indeed want to clear the data.
- The system:
- Removes your database from the device.
- Removes any documents or floor plans that you downloaded during this session.
Note: If your site allows multiple users to use the same device, note that the Clear Data action does NOT remove data for other users that have registered the device.
Log out (unregister)
If you share your device with others at your site or if you use multiple devices, you should log out of the Archibus mobile apps when you are through. Logging out unregisters the device.
For example, your site might have a set of mobile devices that are shared between craftspersons working on multiple shifts. When workers finish their shift, they log out of their device so that the device can be used by the next worker. For information, see Shared Mobile Devices and Multiple Mobile Devices per User and Track Mobile Device Registration.
To log out:
- Clear the data, as described above.
- Click the gear-shaped icon in the upper right corner.

- The system presents the Preferences form.
- Choose the User menu from the left pane.
- Tap the Log Out button at the bottom of the form.
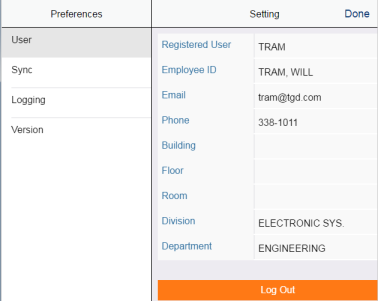
- The device presents the sign-in screen for the next mobile user.
Change languages
To change languages, change the default language of your mobile device. For instance, on the iPad, use Settings / General / International / Language to select a different language. The Archibus Mobile Client and apps will use this new language the next time you start them.
Set and review mobile preferences
Use the Preferences command to review and set preferences. To access this command:
- Click the gear-shaped icon on the Archibus Application Launcher page.

- The system presents the Preferences form, organized by the categories in the left page.
Check your user preferences
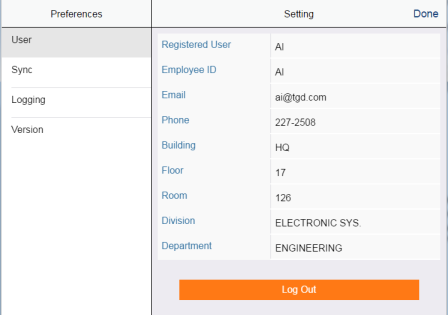
When working with mobile apps, you may find that the system automatically completes some information based on your user profile. You may want to review the values for your profile.
- On the Preferences form, tap User.
- The system presents information about you, as per the above image. If any of the displayed values are incorrect, consult your system administrator who can update the Employees table using Web Central.
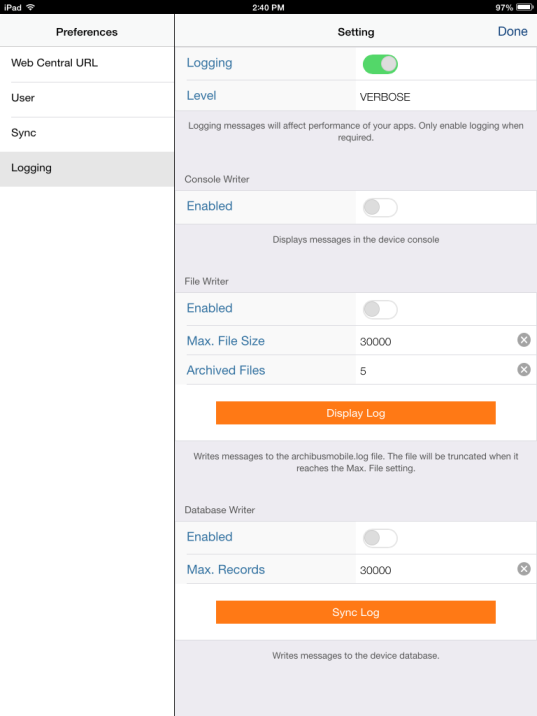
Set mobile logging
These options control how the system saves client application messages so that you can view them when troubleshooting a problem. See Mobile Logging (System Management Help).
Check the version number
Knowing the version number of your Archibus mobile apps is handy if you need to troubleshoot or work with Customer Support.
- On the Preferences form, tap Version.
- The system presents information about the currently-installed version of Archibus Web Central and the Archibus mobile apps.
