Archibus SaaS / Assets
Assets / Assets
Assets / Enterprise Assets
Asset Registration Console
The Asset Registration Console enables you to add your assets (property, buildings, tagged furniture or equipment) to Archibus, either as bulk additions, or by adding a single asset. The console includes a filter and drill-down list to facilitate locating specific assets. You can review the asset's information, such as the asset's status and where it is located. You can also use the filter to verify which assets are already entered into the Asset Registry, so you know which records you need to add. You can also work with equipment in terms of equipment systems.
To enter equipment assets using a bar code and a mobile device without the need to attach a bar code reader, use the Asset & Equipment Registration mobile app.
This topic contains the following sections:
Access the Asset Registration Console from:
- Archibus SaaS / Assets / Asset Manager
- Archibus SaaS / Assets / IT Asset Manager
- Assets / Assets / Asset Manager
- Assets / Assets / IT Asset Manager
- Assets / Enterprise Assets / Finance Asset Manager
- Assets / Enterprise Assets / Department Asset Manager
- Assets / Enterprise Assets / Facility Asset Manager
- Assets / Enterprise Assets / IT Asset Manager
You can work with the Asset Registration Console from a laptop at a loading dock as you are receiving assets, or when doing a field survey. To use bar codes to register new items through the Asset Registration Console, you need a bar code reader attached to your laptop or computer; this is typically connected through the USB port. Note that no special software is required; the bar code reader scans the bar code lines and converts this to an alphanumeric value that Archibus receives just as if you had entered in through the keyboard. For detailed instructions, see Using a Bar Code Reader with the Asset Registration Console.
To enter equipment assets only using a bar code and a mobile device without the need to attach a bar code reader, use the Asset & Equipment Registration mobile app
When entering assets, the form includes two actions that enable you to make changes quickly:
- Save / Add Another. After adding a single asset, use the Save/ Add Another button to directly access the form for adding another asset of the same type.
- Save & Next. When adding multiple assets, when you make an edit to one of the generated assets, you can click Save & Next to edit the next record in the sequence.
The Asset Registration Console includes the Asset Selection Filter and the Geo Location, Location, Organization, and Project drill-down lists. The restrictions you set in the Asset Selection Filter affect what shows in the drill-down lists and in the Asset Registry pane. The drill-down lists that the restriction is applied to depends on the type of criteria you enter. For example, if you enter a building as criteria, the Geo Location list is restricted, but not the other lists.
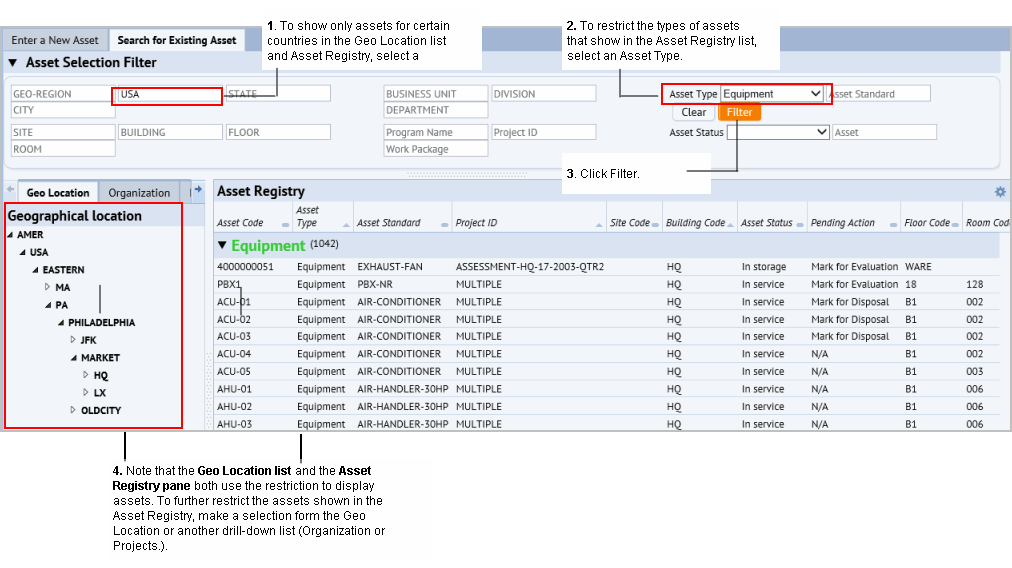
For example, if you select a Country , such as the United States, in the Asset Selection Filter, select Equipment as the Asset Type, and click Filter, the Geo Location drill-down lists show only locations for that country, and the Asset Registry pane shows only equipment assets for the USA, as shown in the following image. You can further restrict what shows in the Asset Registry by making a selection from the drill-down list. For example, select HQ from the list to see only equipment for the HQ building.

To search for assets to verify if it is already entered into the system:
- From the Asset Registration Console, select the Search for Existing Assets tab.
- Enter search criteria in the Asset Selection Filter, and click Filter.
The Geo Location, Location, and Projects tabs refresh to show only the levels that meet the restriction in their drill-down lists. The lists that the restriction is applied to depends on the type of criteria you enter. For example, if you enter a building, the Geo Location list is restricted, but not the other lists.
- To display assets, make a selection from one of the drill-down lists.
The Asset Registry pane refreshes to show only assets for the selected location, organization, or project. If you set an asset restriction (such as asset type or status), the Asset Registry pane shows only assets meeting that restriction.
When adding assets, the system shows you the last number assigned for that asset type, and the next available number. For auto-numbering, the asset must have a prefix. The following separators are recognized:
-
"-"
-
"_"
-
"|"
-
"\"
-
"/"
When you select a prefix, the system fills in the Next # field for you. If you are adding multiple assets, the system creates a record for each asset using the sequential numbers.
Working from the Proposed Project Console, you can add as requirements for the project equipment and furniture that does not yet exist in your inventory
For these proposed assets, when you are ready to add them to your inventory, you can use the Select from Requirements button to copy data from the asset requirements table (eq_req_items) to the Equipment (eq) or Tagged Furniture (ta) table when creating the new record. The Select from Requirements action links the new equipment or furniture record with the copied asset requirements record. The record copies the Asset Plan ID for the requirement to the Equipment Code or Furniture Code fields, unless you have already entered an Equipment Code or Furniture Code for the asset. In this case, the Equipment Code or Furniture Code is not overwritten.
Location information, and the organizational units the asset is assigned to is some of the data that is copied. or equipment, the Manufacturer and Model # are also copied. If needed, you can edit any data after it is copied.

Note: The Manufacturer and Catalog # are not included in the data that is copied from the requirement to the furniture record when you use the Select Furniture from Requirement action to add the new asset record.
To add a single asset:
- From the Asset Registration Console, select the Enter a New Asset tab.
- Click Add an Asset.
The Add Asset form appears.

- Select the option button for the type of asset you are adding - Property, Building, Equipment, or Furniture.
The Get Last # field fills in with the last number assigned to an asset of this type.
- For auto-numbering, select a prefix from the Prefix list.
-
To locate prefixes, you can search in the smart search console by the following supported characters:
"-"
"_"
"|"
"\"
"/"
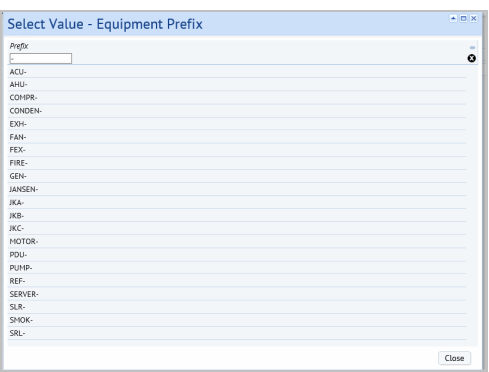
The following image shows a search using the dash separator.

- Select a prefix from the list.
When you select a prefix, the Get Last # and Next # fields fill in with the appropriate numbers for the selected prefix.

- Click Next.
The form for adding a building, property, furniture, or equipment asset appears.
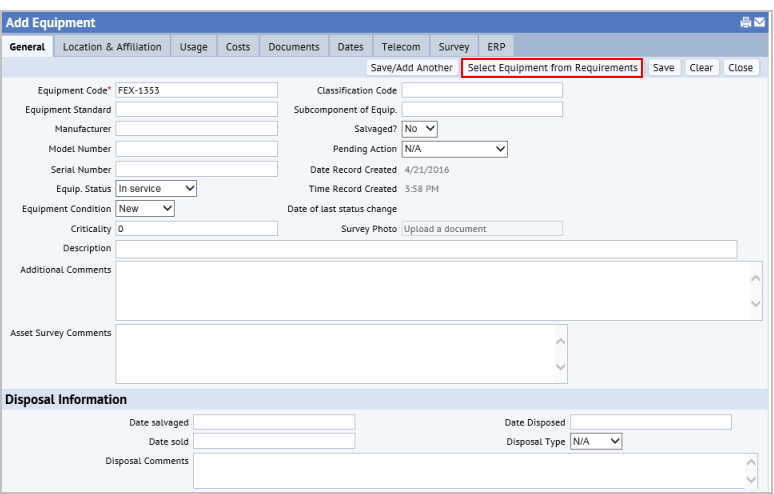
The following image shows the form for adding equipment.

- Optionally, copy data from an asset requirement. If the asset is part of the asset requirements for a proposed project, click Add Equipment from Requirement or Add Furniture from Requirements. These buttons are available for equipment and furniture, and enable you to copy data from the asset requirements table (eq_req_items) to the Equipment (eq )or Tagged Furniture (ta) tables when adding a new piece of equipment or furniture. You are able to change the data that is copied. See Copying data for equipment or furniture added as a requirement at the top of this topic
- Enter asset information in the form's tabs. Enter information in the form for the asset. Work through the various tabs to enter as much information as you can about the asset. If you entered the asset as a requirement, you can edit the information that was copied to the form.
For information on the fields, see:
Note: If Asset Managers need to generate large numbers of assets, it is recommended to generate them in batches of 10,000 assets or fewer to avoid the job taking too long.
- From the Asset Registration Console, select the Enter a New Asset tab.
- Click Add Multiple Assets.
The Add Multiple Assets form appears.
- Select the option button for the type of asset you are adding. The Get Last # field fills in with the last number used for this type of asset.
- Enter the count of assets you are adding in the Number of Assets to Add field.
- If this asset uses a prefix in its naming convention, select the prefix from the Prefix list.
The application populates the Get Last # field with the highest number for an existing asset that uses the prefix you selected.
For auto-numbering, the asset must use a prefix that uses one of the following separators:
"-"
"_"
"|"
"\"
"/"
- Click Next.
The appropriate form for the asset type you selected appears.
- Enter the common data for the asset.
- For buildings, this is the Building Use, Site Code, and Comments. Although these fields are not required, they are useful fields for
- For properties, you designate whether the property is land or a structure, the Property Status and Comments.
- For equipment, you can enter an equipment standard, location, organizational unit and comments for the equipment.
- For furniture, you can enter a furniture standard, location, ownership, and status.
- Click Generate Assets.
The application creates one record for each of the assets you added (based on the count.)
The dialog shows the records that were created.
- To edit an asset, select the check box for the asset and click Edit.
The edit form the asset appears
- Make changes for this asset.
- Do one of the following:
- To change the next asset record in this sequence, click Save & Next.
- To change just this asset, click Save.
For information on the fields that you can enter, see:
Note: To see a floor plan in the generated PowerPoint presentation, the project must have a work package assigned, the floor plan has to have a markup, the markup must be in the doc4 field of the Action Items table (activity_log), and the Action Item record must be assigned to a Work Package
To generate a PowerPoint presentation from your project data:
- Drill-down in the Project list, and click the Export to PowerPoint button
 .
.A job runs that creates a PowerPoint presentation based on the data entered for the project.
- Select to open the project, or to save the project to your system
See Generating PowerPoint presentations from the Enterprise Asset Consoles for details on what is included in the PowerPoint.
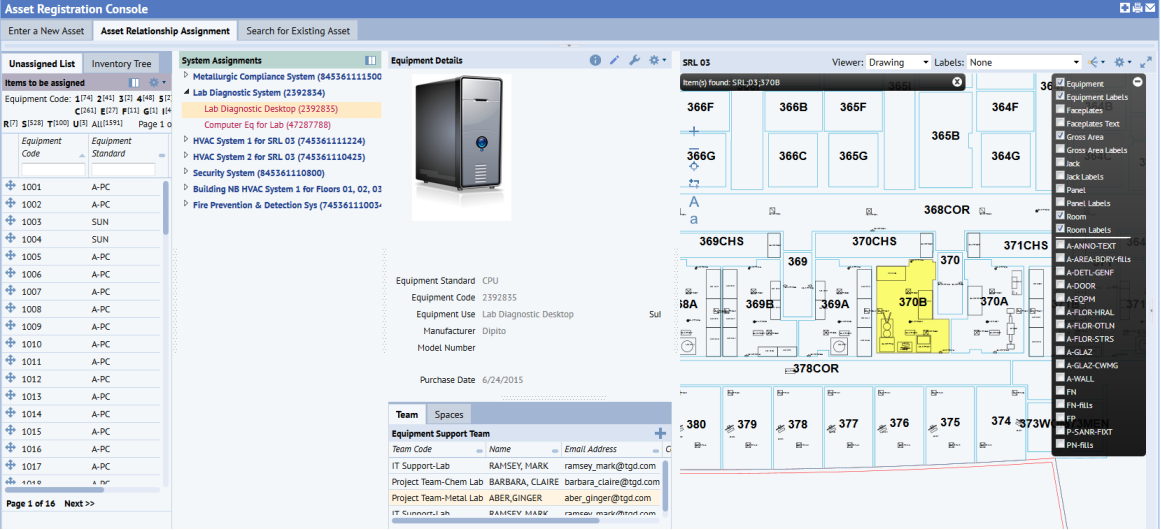
The Asset Registry includes the Asset Relationship Assignment tab, for working with equipment systems. This is the same tab found on the Equipment System Console.
In addition to assigning equipment to equipment systems, you can use this tab to track your assets and their interdependencies, so that you can evaluate the effects that one asset has on another, such as during renovations, moves, or maintenance. You can see the equipment on a floor plan or 3D Navigator to review the spaces served by the equipment, and to trace its dependencies. You can also review the support team that services this equipment. 