Space / Space Planning / Space Planner / Space & Portfolio Planning Console / Stack Plan Tab
Real Property / Advanced Forecasting / Advanced Portfolio Forecasting / Space & Portfolio Planning Console / Stack Plan Tab
Splitting an Allocation
When working with a stack plan. you may decide to split an allocation so that part of the allocation can be moved to another floor, or assigned to a different organization. For example, you may find that you cannot fit a department on one floor and need to split it between two floors. In this case, you can split the original allocation into two, placing the new allocations on separate floors.
Before splitting allocations, carefully review the allocation to see if it should be split. You may have allocations that cannot be split, such as a medical suite that needs to stay together or a receiving department that needs to be located on the first floor for access to the loading dock.
Procedure
- Open the Space & Portfolio Planning Console, select a scenario, move to the Stack Plan tab, and display the stack plan for the desired building
- Click on the allocation in the stack plan, and then click the Split button.
- The system compares the As Of date to the allocation's Start Date.
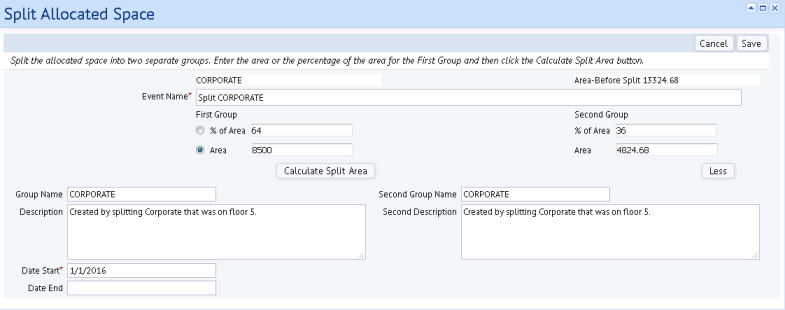
- If the dates are the same, the system immediately presents the Split Allocated Space form, shown below.
- If the dates are different, the Split button presents a menu with the below options. Both options present the Split Allocated Space form, but update the Start Date accordingly.
| Menu | Action |
|---|---|
| Edit this allocation and split into new allocation on this date |
The system completes the Split Allocated Space form's Start Date field with the As of Date. When you save the form, the system saves the new allocations, and also adds an End Date to the original allocation. The system sets the |
| Split this allocation from its start date |
The system retains the original Start Date in the Split Allocated Space form's Start Date field and ignores the As of Date. When you save the form, the system retains the original allocation's record and updates the area value; it creates a new allocation in the Groups table, using the Group 2 values and copying the location, organization, and parent group ID of the original record to the new record. |
- The application presents the Split Allocated Space form. Note the following:
- Event Name is automatically completed with "Split" and the name of the allocation. This is the text that will appear in the Events panel. If you wish, you can edit the generated Event Name.
- In the upper right corner of the Split Allocated Space form, the system presents the original area for your reference. You can use this as a guide when splitting the allocation.
The system offers two methods to automatically calculate the area of the second allocation based on how you specify the first allocation.
- For the first allocation, type the area value in the “Area” field. For example, if you know that a floor has 8500 available square feet, you can specify 8500 for the first allocation so that you can place this allocation on the floor. The system will assign the remaining area to the second allocation so that you can place it on another floor.
- In the "% of Area” field, type the percentage of area for the first allocation. For example, if you know that you want to evenly divide this allocation between two floors, you can enter 50 for the "% of Area" field.

- Complete the values for the First Group (that is, the first allocation).
- Select the Calculate Split Area button and the system calculates the area values based on either the “% of Area” or “Area” field for the First Group. The Second Group area values will always be calculated; you do not enter values into these fields.
- The initial form provides a quick way to split groups, and therefore contains a limited number of fields. You can click the More button to reveal additional fields.
| Field |
Description |
|---|---|
| Group Name |
This is the value that will appear on the stack element's label. It defaults to the same value as the group name of the original allocation. If you want to assign a new organization to either of these allocations, type in the value. You can assign an existing business unit, division, or department, or you enter an organization that does not yet exist. If you are splitting an allocation between floors, retain the original Group Name for both allocations. In the above image, both groups have the same Group Name because CORPORATE will be split between two floors. |
| Description | Defaults to the same value as the name of the original allocation. You can enter a description as to why you are splitting this group. |
|
Date Start |
If the As of Date is the same as the Start Date, this defaults to the start date of the original allocation. See the above discussion on the As of Date and Start Date. |
| Date End | If these allocations are for a set time period, enter the end date of the time period. |
- Click Save to process the Split Allocated Area form. The system:
- removes the original allocation from the stack plan
- creates two new allocations in the stack plan. The two new allocations are the same color as the original.
- updates the records in the Groups table, as described above in Step 3.
- updates the Events pane to include this new allocation event
- updates the Locations panel in order to recalculate the Utilization statistics.
- You can now drag-and-drop one or both of the new allocations to the appropriate floor. See Moving an Allocation on a Stack Plan.