Archibus SaaS / Space / Space Manager / Space Console
Space / Space Inventory / Space Manager / Space Console (non-transactional)
Space / Occupancy / Manager / Space Console (non-transactional)
Create a Team and Add Employees and Associations to It (Using the Space Console)
You can choose to first develop your teams and their employees and associations using the Space / Occupancy / Manager / Define Teams task and then use the Space Console to manage them, or you can define your teams right from the Space Console.
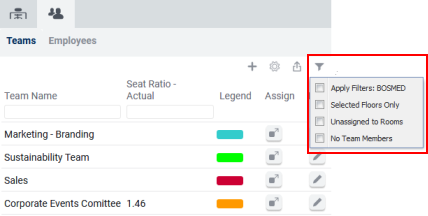
When working with teams in the Space Console, you can take advantage of these filters to control the content of the Teams tab:

This topic has the following sections:
Create a Team
First, you create a team, and then you assign employees, associations, and locations to it.
- Load the Space Console, set to Occupancy mode, activate the team space features.
- From the Teams tab, choose the "+" (Add New) button. The system presents the Add Teams form, which takes over the workspace so that the Space Console is no longer visible. You can resize this form if necessary.
- Complete the Team Properties panel.
| Field | Value |
|---|---|
| Team Code | This is the value that identifies the team record and is hidden from view. |
| Team Name | Enter a descriptive name for the team. |
|
Seat Ratio - Target |
Enter the desired target employee-to-seat ratio for the team. For example, if you have 20 people on the team but you know that only 10 of them will use the space at any given time, you can set the target ratio to .5 Once you assign space to teams, you can compare your actual employee-to-seat ratio to this target. See Employee-to-Seat Ratio. |
| Highlight Pattern - ACAD | The system uses this value to highlight this team on a floor plan. See Defining Highlight Patterns. |
| Team Status | You can set this to active or inactive. Team Status is used in the Team Statistics report, where you can filter out the inactive teams. The Team Space metrics automatically exclude inactive teams. |
| Team Function | High level summary of the team’s mission, goals, or function. Enter a value for this field. |
| Team Category | From the validating list, choose the category for this team. Team Categories are used for sorting and standardizing teams. Define team categories with the Space / Occupancy / Manager / Define Team Categories task. |
| Team Description | Enter a description of the team, such as their purpose, project, and so on. |
Once you save the entries in the Team Properties panel, the system:
- displays the Team Statistics panel
- displays the right-hand panels so that you can assign employees, associations, and rooms to the team.
In the Teams tab, note the Funnel icon's "No Team Members" checkbox . This is handy for quickly find a newly-created team that you want to associate with rooms and employees.
Add Employees to a Team
The Team Space features offer a flexible way to manage alternative workspace scenarios. Thus, there are many ways that employees can be assigned to teams. Below are a few examples and how you account for employees on a team.
- Employees have permanent locations and departmental assignments, but will be working one day a week on a special project and need to sit with the team on this day. The cross-functional team contains employees from several departments. In this case, you will:
- Add the employee to the team and specify the percentage of time they work with the team.
- Associate the team with a project.
- The employee is fully committed to a project for the next five months. When this project ends, they will be reassigned to the next project.
- Add the employee to the team and specify that they work 100 percent of time they work with the team.
- Associate the team with a project.
- The site uses team space to manage a department's space. The employee is fully committed to this department and the team for this department.
- Add the employee to the team and specify that they work 100 percent of time they work with the team.
- Associate the team with a department.
For more information, see Teams (Concept).
Step 1: Add employees to a team:
- Load the Space Console, set to Occupancy mode, activate the team space features.
- Select a team to edit a team, and in the resulting form move to the Employees tab.
- The system lists the Employees On Team in the top panel, and the Available Employees in the bottom panel.
- In the filter, specify the time frame for which you want to assign employees to this team by completing the From Date and To Date.
- If it is an indefinite assignment, you can leave To Date blank.
- The system applies this date range to both the Employees On Team list and the Available Employees list.
- The Teams field in these panels displays any team that the employee is already on during this time frame.
- The system updates the Team Statistics date in the left panel with the From Date value.
- Complete the filter with other options you may require. Note these filter fields:
- Use the Additional Teams filter field to find employees that are on another team besides the team that you are currently editing. Select as many teams as appropriate and the system displays them in concatenated form in the filter field.
In the Employees on Team list, the Team Code filter finds employees that are on the current team and the team you specify in Team Code. In the Available Employees list, the Team Code filter finds employees that are not on the current team, but are on the specified team.
- In the Available Employees panel, locate the employee that you want to add to the team. You may want to use the smart search filter to limit the list of employees.
- Select the check box for the employee and choose the Add button; or select the check boxes of multiple employees and choose the Add Selected button.
- The system moves the employee to the Employees On Team pane. The employee's Start Date and End Date match the values that you specified in the From Date and To Date fields of the filter.
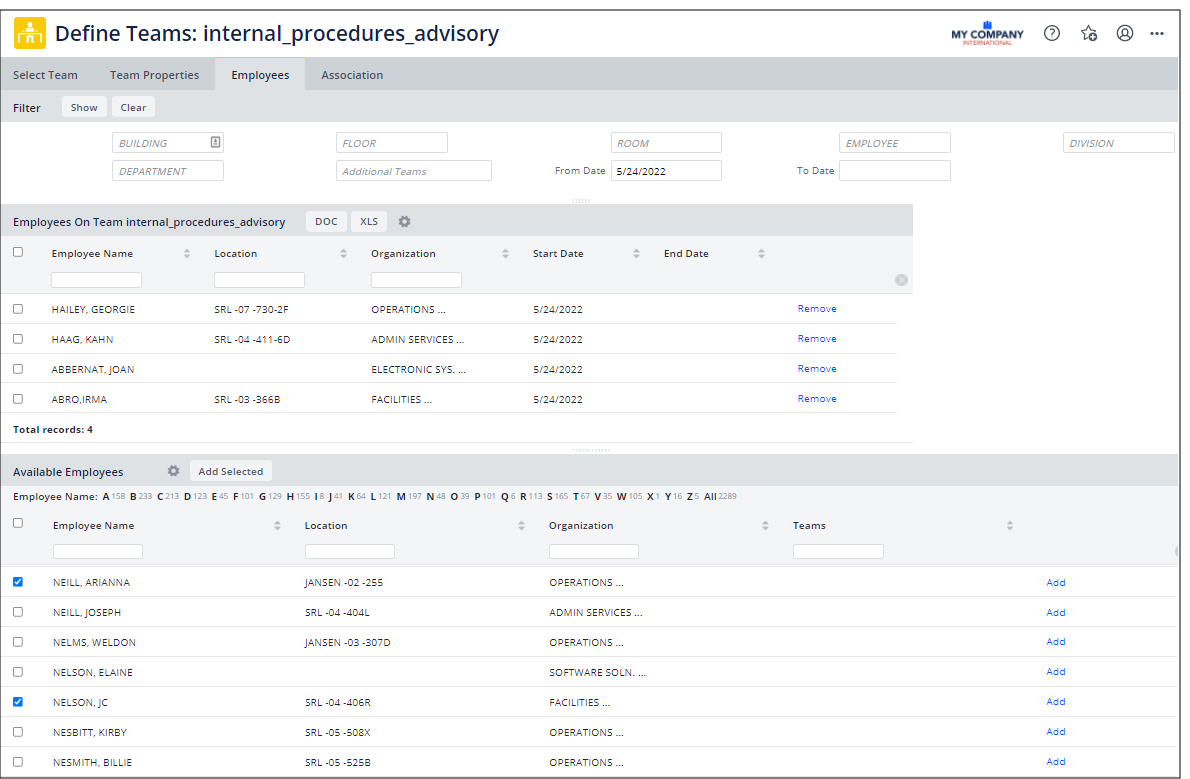
For example, in the below image, the user has added four employees from different departments to an advisory team, and has selected two more employees in the Available Employees pane to add to the team.

Note: The system accommodates employees joining teams for specified time frames and then rejoining at a later date. The Start Date and End Date fields associate each employee's membership on a team with a time frame. Suppose you want to add an employee back to a team of which he was a member at some point in the past. Filter on a date range for which the employee is not assigned to the team; the employee will appear in the Available Employees panel, and can added to the team for this time frame.
Note: Since an employee can be in a team and also in a permanent space, the occupancy count calculations do not include teams as there could be duplicate counting of an employee.
Step 2: Specify an Employee's Time Percentage with the Team
Employees might be assigned full time to a team, or the team might be a side project for the employee, such as their membership on an employee health initiative team. Once employees are assigned to teams, if they do not work 100 percent of the time with this team you can specify the percentage of time that each employee spends with the team.
- In the Employees on Team portion of the form, click the check box for the employee.
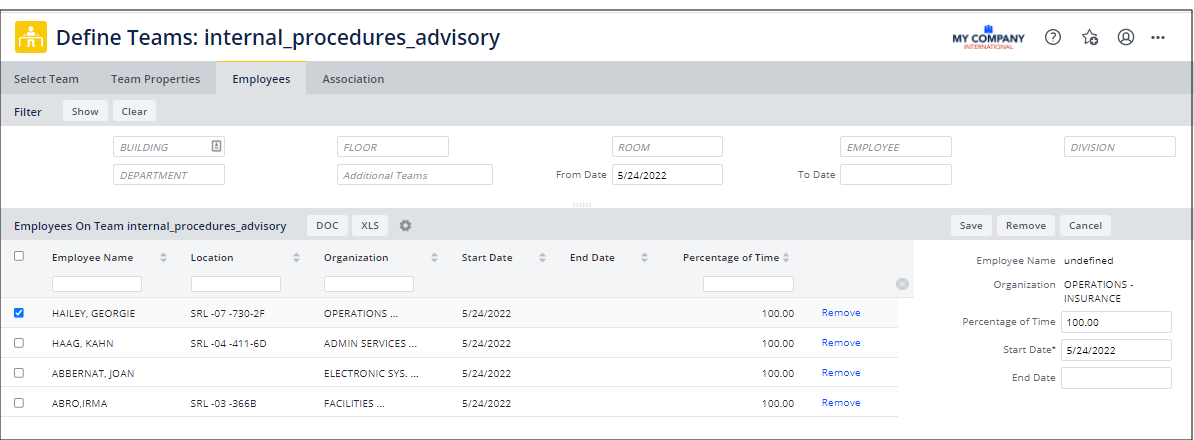
- If you want to assign the same time frame or percentage of time to multiple employees at once, select their checkboxes. When you complete the fields, and the system will apply the values you enter to all selected records.
- To the right of the form, the system displays Start Date, End Date. You can use the gear-shaped icon to access the Select Fields form and display Percentage of Time.

- Complete the fields as follows:
| Field | Value |
|---|---|
| Percentage of Time |
The default is 100 percent, to indicate that the employee is assigned full time to this team. If the employee is a member of multiple teams, enter the amount of time that the spend on the work of this team. For example, suppose an employee is part of the employee health team, and 8 hours a week (one day), they are devoted to this project and require space with other team members. In this case, enter 20 percent for this field. For the employee's other team, enter 80 percent for this field. |
| Start Date | By default, the system completes this field with the Start Date for the employee's team assignment. You can change this, if necessary. |
| End Date |
If the project is open-ended, you can retain this field blank for now. If the project has a projected end date which you specified in the filter, the system displays this value. You can change this, if necessary. |
- Once you complete Percentage of Time, you might want to include this field in the Employees on Team grid. You can use the Select Fields command, available from the gear-shaped icon to do so.
Assign Associations to Teams
In addition to assigning employees to teams, you can associate divisions and departments and projects to teams.
For example:
- If you have cross-functional teams that works on specific projects and that contains employees from several departments, you can associate the project with the team.
- If your team is not cross-functional and instead is composed of employees from the same department, you can associate the team with this department.
- Another option is to associate the team with both a project and a division. For example, suppose members of a certain division are working on a project and sitting in team rooms to do so. In this case, you could associate both the project and the division with the team.
These associations are handy for receiving a complete picture when highlighting employee occupancy on the floor plan. For example, you can use the Divisions with Teams option to highlight rooms assigned to a division as well as rooms assigned to a team that is associated with a division.
When you associate divisions and departments with teams, the system does not check that the employees assigned to the team are part of the associated division or department. Thus, it is possible to associate a division to a team that has employees from other divisions. This design provides for a flexible system.
Procedure:
- Move to the Associations tab.
- The upper portion of the form lists the team's current associations, that is the projects, divisions, and departments associated with the team.
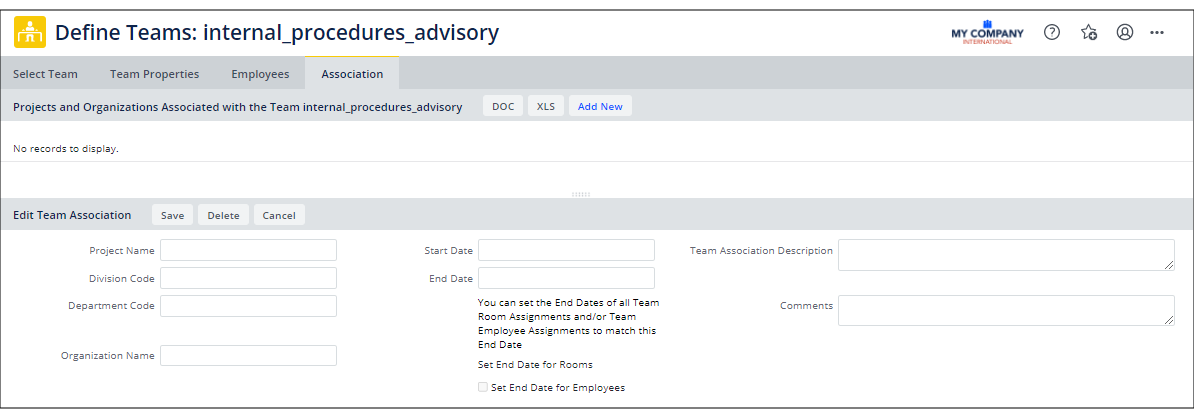
- Choose Add New and the system presents the Edit Team Association form for defining the association. In the below image, the team currently has no associations and the user has just selected the Add New button to access the form for adding an association.

- Complete the form as follows:
| Field | Value |
|---|---|
| Project Name | Associate the team with a project, by choosing an existing project from the validated list. If the team is not associated with a project, you can ignore this field. |
|
Division |
The team might be associated with a particular division or department. For example, you |
| Start Date |
Enter the start date for this association. |
| End Date |
If the association is ongoing, you can leave this field empty. If you enter a value for End Date, the system activates two additional check boxes:
Use these options to have the system automatically set the End Date value for the team's room and employee assignments to match the End Date of this association. This provides a convenient method of connecting a team’s purpose, such as a project, to the actual team assignments, and to set everything to end on the same date. If you set these options, the system overwrites any existing End Date values of the room and employee assignments. Note: Not all room and employee assignments are affected by this feature. Only those assignments that occur within the date range of the association are affected. Any room or employee assignments that occur entirely before the dates of the association or entirely after the dates of the association are not affected. |
| Organization Name |
This an additional and alternative method of organizational hierarchy that you can define. To define organizations, load the Organizations table ( |
|
Description
|
Enter a description for the association. |
- Click Save, and the system updates the end dates for all team and room assignments will be set to match the End Date of the association, depending on which you chose. This also refreshes the Team Statistics panel.
- If you have associated divisions or departments with your team, you division and department highlights will now include teams. Run the you Divisions with Teams or Departments with Teams options to highlight rooms assigned to a division or departments as well as rooms assigned to a team that is associated with a division or department.
Assign Rooms to Teams
There are a few ways to assign rooms to teams. For information, see:
Back to