Assessments mobile app
Assessments Mobile App: Overview
The Archibus Sustainability Assessment, Condition Assessment, and Commissioning applications all have tasks in which a field assessor notes the conditions of specific items in the field. Depending on the application, the field assessor might be noting:
| Application | What is being assessed |
|---|---|
| Condition Assessment | the general condition of equipment and locations. For example: Is it in good shape? Is it safe? Is it clean? Does it comply to codes and government regulations? Is this operating in a cost-effective manner? Does this detract from the public image of our company? Is this affecting other systems or areas in the facility? |
| Sustainability Assessment | the “green” state of your equipment and locations. For example: Is this promoting good air quality? Is this conserving energy? Is this conserving natural resources? Does this meet government environmental regulations? Are waste products being disposed of properly? Are they hurting the environment? |
|
Commissioning |
the appropriate building components for each location and equipment item-- such as pumps, air distribution units, water treatment filters, and fire alarms -- are on site, ready for installation, correctly installed, and functional. In short, you are assessing the items on the construction checklist and making sure that they meet the requirements specified by the building owner. |
Note: If field assessors will be using the Assessments mobile app in the field, your site should have a license for at least one of the above Web Central applications.
To perform these types of assessments, field assessors can use the Archibus Assessments mobile app running on their smart phone or mobile device. With the Assessments mobile app, field assessors do not need to depend on a laptop connected to their corporate network for access the forms for performing the assessment.
The following is the typical workflow for using the Assessment mobile app to perform field surveys required by the Condition Assessment, Sustainability Assessment, and Commissioning applications. The workflow consists of these steps:
- Prerequisite: Facility managers prepare data for download and optionally define questions
- Step 1: Assessment manager assigns assessment items to field assessors
- Step 2: Field assessors sync their devices and review their work queue
- Step 3: Field assessors review the physical items and update the assessment records with current conditions
- Step 4: Field assessors sync their devices to upload the assessment data
Prerequisite: Facility managers prepare data for download and optionally define questions
Before the field auditor can get started using the mobile app, the facility manager must prepare the background data and perform other tasks. For information, see Assessment Mobile App: Facility Manager Tasks.
Step 1: Assessment manager assigns assessment items to field assessors
First, the Assessment Manager assigns assessment items to the Field Assessor using these Web Central tasks:
- Condition Assessment / Assessment Manager / Manage Assessment Items
- Sustainability Assessment / Assessment Manager / Manage Assessment Items
- Commissioning / Construction / Manage Construction Checklists
The assessment manager must also issue the assessment project using the Background Data / Define Projects task. The assessment project will not show up in the queue of the mobile device user until the project is issued.
Step 2: Field assessors sync their devices and review their work queue
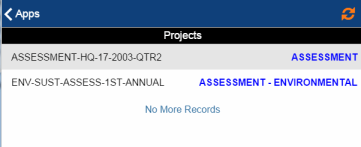
The field assessor syncs their mobile device to receive a list of issued projects that contain assessment items assigned to them.

Note: Assessment items show on the mobile device only if they belong to a project has a status of "Issued and In Process." Project status is updated using Web Central's Condition Assessment or Sustainability Assessment / Background Data / Define Projects view.
For Commissioning, use the Construction / Manage Construction Checklists view.
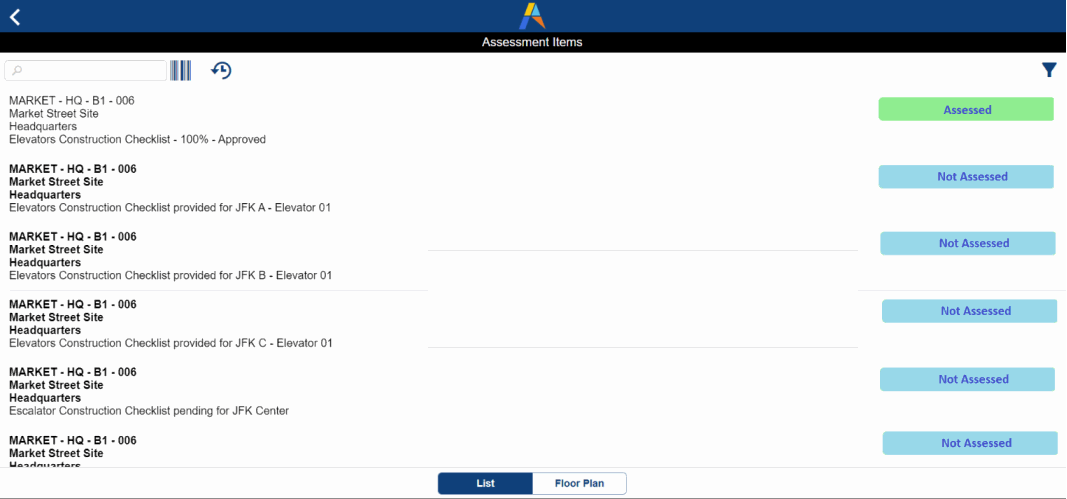
The assessor taps a project to see the list of assessment items for this project assigned to them. Note the following about this list:
- Items to address are in bold and marked in blue; completed assessment items are not bold and marked in green.
- The list contains both rooms and equipment to assess.

The field assessor may wish to see the assessment items in terms of a floor plan drawing, rather than as a list. If so, the field assessor taps the Floor Plans button, receives a list of floors with assessment items, and chooses a floor plan. The system presents the floor plan and:
- highlights in yellow rooms that have open assessment items
- highlights in orange rooms for which all assessment items have been completed
From the floor plan, the assessor can tap on a room to access the Edit Assessment form for each item in the room.
If the field assessor has many items in their queue to assess they may wish to use the funnel-shaped icon to set a filter so that they can more easily find records.
For example, they may wish to see only items to complete instead of the all assessment items assigned to them. If they have items on multiple floors assigned to them, they may wish to filter the list of assessment items to only those on a certain floor.
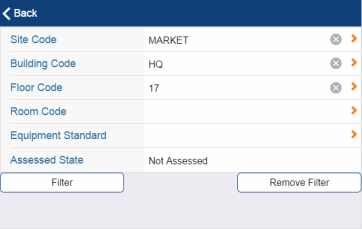
From the Assessment Items screen, assessors can tap the funnel-shaped Filter button in the top right corner![]()
to access the following form for setting a filter.

For example, with the above filter options, the field assessor will see in the Assessment Items list only uncompleted assessment tasks for floor HQ-18. For more information on filters, see Searching and Filtering.
Step 3: Field assessors review the physical items and update the assessment records with current conditions
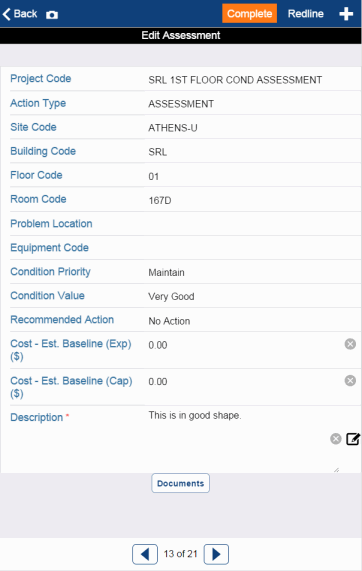
From the list of assessment items, the field assessor taps an assessment item (or taps on a room on the floor plan) to see the details of the item in the Edit Assessment screen, shown below. The assessor then travels to the location of this item and assesses its current state. For example, the assessor can note the general condition, recommended action, the cost to replace, and so on. For information on the values that the field assessor can choose for the priority and value fields, see Field Assessor / Documenting the Condition and Sustainability of Rooms and Equipment.

The field assessor completes as many fields as applicable to their site's practices; for example, practices may dictate that the field assessor does not estimate a replacement value for inexpensive items. Minimally, the assessor must enter a value in the Description. Tapping the field's icon presents a list of standard descriptions, or they can type in their own.
Tip: You typically want to complete the Sustainability Priority field only if you are performing a sustainability assessment. In Web Central, the Condition Assessment and Commissioning tasks do not display the Sustainability Priority field.
In addition to the standard assessment fields shown in the above image, the facility manager may have developed a set of questions specific to each assessment project type or each type of equipment. If so, the field assessor will encounter these additional questions on their mobile device forms.
Note that the Edit Assessment form is used for both equipment assessment items and room assessment items.
- If there is no value for Equipment Code, the room should be assessed.
- If there is a value for Equipment Code, the equipment item should be assessed.
In addition to completing the fields for the assessment item, the assessor can:
Redline a floor plan drawing
The assessor may want to indicate on a floor plan drawing notes about current conditions, such as the specific area of a room that needs attention. The assessor can add notes directly to the floor plan drawing by using the redline feature. To do so:
- Select the Redline button to access the floor plan for the current assessment item.
- Use the redline tools (located on the left-hand side of the drawing) to add notes to or mark up the floor plan.
- Save the changes. The system saves the floor plan with edits as a PNG file and stores this in the Document 4 field of the assessment item. From mobile, you can examine using the Documents button.
- If the assessor finds they need to note additional information on the floor plan, they can use the Documents button to access the PNG file. When the system displays the PNG file, it includes the redline tools so that the assessor can further notate the floor plan drawing.
Take a picture
Suppose an item is in poor shape. Taking a picture of it and attaching the photo to the assessment item can provide a wealth of information to the assessment manager reviewing the completed assessment. If the assessor's mobile device or smart phone has a camera feature, the field assessor can capture an image of the item by tapping the Camera icon in the upper left corner of the Edit Assessment form. For more information, see Viewing Documents and Saving Photos as Documents
For further notation, the assessor can add redlines to photos.
Create a new assessment record
Sometimes the assessor notes something in the field that should be reported, although this is not a location or equipment item that they should specifically check. For example, assessors might notice a problem in the corridor that should be addressed. They can tap the "+" button in the upper right corner of the Edit Assessment form to access a form for entering the item. The system copies key information from the previous assessment item, such as Project Code, Action Type, Equipment Code, and location fields. The field assessor can edit the location and equipment values as necessary. Note that the assessor needs to tap the Save button and save new records that are created with the "+" button.
If creating an assessment record for an equipment item, you can take advantage of the bar code features. If the equipment item in question has a bar code tag, the assessor can scan the tag with the mobile device. The system will complete the Equipment Code field with the value of the bar code tag. For more information, see Using Bar Codes in Mobile Apps.
Complete the assessment item
When through with this item, the field assessor taps the Complete button. The following happens:
-
The application sets the Date Assessed field to the current date.
-
The item will no longer appear as bold in the assessment list. It will have green label that displays the Assessment State, which is “Assessed.”
-
In the floor plan, the room becomes orange if all the items are completed.
If the user has not finished with this item, they can still move off the record and return later to this item to complete it.
Next, the assessor can:
- use the Back button to return to the list of assessment items
- swipe or use the navigation arrows to access the next assessment item
Step 4: Field assessors sync their devices to upload the assessment data
When they have reviewed their data an are ready to upload it, assessors can sync their mobile devices with the database server. Syncing performs the following important actions:
- uploads to the server the assessment items that the user has completed. These items will no longer appear on the assessor's mobile device.
- downloads from the server any assessment items that have been assigned to the mobile user since their last sync.
- if necessary, downloads from the server facility background data such as room lists, priorities, conditions, recommended actions, and so forth. These are the values that mobile users will choose from when assessing items. For information on downloading facility background data, see Mobile Apps: Transferring Archibus Data and Drawings.
Once the field auditor uploads the data to the Archibus system on the server, the Web Central applications work with this data based on the defined workflow.