Archibus SaaS / Foundations / Facility Services / Service Console
Workplace Services / Service Desk / Service Provider / Service Console
Manage Reservations (Meeting Space Requests)
When self-service users request meeting space using the Archibus Workplace, the reservation is automatically approved, email notifications are sent, and the space is designated as no longer available for other meetings. No further actions are required by the requestor or the manager in order for the reservation to occur.
However, the manager can take the following actions from the Service Console:
In order to work with reservations in the Service Console, first display them in the Service Console by selecting Show Reservations from the gear icon. Since reservations are automatically approved, they appear in the Approved section of the Service Console.
Reservation reports provide summaries and statistics about your reservation requests.
Note: In order for Workplace users to request meeting spaces, they must have a license for the Reservations module. Without this license, Workplace does not display the options for requesting meeting spaces.
Cancel reservations
If circumstances change and a meeting space is no longer required, you can cancel the reservation and free up the room for other meetings. Since self-service users cannot cancel meetings from Workplace, as a manager you can cancel the meeting from the Service Console.
You can cancel meetings that were scheduled to happen in the past. This is useful for updating the system if the meeting never happened. Canceling a reservation ensures that is not included in the service request reports.
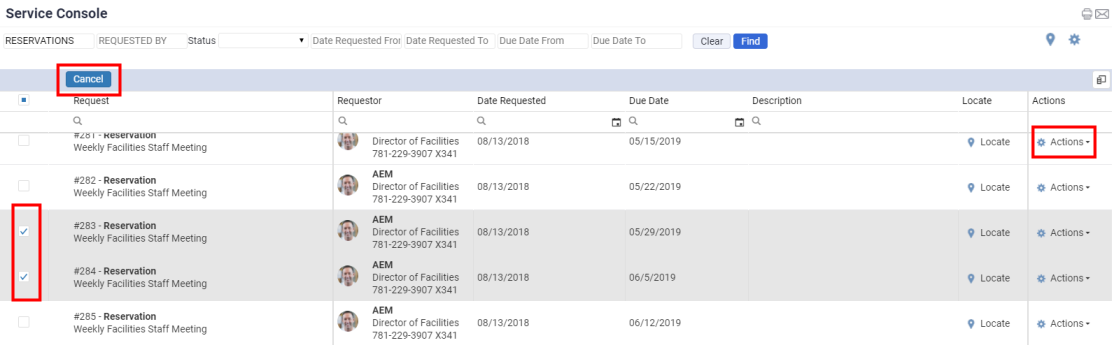
Cancel multiple reservations at once
- Select one or more reservations by clicking on its selection box in the left column.
- Choose Cancel in the upper left corner.
- The Service Console removes the reservations from the list of Approved requests and generates an email notification to the meeting requestor and meeting attendees.
- The Service Console is set with a permanent restriction to show only those reservations that are not rejected, cancelled, or closed. Because of this permanent restriction, if you have opted to view canceled requests, the Service Console will not display these reservations in its Canceled section.
Cancel one reservation
- Select one reservation clicking on its selection box in the left column.
- For this reservation, click its Actions drop-down menu and select Cancel.
- The Service Console removes the reservation from the list of Approved requests and generates an email notification to the meeting requestor and meeting attendees.
- The Service Console is set with a permanent restriction to show only those reservations that are not rejected, cancelled, or closed. Because of this permanent restriction, if you have opted to view canceled requests, the Service Console will not display this reservation in its Canceled section.
Review reservation details
You may want to review requests for meeting space.
- In the Service Console's Request column, click on the reservation.
- The Service Console presents the Reservation Details form.
- The top section is a filter, and also shows the reservation date in the calendar. You do not set a filter when reviewing an existing reservation.
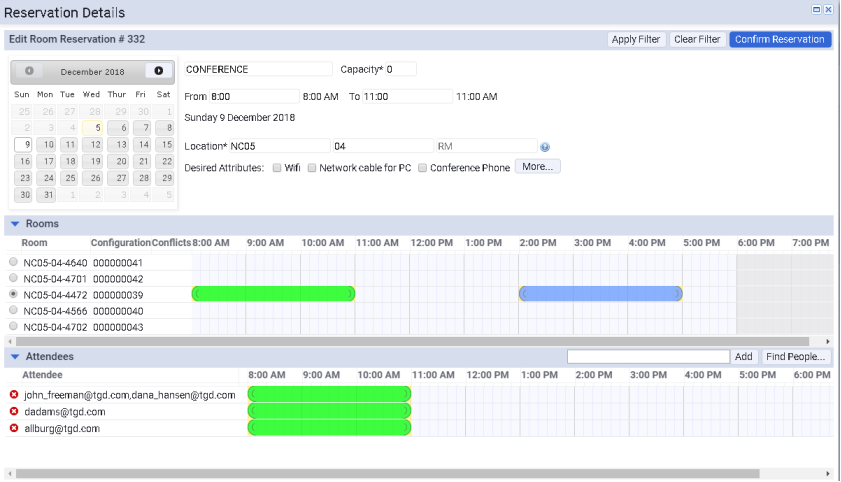
- To review the other details for the selected reservation, review the Rooms and Attendees section of the form.
- The Rooms pane shows the room that is reserved and the time for which it is reserved.
- The green bar on the timeline indicates the reservation you have selected to review.
- A blue bar on the timeline indicates other reservations for the rooms.
- You can click on the bars to access pop-up forms which present details about the reservations.
- The Rooms pane also lists other meeting rooms that might suit your needs. This list is useful when editing reservations, as described below.
- You can see the arrangement for a room by clicking on the room number in the Rooms pane.
- The Room Details form appears showing information on the room and its arrangement.
- If there is an associated drawing for this room, the program zooms to the room and highlights it in the drawing.
- The Attendees pane lists the email addresses of those invited to the meeting, and the time period for the meeting.
- When finished reviewing the reservation, click the Close button to return to the Service Console.
Features from the Reservations module
If users at your site has created reservations using the Reservations module, these reservations will appear on the Service Console. The following elements of the Reservation Details form refer to features that are supported by the Reservations module.
- Set-up and clean-up times. You may notice that some reservations have yellow indicators at their ends. These yellow indicators show setup and clean up times, and are useful so that you don't schedule a meeting immediately following a meeting that requires cleanup. To make reservations with set-up times and clean-up times, you must use the Reservations module. These types of reservations but can appear on your timeline if others at your site use the reservation features of the Reservations module.

- Conflicts. When a self-service user creates a recurring reservation, the situation might arise that a room is not available for all the dates in the specified time period. The application creates the recurring meetings as if the room was booked for all occurrences, even when there are conflicts.
- Configuration column. The Configuration column, located to the right of the Room Number in the Rooms panel, lists a room's configurations, which are automatically generated when you define a room as reservable in both Foundations and the Reservations module. In the Reservations module, you can edit the generated configuration and define multiple configurations for a room, and then reserve the desired configuration. Although a configuration is generated in Archibus Foundations, Archibus Foundations users do not work with configurations.
Edit a reservation
You cannot edit reservations whose due date has already passed.
- In the Service Console's Request column, click on the reservation.
- The Service Console presents the Reservation Details form, described above. The top section lists the reservation date and also serves as a filter for finding a new room.
Change the meeting time
In the Rooms pane, the green bar next to a room indicates the reservation you are editing and the time frame of the reservation.
- To change the time, click and drag your mouse on the timeline bar to the desired time frame.
- You cannot drag the timeline bar so that it conflicts with an existing reservation for this room (indicated in blue). For example, in the above image, you cannot drag the green bar past 2:00, as another reservation starts at 2:00.
- The green bar indicates the new time.
- The program updates the timelines for the attendees to match the new meeting time.
The From and To fields in the Filter at the top of the form fill in with the start and end time for the reservation.
Alternately, you can double-click on the green bar and complete the resulting Edit Room Reservation form with the new time.
Change the attendee list
- In the Attendees pane, click Find People.
The Invite Attendees form appears. You can invite company employees, as well as visitors, by choosing the appropriate tab on the form.
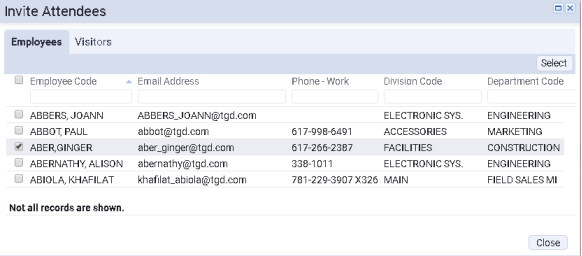
- From the Employees tab, select the check boxes for employees; from the Visitors tab, select the check boxes for any visitors, and click Select. If the desired party is not included in the Employees or Visitors tabs, you can add them to the meeting using their email address, as discussed in step 5.
Note: The list of visitors from which you can choose comes from Archibus Workspace self-service employees who create visitors when requesting meeting space, and from visitors who make requests from Workspace kiosks and are prompted for their names. This information is stored in the Visitors database table, which is also accessed by the Reservations module.
Note: The application permits you to add more employees to a meeting than specified by the capacity of the room housing the meeting (the Maximum Capacity field of the Room Arrangements table). For example, if a room has a capacity of 3, the system enables you to add more than 3 employees to the meeting. This behavior considers the fact that some employees may be attending the meeting using remoting services and will not be physically present in the meeting room. Thus, you do not need to consider the physical space they would occupy and the capacity of the room.
-
Close the Invite Attendees form, and the Attendees pane shows the selected attendees with their timeline bars matching the time of the meeting.
-
If an attendee is busy during the selected time frame, the timeline appears in blue and the attendee's blue bar will overlap the green reservation. However, all selected attendees are added to the reservation, even if they have conflicting meetings.
-
- You can also add attendees by typing their email address in the box next to the Add button and clicking the Add button. This is handy for adding attendees that are not listed in the Employees and Visitors lists, or for adding employees and visitors for whom you know their email addresses.
- To remove an attendee from a meeting, click the x next to the attendee in the Attendees pane.
Change the meeting date
- In the top of the form, enter a new date in the calendar.
- For recurring reservations, the calendar limits you to selecting a date within a specific date range so that you don't choose a date that conflicts with the next recurring date and you end up with two meetings in the same time period.
- When you select a date, it appears on the form to the right of the calendar.
- If the room is available at this same time on the new date, the timeline refreshes.
- If the room is not available at this same time on the new date, you can choose a new room. The Rooms pane lists rooms that match the restriction in the filter. The filter is discussed later in this topic.
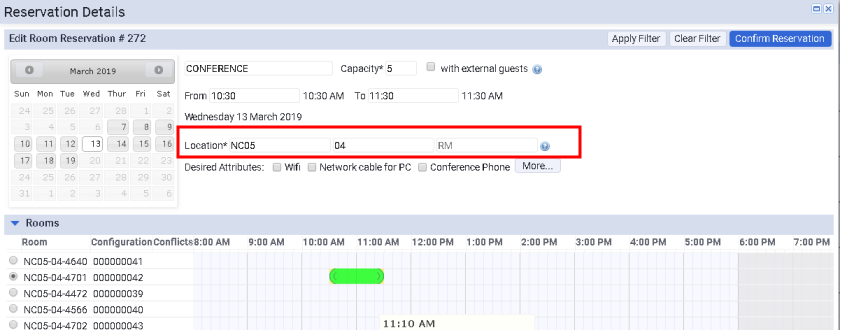
Change the meeting room
The top of the form presents a filter, completed with the reservation details except for the reserved room number. The Rooms panel then lists meeting rooms that meet the filter restriction, with the room that was reserved marked as selected. For example, in the below image, the filter is set to the fourth floor of building NC05, and the Rooms panel lists all the conference rooms on this floor.
If you need to find another room for this reservation, you can start with the list of rooms already listed in the Rooms pane as these rooms are similar to the reservation's current room.
- Select a room in the list.
- The timeline adds the green time block the selected room, and the attendees update as well.
- You cannot change the room to one that has an existing reservation (in blue) that conflicts with the meeting time.
Alternately, you can use the filter to look for a new room, as described below.
Search for rooms using the filter
The top of the form displays basic information about the reservation, as well as a filter for searching for new room.
If you need to find another room for this reservation, use this filter to search for a room that meets the criteria of the original request.
- In the filter, select a room arrangement, such as a conference, classroom, or theater, if this is important for your purposes.
- Enter the capacity. The Capacity field in the filter determines which rooms are displayed according to the minimum required attendees and maximum capacity defined for the room's room arrangement.
- Select the building for the reservation. Building is a required entry in the filter. Optionally, you can also select the floor and room if you are looking to reserve a particular room, or a room on a particular floor.
- If you cannot be flexible about the meeting time, enter the time in the From and To fields. This ensures that you see only rooms that are available during that time frame. To review all the rooms that match your criteria, leave the From and To fields blank. This enables you to select a time after reviewing the available time slots.
- Optionally, select to show only rooms that have a fixed asset by selecting the check box for the asset in the Desired Attributes section.
- Click Apply Filter.
The form displays available rooms for the date and search criteria that you specified.
Any existing room reservations will appear as blue blocks. Double-click on a blue block to view detailed information on the existing reservation.
- In the Rooms panel, review the available rooms.
- If you did not specify a From and To time in the Filter, all rooms that match your search criteria are shown. On the desired room, drag the cursor to indicate the time span for the reservation. Any confirmed reservations for these rooms are shown with a blue bar on the timeline. You cannot create a reservation that overlaps an existing reservation for that room.
- If you did specify a time in the filter, the timeline displays the time span on the room that best meets your search criteria. You can select a different room if you wish.
Confirm your reservation changes
To finalize your edits to the reservation, you must confirm it.
- Click Confirm Reservation.
- In the Confirm Reservation form, review the information.
- If you are satisfied, click Submit. You can then return to the Service Console, which will reflect your updates.
- Otherwise, click Return to Reservation Form and make additional edits.
- The system generates email messages to the meeting attendees and meeting requestor with the new information.