Archibus SaaS / Foundations / Facility Services / Service Console
Workplace Services / Service Desk / Service Provider / Service Console
Review Maintenance Requests and Add Details
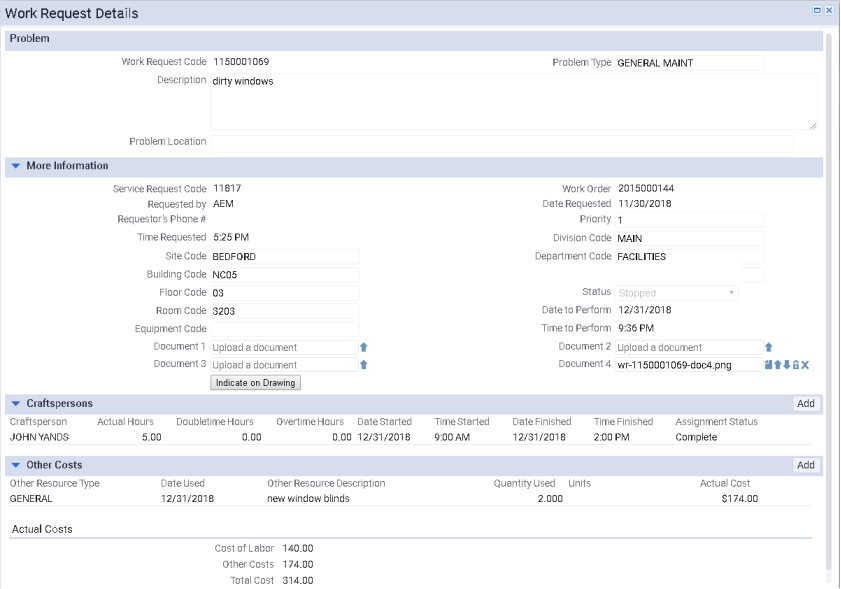
Throughout the life of a work request, you can review the details and update the work request as necessary. For example, you can associate a craftsperson with the job and when work is completed, you can update the request with the labor hours and additional costs incurred in executing the work. The system calculates this as the Total Cost of the work and displays the total cost at the bottom of the form.
When the Archibus Workplace user requests work, they will enter basic information, which will be captured in the Work Request Details form. Access this form by clicking on a maintenance request in Service Console.
The Work Request Details form is divided into various sections which you can hide and expand using the triangle-shaped icon. The below image shows the form with all sections expanded.
Review and add information about the work
The fields in the Problem panel are not editable; the values are completed by the Archibus Workplace user reporting the problem. Likewise, many of the fields in the More Information section are completed by the Archibus Workplace user and are not editable. In the More Information section, you can add two pieces of information:
- Add a floor plan drawing that includes notes about the maintenance problem (mark-ups)
- Upload documents pertaining to the maintenance problem using the Archibus document management system
To document a maintenance issue with a mark-up
Once a problem is reported, as manager you may want to indicate on a floor plan drawing notes about the problem, for example the exact location of a maintenance issue or the wall that needs to be repaired. You can do so by making notations on the floor plan drawing and then attaching this notation to the maintenance request. Likewise, a craftsperson in the field may report back to you with details that you want to note in the floor plan drawing.
- On Service Console, select a maintenance request of any status.
- In the Work Request Details form, expand the Other Details panel.
- Click Indicate on Drawing.
- The form presents the Redlines form. Use the tools to indicate an area on the drawing and the text tool to add any notes. Note that the floor plan already outlines in red the room that has the maintenance issue. For information on using these tools, see the "redlines" discussion in Marking Up Images and Floor Plans. In the below image, note that the floor plan has been zoomed and the Plan Type has been set to Category so that the rooms are highlighted according to their room category. These are optional steps; you can retain the default zoom and leave Plan Type blank if you choose.
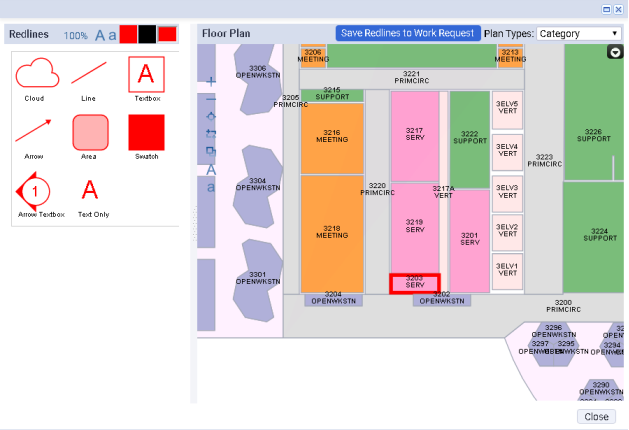
- When through marking up the floor plan, click the Save Redlines to Work Request button.
- Archibus creates a PNG file of the floor plan and add it to the Document 4 field.
To associate a document with a maintenance request
You may want to associate various types of documents with the work, such as a photo of the exact item that needs repair, a permit to make construction changes, or receipt for required parts. Use the Document 1, 2, and 3 fields for this purpose. (The Document 4 field is used for markups; however, if you are not generating a markup, you can upload a document to this field as well.)
You use the button next to the Document fields to upload documents; once you upload a document, the field offers additional buttons for accessing the uploaded documents. For information, see Using the Document Management System.
Specify the craftsperson and the hours spent on the job
Note: In Archibus Foundations, when you complete the craftsperson fields below, you are not directly assigning work to craftspersons for execution; that is to say, the craftsperson does not receive this job in their queue and does not update the system with details about completed jobs, as is the case with the Maintenance module. Instead, in Archibus Foundations, you associate a craftsperson with a work request in order to track the labor costs of the job.
To notify a craftsperson of their assigned work, you can print out the work details using the Report button at the top of the Work Request Details form. You can then supply the craftsperson with this hard copy. The craftsperson can make notes about the job on the hard copy, which you can record when you update the system with details about the work. 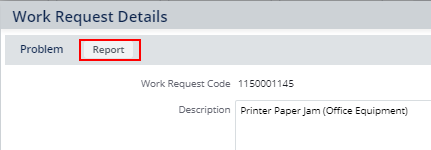
In order to track the costs of the work, you can specify the craftsperson who executes the work. Since hourly wage rates are specified for craftspersons in the Craftspersons table, the system can calculate the labor cost of this job.
You can add craftsperson information at any time (Requested, Approved, Completed). You might want to enter a craftsperson when you approve the request; optionally, you could enter estimated hours (in the Regular Hours field) so that you can have an estimate of the labor costs. Later, after the work is completed and the craftsperson reports back to you with details of the job, you can return to this form and update the Regular Hours field with the exact hours, and optionally the date and time that the craftsperson executed the work.
- On the Service Console, select a maintenance request of any status.
- In the Work Request Details form, expand the Craftspersons panel.
- In the Craftspersons panel, click Log Work to access the Log Work form.
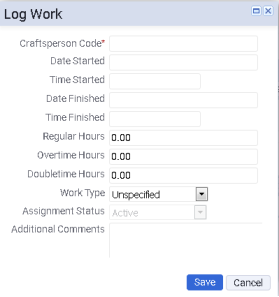
- Enter craftsperson information as follows:
- Save the craftsperson information. The Craftsperson panel of the Work Request Details form now lists this craftsperson and the Actual Costs shows the Labor Costs.
- Enter any other craftspersons who work on this job.
| Field | Description |
|---|---|
| Craftsperson Code | Click on the ellipses button to choose a craftsperson from the list of entered craftspersons in the Select Value form. If the craftsperson you require is not listed on the Select Value form, you can enter a new craftsperson directly from the Select Value form. |
| Date Start/Finished Time Start/Finished |
Complete these fields to note the length of the job. The system does not use this information in calculations; it is for your reference only. |
| Regular Hours | Enter the hours that the craftsperson worked at regular rate. The system uses this to calculate the labor cost of the job, using the hourly rate stored in the Craftspersons table. |
|
Doubletime Hours |
Enter the hours that the craftsperson worked at doubletime and overtime rates. |
| Work Type |
For more detailed reporting, you can specify the type of work (setup, cleanup, travel, etc) by choosing a value from the drop-down list. You can create multiple entries for one craftsperson in order to track the hours at each phase. For example, complete the form for craftsperson Will Tram and the hours the he spends on travel. Save the record and complete the form again to create an entry for Will Tram actually executing the work. Note that Work Types does not show in the Craftspersons panel of the Work Request Details form. Therefore, to see this information, you will need to click on the row in the Craftspersons panel and view the Work Type in the Log Work form. |
| Assignment Status | This field is not used in Archibus Foundations. |
| Additional Comments | Enter additional comments, as needed. For example, in the above image the Additional Comments field documents the overtime hours. |
Specify other costs
In addition to labor costs, you track other costs for the job, such as supplies and permits. As with labor costs, you can add these costs at any point in the life of the work request. The system will sum the total of the costs that you add and include them in Total Cost, as shown in the image below.
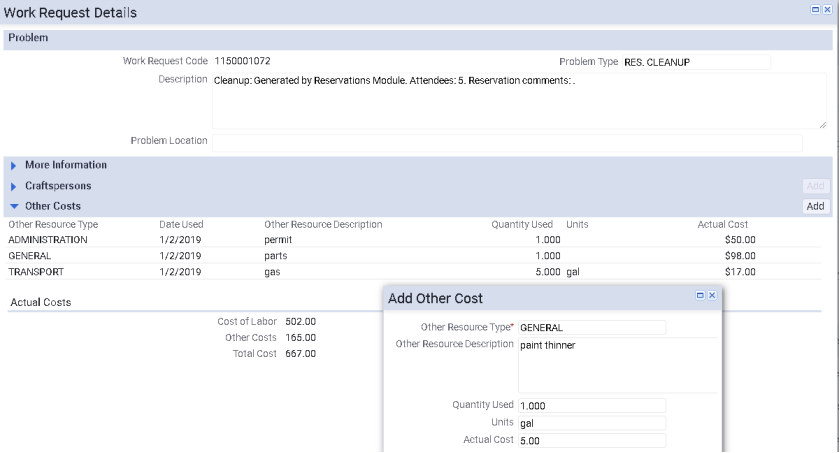
- On Service Console, select a maintenance request of any status.
- In the Work Request Details form, expand the Other Costs panel.
- In the Other Costs panel, click Add.
- In the resulting form, Add Other Cost form, complete the fields as follows:
- Save your cost. The Work Request Details form lists it in the Other Costs section, and includes the cost in the Other Costs summary at the bottom of the form.
| Field | Description |
|---|---|
| Other Resource Type | Choose one of the classifications: Administration, General, or Transportation |
| Other Resource Description | Enter a description of the cost. |
| Quantity Used / Units | For your own tracking purposes, you can enter the quantity and unit used, such as 2 gallons. The system does not work with this data; it is for your reference only. |
| Actual Cost | Enter the amount of this cost. The value you enter will be included in the Other Costs and Total Cost calculations. |