Archibus SaaS / Foundations / Background Data & Reports
Define Divisions and Departments
An organization is often divided into divisions, which in turn, are composed of departments.
For example, a company might have "Marketing Publications" and "Consumer Publications" divisions. Each of these divisions might contain Writing, Editing, and Production departments. Since each of these divisions has the same departments, the departments are identified by their owning divisions, such as CONSUMER-PRODUCTION and MARKETING-PRODUCTION. Thus, when you create a new department, you must always associate it with an owning division.
Tip: If your company does not work with divisions, you can create a placeholder division and then assign all departments to this placeholder division.
With the Background Data / Define Departments task (ab-ess-def-dp.avxw ), you can examine existing division and department details, edit the divisions and departments, and enter new divisions and departments. An important aspect of defining divisions and departments is setting the highlight pattern for each division and department. The Space Console uses this information to highlight the rooms in a floor plan according to the department or division to which they belong.
This topic has the following sections:
- To see a division's departments
- To edit a division
- To create a new division
- To edit a department
- To create a new department
- To delete a division or department
Tip: When working with the Define Departments task, you can take advantage of several actions, such as exporting data and changing the displayed fields. For details, see Working with Archibus Forms.
Tip: When working with the Space Console to assign divisions and departments to rooms on the floor plan, you may find that you want to edit the properties of these items, such as change the highlight color. Rather than return to this view to make the edits, you can edit these items directly from the Space Console. On the Space Console's Organizations tab, use the Add New and Edit features.
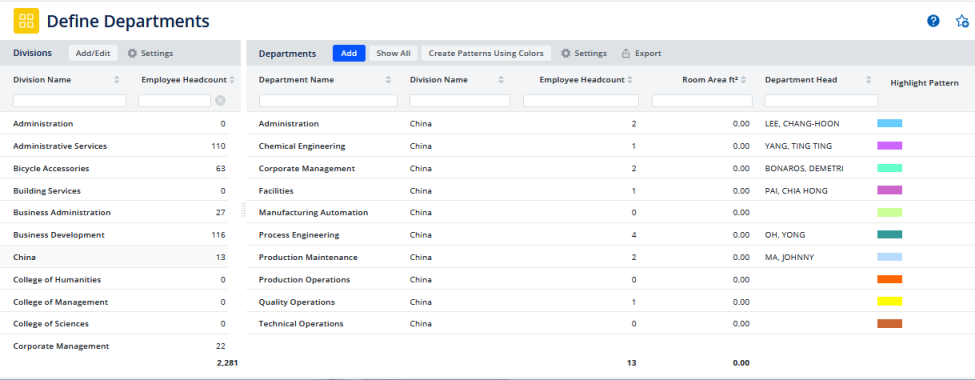
To see a division's departments
- Load the Background Data / Define Departments task.
- The left panel lists all the divisions in your organization.
- Click on a division.
- The right panel lists the departments assigned to the selected division, as well as a total of the headcount and departmental area for the departments in the selected division.
- To return to the complete list of departments, click Show All in the Departments panel.
To edit a division
- Load the Background Data / Define Departments task.
- The left panel lists all the divisions in your organization.
- Choose the Add/Edit button in the upper right corner of the Divisions panel.
- The system displays a form listing all the divisions. Choose a division. The bottom of the form lists the values for this division.
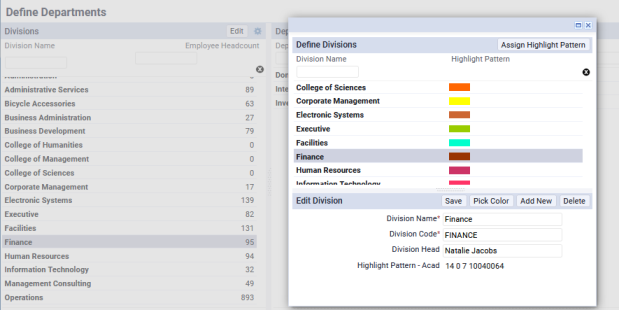
- Complete the values as follows:
| Field | Explanation |
|---|---|
| Division Name | Enter a descriptive name. |
| Division Code | Enter the value that uniquely identifies this division. This value, combined with Department Code values, will identify departments assigned to this division. |
| Division Head | Choose an existing value from the Employees table. For information on completing fields for which you choose existing values from a database table, see Completing Validated Fields. |
| Highlight Pattern - Acad |
This is the color by which you will highlight in floor plan drawings rooms of this division. Each division should have a its own color so that you can clearly distinguish the rooms of each division on highlighted floor plans. There are two methods for setting the highlight pattern:
Once you set a color, the Edit Division form lists the color's AutoCAD number in the Highlight Pattern - Acad field. When you save the Define Divisions form, the highlight color displays next to the category. For more information on highlight colors, see Defining Highlight Patterns. |
To create a new division
- Load the Background Data / Define Departments task.
- Click the Edit button in the upper right corner.
- The system displays a form listing the existing divisions, and a section for creating a new division.
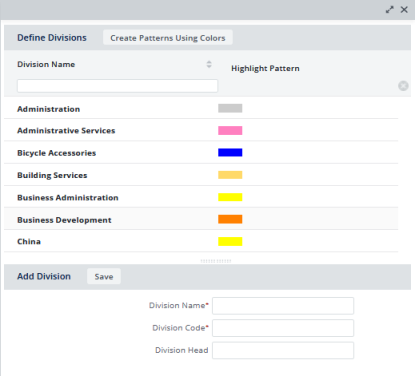
- Complete the form's fields, using the above table as a reference.
To edit a department
- Load the Background Data / Define Departments task.
- (Optional) To narrow the list of departments, in the left panel, click the division to which the department you want to edit belongs.
- In the Departments panel, click anywhere on the department record you want to edit.
- The system displays an edit form listing the values for this department.
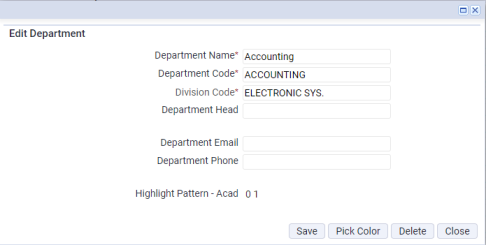
- Complete the values as follows:
| Field | Explanation |
|---|---|
| Department Name | Enter a descriptive name. |
| Department Code | Enter the value that when combined with Division Code uniquely identifies this department. |
| Division Code | Click the field and choose a divisions from the list of existing divisions. If you don't see the division in the list, you can create it using the Divisions panel on the left. |
| Department Head |
Choose an existing value from the Employees table. For information on completing fields for which you choose existing values from a database table, see Completing Validated Fields. The employee record that you choose as a department head should be specified as a manager in the Manager field of the Employees table. The Archibus Workplace has special features for users classified as department managers. A department manager is an employee who meets these conditions:
|
| Department Email | Enter the email address of the department contact; usually, this is the Department Head. |
| Department Phone | Enter the phone number of the department contact; usually, this is the Department Head. |
| Highlight Pattern - Acad |
This is the color by which you will highlight in floor plan drawings rooms of this department. Each department should have a its own color so that you can clearly distinguish the rooms of each department on highlighted floor plans. There are two methods for setting the highlight pattern:
Once you set a color, the Edit Departments form lists the color's AutoCAD number in the Highlight Pattern - Acad field. When you save the Define Departments form, the highlight color displays in the Departments panel. For more information on highlight colors, see Defining Highlight Patterns. |
To create a new department
- Load the Background Data / Define Departments task.
- In the Divisions pane, choose the division to which you want to add this department.
- Click the Add Department button in the upper right corner of the Departments pane.
- Complete the resulting form as directed in the above table. The Division Code will be pre-filled with the division that you selected. You can change this value if you wish.
To delete a division or department
- Load the Background Data / Define Departments task.
- In the Division pane, click the division you want to delete;
- To delete a division, click the Edit button. In the resulting form, click Delete. All departments assigned to this division will also be deleted. Confirm that you want to delete the record.
- To delete a department, click the division to which the department you want to delete belongs.
- Click the department you want to delete.
- In the resulting form, click the Delete button.