Sustainability & Risk / Hazardous Materials / Objectives
Use Case: Access SDSs in Emergency Response
Objective
SDSs provide clear and direct benefits to hazardous material users and occupants of a room in the event of accidents such as spills and unintended exposure. In the event of a larger scale emergency, having a comprehensive SDS inventory tied to locations provides vital information for response teams.
Suppose a fire breaks out in one end of a building. As fire fighters travel to the site, they communicate with the emergency contact for the site. Suppose the primary contact for the afflicted building who would otherwise be able to quickly recite crucial hazard information from memory is unavailable to provide advice on the contents and critical hazards in the building.
Solution
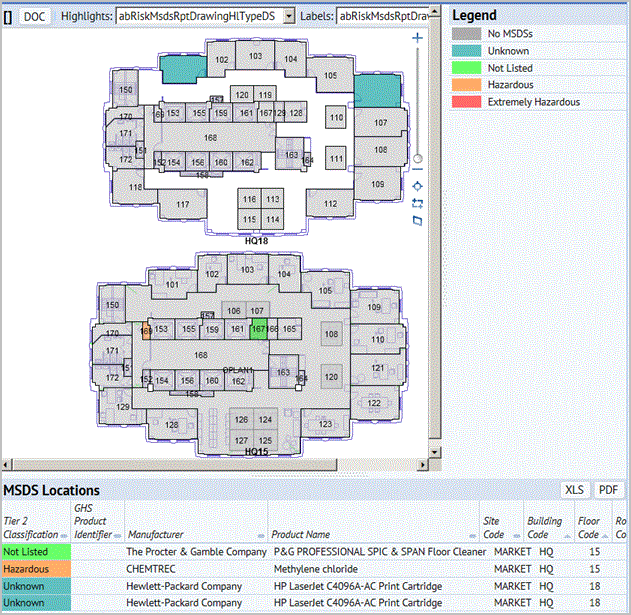
Since the Archibus SDS application captures both the location and constituent hazards, personnel available on site can sign into Archibus and, using the SDS Geographic Drill-Down report, quickly locate the building, retrieve a floor plan, and zoom to the area likely to be affected by the fire. The diagrams will highlight rooms having SDSs and the legend can be used to highlight the type and severity of the hazards at that location. A list of all SDS entries for the floor appears below the drawing. By drilling down to the highlighted rooms in the section of the building that is of concern, the system lists SDSs for those individual rooms. Now emergency personnel have the data they need to evaluate the situation and provide and appropriate and safe emergency response.
Procedure
- Select Sustainability & Risk / Hazardous Materials / Review Material Inventory / SDS Geographic Drill-Down.
- Use the drill-down selection list to expand the geographic locations to show the building.
- Select the check box for a building, and click Show Selected. The map to the right displays the building with a diamond that is color-coded to indicate the number of SDSs at that location.
- You can zoom to the area affected by the emergency using the zoom control to the right of the floor plan.
- Click the diamond for the building you are examining.
- The SDS Location Highlights view appears.
- Select the check box for the floor plan you want to examine, and click Show Selected. You can select more than one floor plan.
- The floor plans highlight rooms having SDSs, and the legend indicates the type and severity of hazards at that location.

- In the SDS Locations pane, click in the row for an SDS to see its details.
A pop-up displays SDS details for the selected SDS. The form opens to the Identification tab, but you can click any tab to see its details.
- To print the information on a tab, click the Print icon.
- To view or print the complete SDS, click the Documents tab. If you have stored the scanned SDS document in the Archibus document system or provided a link to the manufacturer's URL, there will be a link to open the SDS as a PDF.