Archibus SaaS / Foundations / Facility Services / Service Console
Workplace Services / Service Desk / Service Provider / Service Console
Find Service Requests
When you first load the Service Console, it displays a set of service requests that were requested through Archibus Workplace and are:
- assigned to you to manage. That is, you are the value for the Service Provider Assigned To field in the SLA that governs the request. For information, see Define Procedures and Service Providers.
- set to a status Requested, Approved, or In Progress
With the default operation, the Service Console does not display:
- requests for working space
- requests for meeting space (reservations)
- requests that are completed
- requests that are canceled
As described below, you can adjust this default list and include requests of other statuses and request types, as well as limit the list by specified criteria. Taking the time to control the list of service requests can improve your efficiency when working with the Service Console.
Note: If your site uses the Archibus modules and mobile apps and you are the contact for requests that were made with the modules or mobile apps (such as requests for meeting space, working space, or maintenance), these requests will appear in the Service Console.
Note: Service requests for maintenance have a special behavior. For information, see Understanding Requests for Maintenance Work.
Display requests that are hidden by default
Because requests for working space and meeting space (reservations) are automatically approved and do not require action on the part of the manager, the Service Console hides them by default. Likewise, the Service Console hides completed and canceled requests as you do not need to take action on them.
However, you may want to review these requests or cancel and edit reservations and workspace requests; in this case, you can display them in the Service Console by choosing the appropriate category from the gear icon.

If you already set a restriction in the filter console (see below) and then choose to show these hidden requests, the list includes the requests only if they meet the filter options that you have already set.
For workspace requests and meeting space requests (reservations), the Service Console is set with a permanent restriction to show only those items that are not rejected, cancelled, or closed. Therefore, if you opt to show both reservations and cancelled requests, you will not see cancelled reservation requests. The same holds true for cancelled workspace requests, and completed workspace requests and reservations.
Restrict the list using the filter console
To find the set of service requests you want to work on, the Service Console offers a filter console, located at the top of the Service Console. Complete any combination of the filter console fields: Request Type, Requestor, Status (Requested, Approved, Completed, Cancelled) Date Requested, and Date Due.

To complete Request Type and Requested By, mouse over the field, click on the ellipses button, and choose a value from the pop-up lists. Complete the date fields by mousing over the fields, clicking on the calendar button, and selecting a date from the pop-up calendar.
Unless you explicitly choose to show them, the filter results automatically omits completed, closed, reservation, and workspace requests.
Restricting by Request Type
Notice that when you click on the ellipses for Request Type, the list of types is restricted by the requests that are currently in the system. So you will only see the types for requests that are existing. In other words, if a request of type SERVICE DESK - COPY SERVICES has not been made yet, then you will not see it in the Select Value dialog until one is made.
If you want to show only reservations or only workspace requests, you must first use the gear icon to display these types (the Show Reservations, Show Workspace Requests options). Once you do so, these types will appear as choices in the Request Type form, as long as requests of these types have been made and exist in the system.
Restrict the list using the search fields
In addition to using the filter console, you can restrict the list of requests by working with the search fields, located at the top of the grid, beneath the field titles. This filtering method is handy if:
- You have already set a restriction with the filter console, but you still need to refine the list.
- You want to restrict the list of records by a field that is not offered in the filter console. First, show this column and then enter the restriction criteria in its search field. For example, you may want to search on requests associated with a certain vendor. Display the Vendor column, and then enter the vendor's name in the column's search field.
- You want to make a sophisticated restriction, such as using a "not equal to" restriction or a "contains" restriction
For example, in the below image, the user has elected to not complete the filter console, but instead has searched for requests that contain "lab" in the description and were requested after 11/1/2018. Two results were returned.

To complete the search fields, enter the value on which you are searching in the field. For date fields, you can click the calendar icon to access a pop-up calendar and select the date from there.
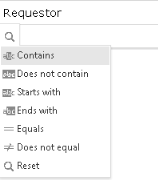
As another option, you can mouse over the magnifying glass icon to access a drop-down menu of operators that you can use in the search. The following operators are available for text fields such as Requestor:

For example, you could omit requests made by a certain requestor by using the "does not equal" option and typing their name.
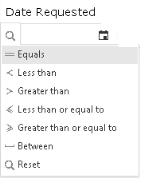
Date fields have these operators:

Clear a restriction with the Reset command from the drop-down menu.