Smart Client Extension for AutoCAD
Edit Data command
Command: AFM_EDITDATA
How to access this command: From the Ribbon, select Archibus / Asset / Edit Data, run the command from the command line, or choose it from the Navigator in CAD.
Purpose: Use this command to create new assets and to edit data for existing assets.
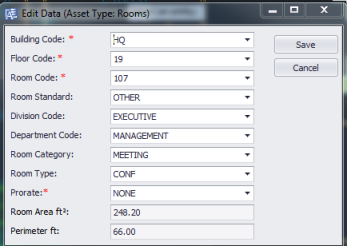
When you run this command, the system presents a dialog listing the selected item's record so that you can edit the record, or if the selected item is an entity, you can create a new record.
The fields displayed in the Asset Type dialog are determined by the default view of the selected item's asset type.
Note: For assets that belong to a room, such as equipment, you cannot change the Building, Floor, or Room information.
Editing Records for Existing Assets
Issue this command, select an asset symbol, and the command presents a dialog showing this asset symbol's linked record. This command is handy for checking the database values of an asset symbol.
To change a field's value, simply type in a new value. Fields that are displayed in gray are drawing-driven or calculated and cannot be edited.

If a field is validated, the command confirms the value you supply against a validating table. If you complete a validated field with a value not present in the validating table, the command presents an error message.
To obtain a list of values in the validating table, press the field's triangle button. The command presents the Select Values dialog box, listing the primary keys of the records in the validating table. Highlight a value, and click OK, and the command completes the validated field with the selected value.

Creating New Assets
To change a regular drawing entity, such as a block or a polyline, into an asset symbol, issue the Archibus / Asset / Edit Data command and select the entity. The command presents an Asset Type dialog so that you can provide a primary key and other information.
Since the selected item is an entity without a database connection, how does the command know from which table it should present an empty record? The layer on which the item is located determines its asset type and the table in which the record is created. For example, if a polyline entity is located on the Room prototype layer, it will be registered in the Rooms asset table.
Use the Asset Type dialog to define values for the selected entity. You must enter at least a primary key to identify the record. (If the asset type is auto-numbered, the program generates the primary key). The command completes the item's drawing-driven fields, such as the Area and Entity Handle fields.
Once you process the Asset Type dialog, the program generates a record with the specified values and links it to the drawing entity by registering the table name and primary key in the entity's extended entity data. The program then moves the entity from the prototype layer to the asset symbol layer and generates asset text.
When you use the Archibus / Asset / Insert Asset command to create the drawing entities, the entities already store their standard. Accordingly, when you issue the Edit Data command to convert an inserted entity to an asset symbol, the Asset Type dialog will show that the standard field has a value. You can retain or change this value.
Running the Command
To run the Edit Data command:
- From the Ribbon, select the Archibus / Asset / Edit Data command.
- Select an asset in the drawing.
The Asset Type dialog appears.
- Select the record.
Use the ellipsis button to select records that are not already attached to an asset symbol. For example, to create a room asset, select the ellipsis button for the Room Code field to select the room record for the asset symbol. If there are no records in this list, this means that there are no unattached records.
You can also type in a new value to create a new record. For example, you can enter a value for the Room Code field to create a new room record to associate with the room asset symbol in the drawing.
- Enter additional data for the record.
For multi-part keys that include the Building and Floor Codes, the system fills in these keys using the space hierarchy values for the drawing (such as Building Code and Floor Code for a room asset) and you are not able to edit these keys.
- Click Save to create the asset.
- To add additional data for the record, use a Smart Client task. For example to define additional information for a room record, use the Space / Space Inventory / Room Inventory / Draw Rooms task (which loads the Rooms database table) to add additional data for a room record.