Smart Client Extension for AutoCAD
Adding Areas with Rectangles and Polylines
Facility managers need to depict areas such as rooms, suites, vertical penetration areas, and gross areas in their floor plan drawings. A building architect, landlord, or company draftsperson may have supplied you with CAD floor plan drawings that depict walls, support columns, and other structural elements. In this case, you need to add facilities polylines to these drawings to represent the various areas on a floor.
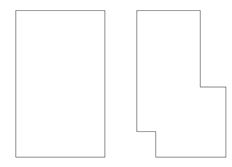
A polyline is a drawing entity composed of one or more line segments or curves that the program treats as one entity. In the following image, the item on the right was made with Home/ Draw / Polyline command; the items on the left was made with the Home / Draw / Rectangle command.
You can use the drawing's wall and column information to add gross area, vertical penetration, and room polylines, and then insert furniture and equipment blocks within these polylines.
To add facilities polylines to a floor plan drawing
- Set a rectangular snap grid of 6 inches or 1 inch, depending on your required level of accuracy.
It is usually not necessary to draw an architectural reference grid because your drawing already has reference points. You can use these reference points as a basis for developing your polylines. For example, use relative coordinates and polar snap to place the polylines exact distances and angles from existing points - Add your area polylines.
Note: When drawing polylines to represent boundaries on floor plan drawings, you can use open polylines. For example, if a drawing contains an interior gross floor area, you can represent a room by drawing a polyline to meet the Gross Area polyline. However, most users find it easier to use rectangles or closed polylines to depict their floor areas.
To draw a polyline
- From the Navigator in CAD, select a task to draw a polyline, such as Space / Space Inventory / Room Inventory / Draw Polyline.
- In the status bar, the command prompts you to choose a starting point. Click to choose this point.
- In the status bar, the command prompts you to choose the next point. Drag the mouse to select this point and click.
- Continue selecting points until the polyline is of the desired shape.
- If you are not satisfied with the previously drawn segment of the polyline, you can cancel it by typing U, Space for the Undo option keyword.
- When the polyline has at least two line segments, you can close the polyline by typing C, Space for the Close option keyword. This closes the polyline by drawing a line from the current point to the polyline’s beginning point and exits the command.
To draw a rectangle
- From the Navigator in CAD, select a task to draw a rectangle, such as Space / Space Inventory / Room Inventory / Draw Rectangle.
- In the status bar, the command prompts you to choose a point representing the rectangle’s corner. This can be any of its four corners.
- Drag the mouse to specify the rectangle’s size and locate its opposite corner. For example, if the first point you defined was the rectangle’s upper left corner, drag the mouse to choose its lower right corner.
- As you drag the mouse, AutoCAD outlines the rectangle. When you are satisfied with the location of the opposite corner, click the mouse.