Archibus Web Central
Restricting Data Using a Filter Console
If there is a large amount of data, you may want to restrict that view so that not all of the data is displayed, such as showing only employees of a specific department. Many views offer a filter console in the top frame to filter data.
The filter console displays a series of fields that you can use to enter restriction criteria. All restriction criteria are optional, unless a red asterisk (*) is displayed next to the field. For example, in the below filter, you can restrict data by location, building, property, or cost category. The more fields you enter in the filter console, the narrower your search results will be, as to be shown in the results, an item must match all the criteria you enter.
If you do not want to enter a restriction, click Show without making any entries, and the view presents the data without a restriction.

After you enter your restriction criteria, click the Show button to display data in the lower pane.
Once you set the restriction, you may wish to hide the Filter console so that you can display more of the view. As you examine your data, remember that you are working with a restricted set of data. If you need a reminder of the restriction, simply redisplay the Filter console.
If a restriction is in effect and you export the view to Excel, the system considers the restriction and exports only the data meeting the restriction.
Note: After you click the Show button, you may need to wait a few seconds for the view to load. This delay will occur if you are loading a view with a large number of fields, or if you have a slow Internet connection. You can view your loading status in your browser status bar.
About the Maximum Number of Records Displayed
When you click the Show button, only the data that is included in your restriction criteria is displayed up to a maximum number. By default, the maximum number is 200 records. If there are more than the maximum number of records that meet your restriction, a message informs you that not all records that exist for that restriction are shown. In these cases, consider setting a different restriction that shows less than the maximum number of records.
If you want to see all records meeting your restriction, and the view includes an export to DOCX or XLS button, when you export the data, all the records in the database that meet your restriction are exported.
Using Smart Search in Select Value Lists from Filter Consoles
If the restriction criteria include Select Value lists, you can use the Smart Search feature with these lists.
Smart Search enables you to type a partial entry in the list box field before selecting the Select Value button ( ). This limits the Select Value list to only the values that include the entry you make. You can also use the % operator as a wildcard to indicate the position of your partial entry in the value. See Using Partial Entries and the Wildcard (%) in Select Value List Smart Searches.
Selecting Multiple Values from Select Value Lists
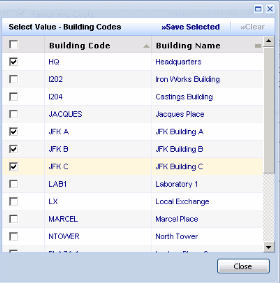
Some filter consoles include Select Value lists that enable you to select multiple values to use in the filter. For example, you could select multiple buildings that you want to review in one report. You select the check box for the values you want to include and click Save Selected.

After you save your selections, the selected values are shown in the field. If the selected values exceed the space for the field, mouse over the field and a tooltip shows the complete list of selected values.

Note: The items in the Select Value list are clickable links; click an item when you want to select a single value. Clicking the item closes the Select Value dialog with your single selection showing in the form.
Note: When setting a filter restriction, you can typically filter by more than one field. However, you should multiselect on only one part of a multipart key, so that the selection happens correctly. In other words, multiselect only sites, or only buildings, not buildings and sites. Otherwise, some erroneous combinations can occur.
Note:. In Filter consoles, the separator for the values is a comma plus a Unicode character "zero with non-joiner." When entering filter criteria for fields that allow multiple selections, if you manually remove a value, only the comma might be removed, which would cause a workflow rule error to occur.
Selecting Values from Multiple Pages
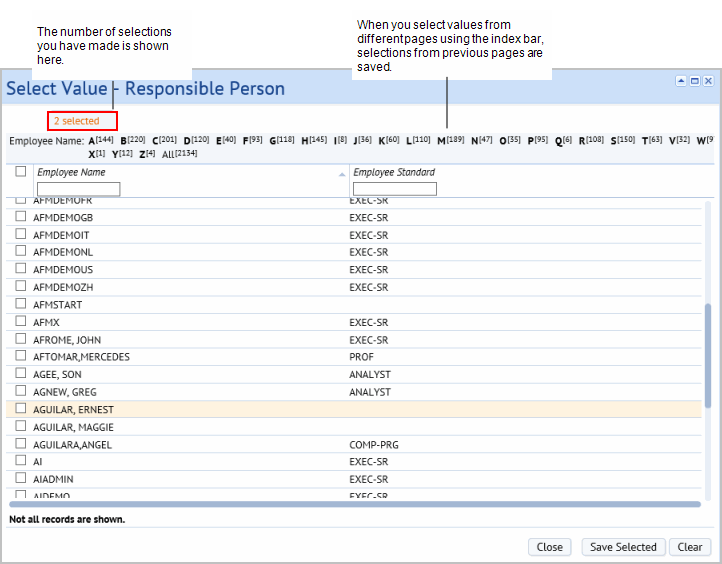
When selecting multiple values as filter criteria, you might have to page through several pages of records to find your selections. When you select a value from one page, and then move to another page, your previous selections are saved.
The following image shows a Select Values form that includes an index to access multiple pages of values. The form tracks the number of selections you make on all pages, and applies all of the selections to the filter when you save and close the selection box.

Using the Main and Date Filter Consoles
Some views, such as the tasks that you use to locate and work with compliance events, include two Filter Consoles:
| Filter | Description |
|---|---|
| Main Filter | Enables you to restrict the view by a variety of criteria; for example, you can show only events for specific regulations, programs, requirements, or locations. To target your most critical regulations, you can restrict by Regulation Rank, or to target the events that are most at risk for non-compliance, you can restrict by compliance level code. |
| Date Filter | Enables you to locate events by entering date ranges using the Date Requirement, Date Start and End, Date Required, Date Actual Start, Date Completed, Date Verified, and Date Closed |
The restriction uses the selections you make on both filters, so you can set a restriction using both a date restriction and a restriction using one of the criteria found on the Main Filter.
You toggle between these filters using the Show Main Filter/Show Date Filter buttons.