Space / Space Inventory / Space Manager / Assign Room Attributes and Occupancy task (Transactional)
Space / Occupancy/ Space Manager / Assign Room Attributes and Occupancy task (Transactional)
Using a Room Form to Edit Room Properties
In addition to assigning room attributes from the room plan, you can use the Assign Room Attributes and Occupancy task to access a form for editing the following room properties:
- Room Category and Room Type
- Division Code and Department Code
- Employee Capacity
- Room Standard
- Room Name
- Prorate
- Room Number
- Building Code and Floor Code
Note: You can also edit rooms by right clicking on a room when using the Worspace Transaction Console.
This form has several uses:
- Edit multiple attributes at once. For example, change both the room standard and the room category and room type at one time.
- Edit attributes that are hat are not available to edit by clicking on the room. You may need to change these values if you make an attribute change from the drawing.
For example, suppose you use the Assign Room Attributes and Occupancy task to change a room from a storage area to an office by selecting the Office room type and then selecting the room on the floor plan. A storage area room's cost is typically shared among the departments of the floor or building and therefore has a Prorate value. Now that the room is an office to be used exclusively by one department, you need to change the Prorate value to None to reflect that this is not shared by among multiple departments. Similarly, as a storage area it should have had an Employee Capacity of 0; this now needs to be updated to reflect how many employees can be housed in the room. To make these changes, access the Edit Room form as described below.
- Edit attributes for any room, not just those rooms depicted in the drawing. See the below procedure.
- Delete a room.

To select a room from the drawing and edit its attributes
- The system presents a filter console, and a drill-down tree for selecting the floor plan.
- If you have several records to drill through, you may wish to use the filter at the top of the view. The filter limits the drill-down frames to showing just the data that you indicate in the filter.
- For example, if you want the drill-down frames to present only floors in the HQ building, set the Building Code to HQ in the filter console.
- Select the floor whose rooms you wish to edit. The drill-down frame presents only those floors for which CAD drawings have been developed.
- Once you select the floor, the system presents its drawing in the right pane.
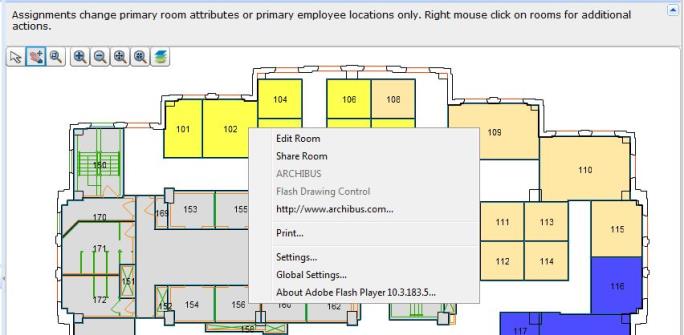
- Right-click on a room and choose Edit Room from the pop-up menu.
- The resulting form displays information for this room. Edit these values as necessary.
- When you have finished your edits, save the record.
To edit properties of any room
As described above, to use this task, you select a room, right-click to access the pop-up menu, choose Edit Room, and receive a form with a filter restricted to the selected room. However, if you clear the values in the filter, you can edit properties of any existing room, create new rooms, and even create new sites, buildings floors, and rooms.
After you select a room from the drawing and the system displays a form for editing the room's properties, you must display the filter by clicking on the small triangle button at the top of the frame. Similarly, display the space hierarchy tree navigation in the left panel by clicking on the small triangle button on the left side of the frame.
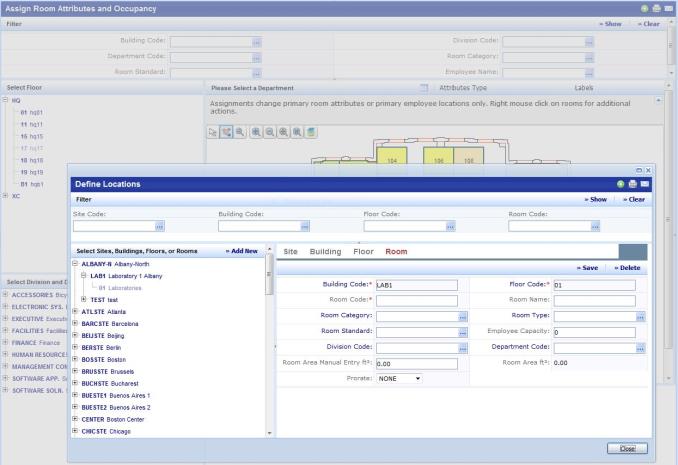
For example, in the below image, the user selected a room on HQ17, chose Edit Room from the right-click menu, cleared the filter, and displayed the space hierarchy tree in the left frame. The user can now make any edit to a room in any building; in this case, the image shows editing building LAB1 even though the form was originally accessed from the HQ17 floor plan.

To edit any room or any part of the space hierarchy:
- Select the Assign Room Attributes and Occupancy task.
- The system presents a filter console, and a drill-down tree for selecting the floor plan. In this case, you can display any floor plan, as the floor plan is the vehicle for accessing the form for editing all rooms.
- Once you select the floor, the system presents its drawing in the right pane.
- Right-click on a room and choose Edit Room from the pop-up menu.
- The system displays the Define Locations form.
- Use the resize button at the top of the form (small triangle button) to display the filter at the top of the form and in the filter, clear the Building Code, Floor Code, and Room Code values. Choose Show to apply this change.
- Use the resize button on the left of the form to display the space hierarchy navigation tree in the left frame.
- If you wish, you can maximize the Define Locations form.
- Edit, delete, and create entries for the space hierarchy as needed.
- When you have finished your edits, save each record.