Archibus SaaS / Maintenance / Corrective Maintenance / BIM Viewer
Maintenance / Corrective Maintenance / Supervisor / BIM Viewer
Assets / Assets / Asset Manager / BIM Viewer
Assets / Enterprise Assets / Facility Asset Manager / BIM Viewer
Work with Equipment Systems in the BIM Viewer
Many equipment items are organized into equipment systems -- collections of assemblies and components. For example, an HVAC system is an equipment system that consists of the following assemblies: duct work, fan coil unit, dampers (fire / smoke), VAV, hot water heating steam system, and chilled water system. These assemblies are, in turn, made up of components.
The BIM Viewer provides methods for viewing an Archibus equipment system in a hierarchical list in the Systems Explorer, as well as in the BIM model.
This topic has the following sections:
Trace Menu
You work with equipment systems using the Trace menu, as well as the Group by System option in the Assets tab.
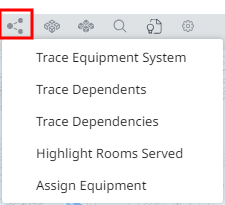
The Trace menu offers the following commands.
| Command | Description |
|---|---|
| Trace Equipment System | Click on an asset, and the command show the items it depends on in red and the items that depend on it in green. |
| Trace Dependents | Click on an asset, and the command show the items that depend on it in green. |
| Trace Dependencies | Click on an asset, and the command show the items that this item depends on it in red. |
| Highlight Rooms Served | Click on an asset. In the system tree, the command highlights in blue the row for the selected asset. In the Viewer, the command highlights the selected asset in blue and highlights the rooms served by this asset in green. |
| Assign Equipment | Click on an asset and you can see the equipment systems to which it is currently assigned, as well as assign the item to an equipment system. |
Review Equipment Systems in the Model
To review the equipment system in the model, you use the Trace commands from the menu.
The following example uses the Trace Equipment System command so that you can see the entire system in the model; use Trace Dependents and Trance Dependencies when you want to focus on just these relationships.
Example Procedure
-
Load a model.
-
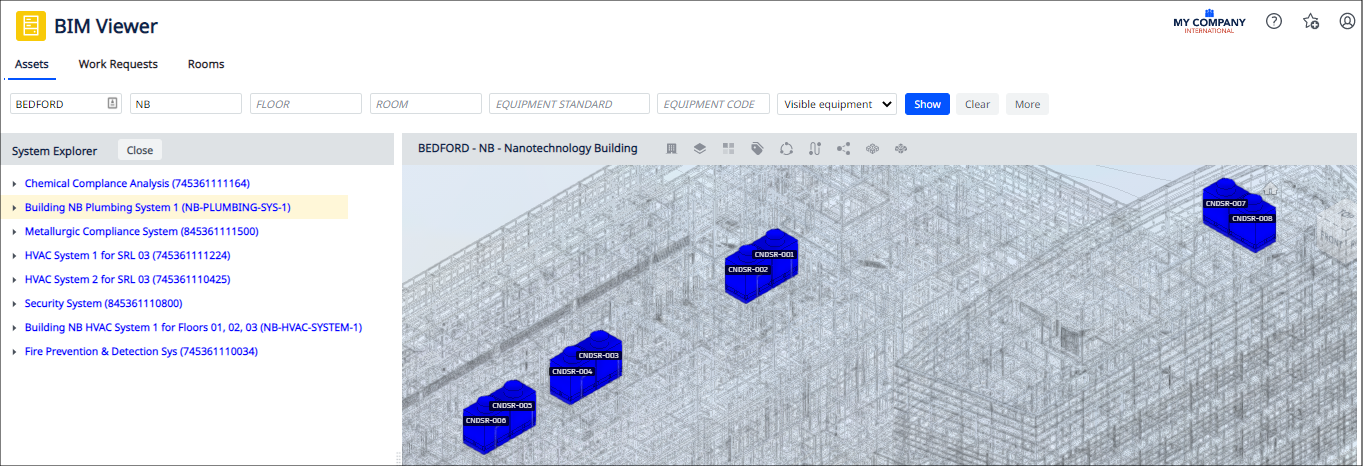
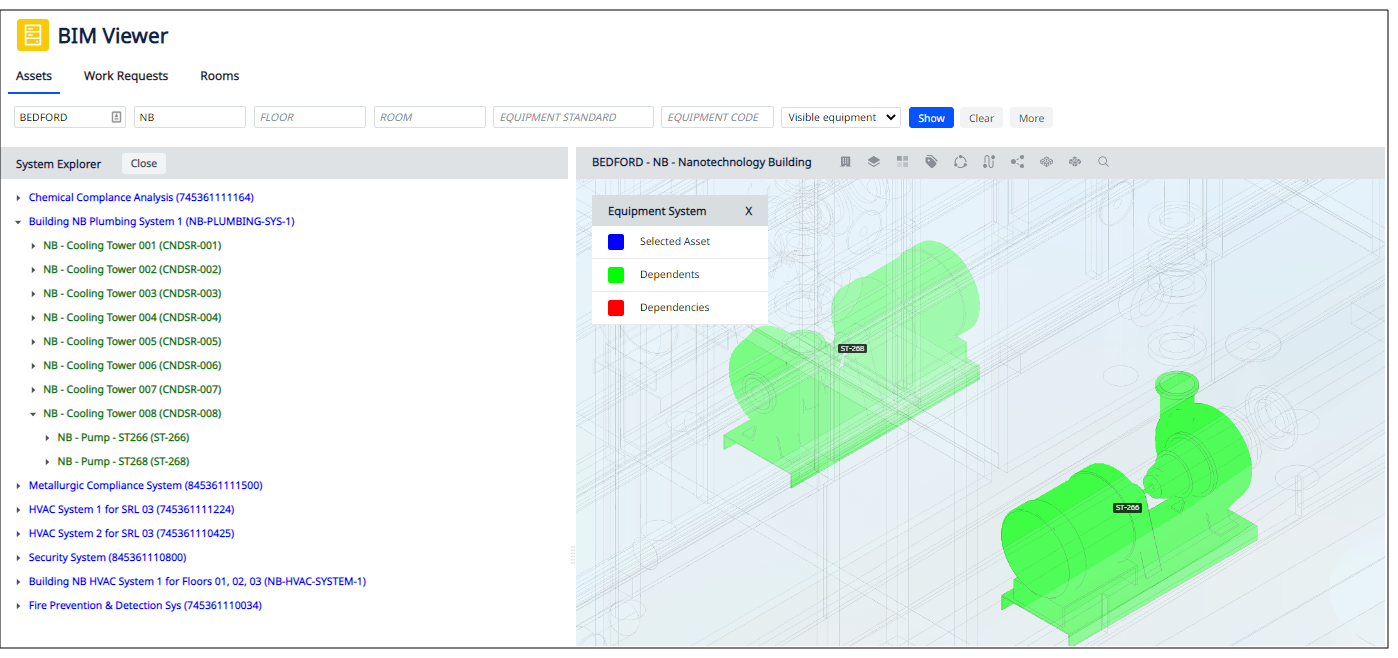
In the left pane, make sure the Assets tab is active and choose Group by Systems. This opens in the left pane the System Explorer, which presents a list of all systems in the building.
-
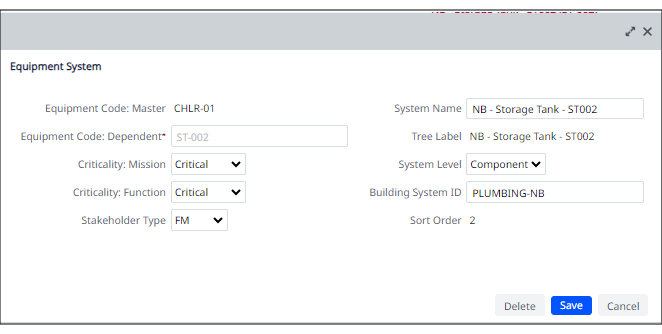
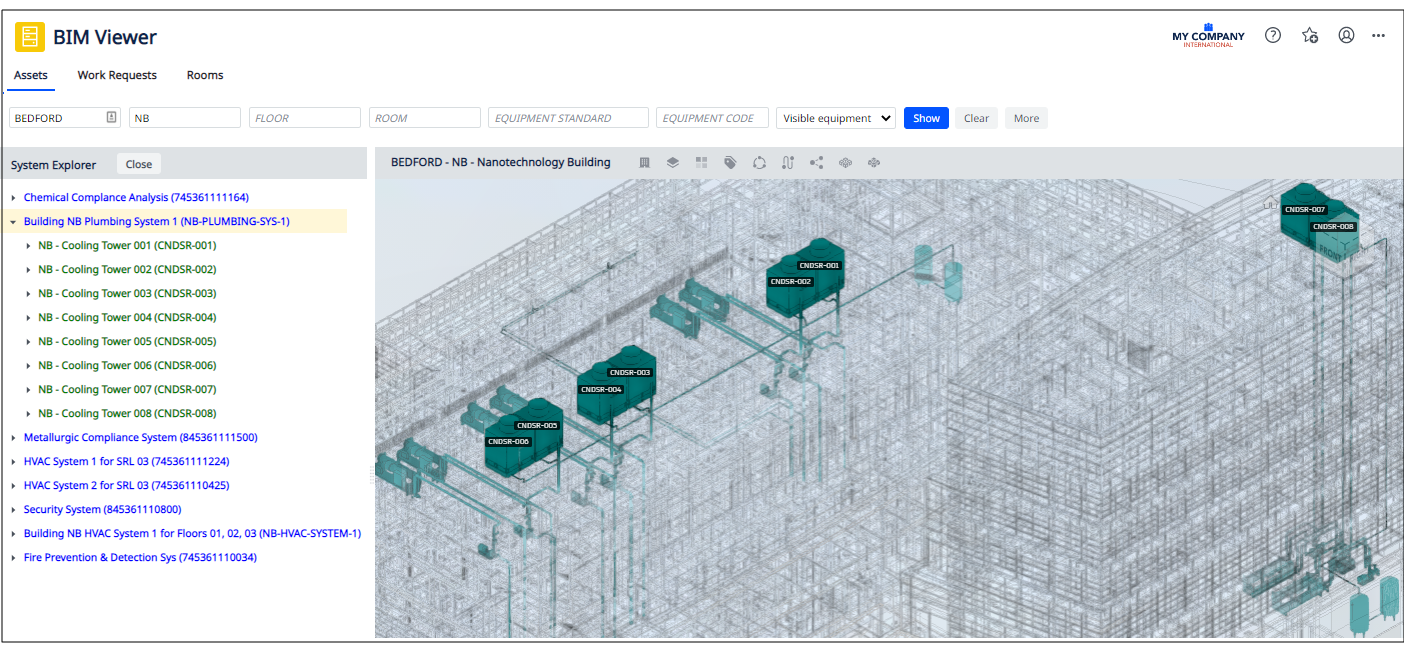
Click on a system in the list, such as Building NB Plumbing System. The model highlights the first level of the system; it does not indicate subsequent levels in the model.
-
To see other components of the system in the model, click on an asset and close the Equipment Details form. Next, invoke the Trace command from the menu.
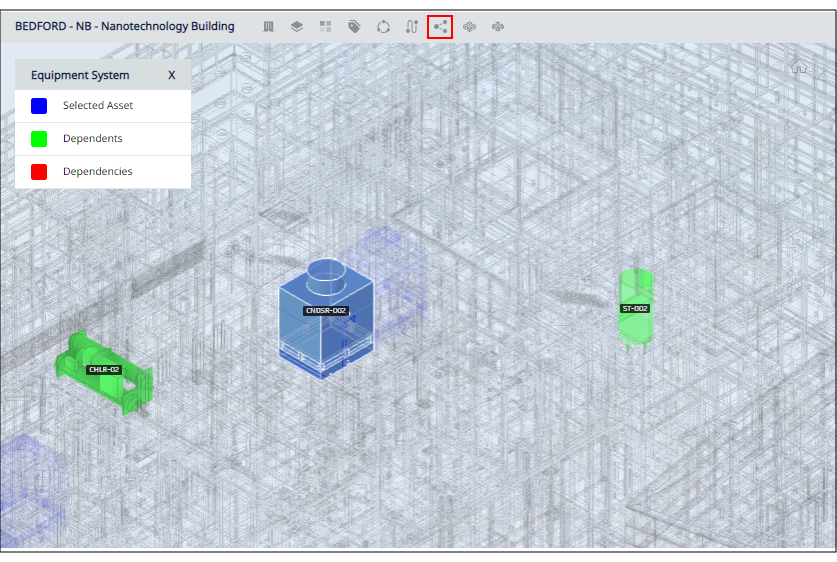
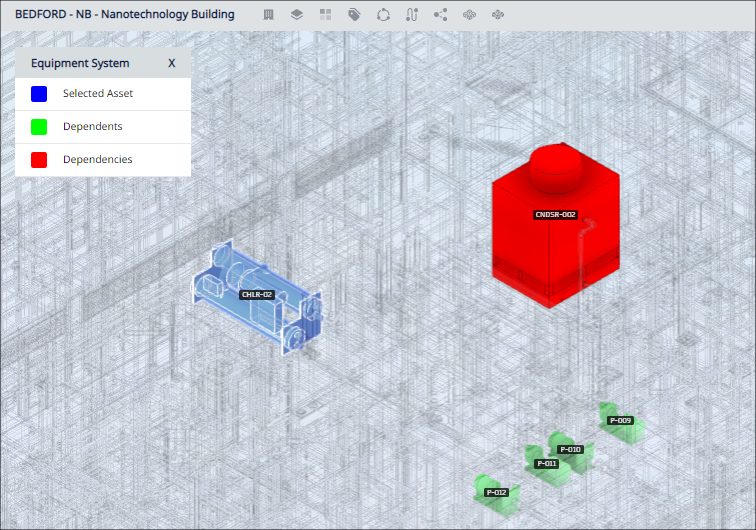
For example, the below image shows clicking on the cooling tower CNDSR-002 (the left cooling tower of the set of far right cooling towers in the above image) and invoking the Trace Equipment System command from the menu. The Viewer zooms into the item, displays it in blue, and displays its dependents in green.
-
You can continue tracing the equipment system by selecting one of the dependent items.
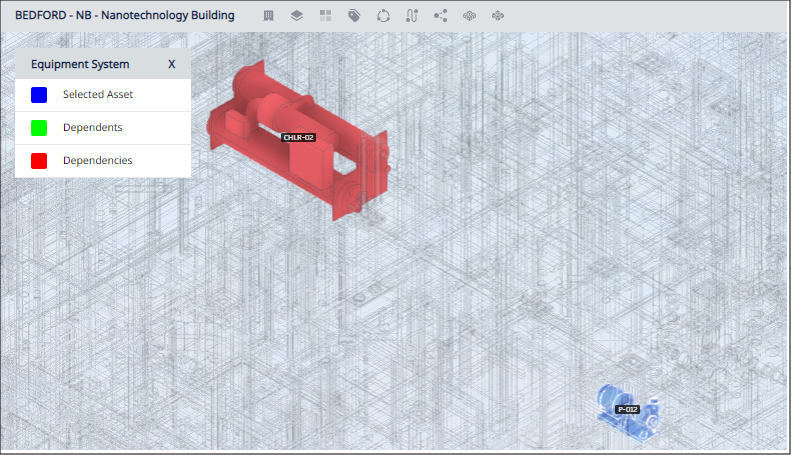
For example, select the chiller located to the left of the cooling tower and click Trace Equipment System. The Viewer zooms into the cooler and displays it in blue, and shows its dependencies and dependents. In this case, the chiller has four dependent pumps (in green) and is dependent itself on the cooling tower (in red).
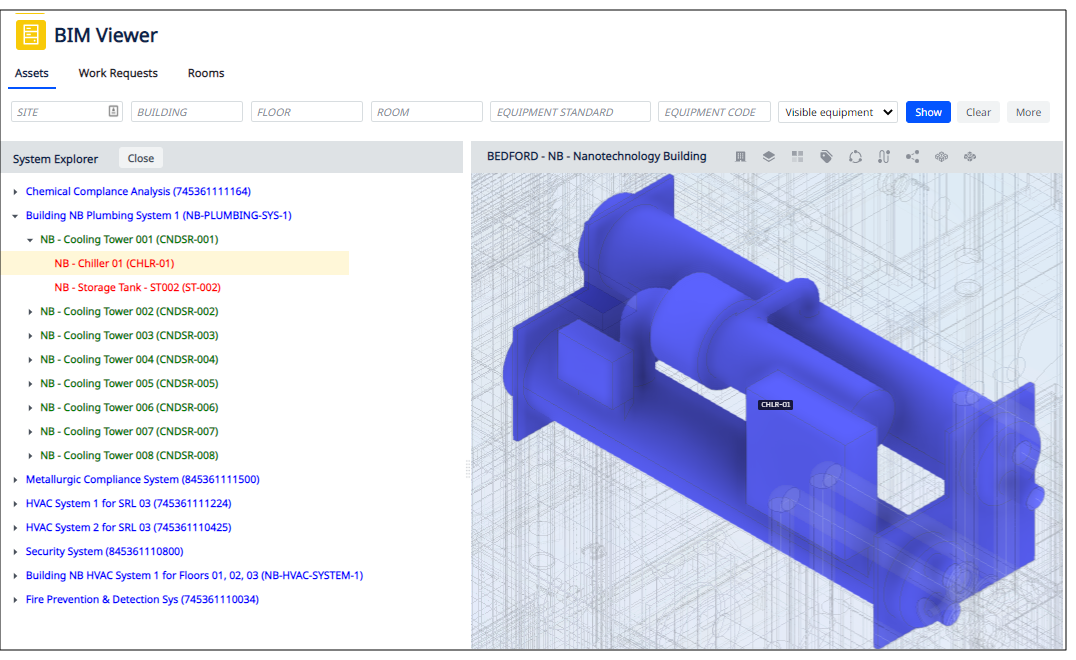
Finally, click on a pump, run Trace Equipment System, and you see that the pump (in blue) is dependent on the chiller (in red) and that the pump has not items dependent on it.
Alternate Procedure
In the above example, tracing an equipment system started by first selecting the equipment system in the System Explorer window, displaying the overall system in the model, and selecting items in turn.
You can also trace equipment systems working strictly in the model.
-
Click on an asset in the model. Close the Equipment Details form.
-
Invoke Trace Equipment System from the menu.
-
View the equipment system, and continue to trace its components using the Trace commands, as described above.
Seeing the System Trace on a Selected Level
If you select Trace Equipment System and then pick a floor from the Levels list, the model keeps the system visible on the selected floor.
For example, suppose you run Trace Equipment System for the cooling unit CNDS-008 in building NB and the Trace command highlights two dependent pumps on Level 00 (Foundations Level). Next, you choose Level 00 from the Levels list; the model will zoom to Level 00 and show only the system components that are located on this level -- the two dependent pumps. The pumps retain their trace highlight color.
Review Equipment Systems Using the System Explorer
You can also review equipment systems working from the Systems Explorer (located in the Assets tab when Group by Systems is selected). The Systems Explorer uses these colors to indicate an item's position in the system.
| Color in System Tree | Indicates |
|---|---|
| Blue | The item is a system. |
| Green | The item is an assembly which has its own sub-items. |
| Red | The item is a component. |
-
Load a model.
-
In the left pane, make sure the Assets tab is active and choose Group by Systems. In the left pane, this opens the System Explorer, which presents a list of all systems in the building.
-
In the System Explorer, expand a system by clicking on the chevron-shaped icon to the left of the text. Drill into the system as desired to obtain an alphanumeric listing of the equipment system.
-
For any item displayed in the system tree, click on it to see it in the Viewer. The Viewer zooms into the item.
-
Click on another entry in the system tree to see it in the Viewer.
-
For any item you display in the Viewer, you can now click on it and use the Trace commands to see its related items.
Review Equipment Systems in Terms of Revit Mechanical and Plumbing Systems
Your Revit model might contain mechanical and equipment systems that you can see with the BIM Viewer's Mechanical Systems and Equipment Systems commands. The Archibus equipment system features divide these overall systems into smaller systems. You can use the Archibus equipment system features and Revit Mechanical and Plumbing System features together. You might trace the components of an Archibus equipment system and then run the menu's Plumbing System command to see how this equipment system fits in with the overall plumbing system.
For example, in the below image the user has clicked NB-PLUMBING-SYS-1 in the System Explorer and the Viewer highlighted and labeled the top-level items in this system. The user than ran the Plumbing Systems command from the menu and elected to see all Revit plumbing systems. The top-level items of the Archibus equipment system retained their labels so that you can distinguish these items from the overall plumbing system. To hide the Revit plumbing system, re-select the NB-PLUMBING-SYS-1 record in the System Explorer.
Show Rooms Served by an Equipment System
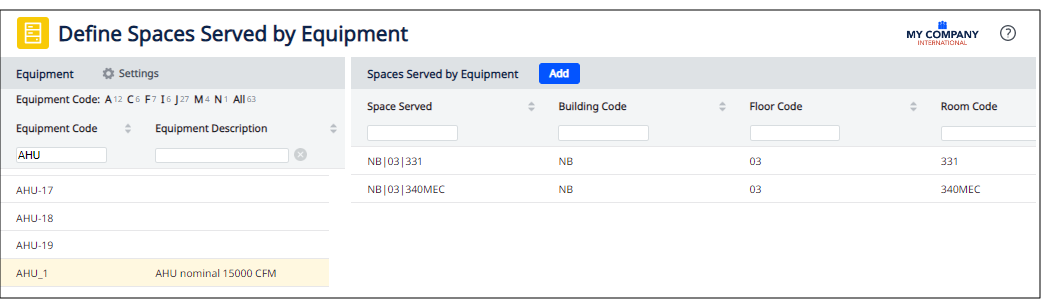
You may want to visually see the rooms that an asset or its equipment system is serving. To use this feature, you must first set the relationship between the asset and the rooms using the Define Space Served by Equipment task.
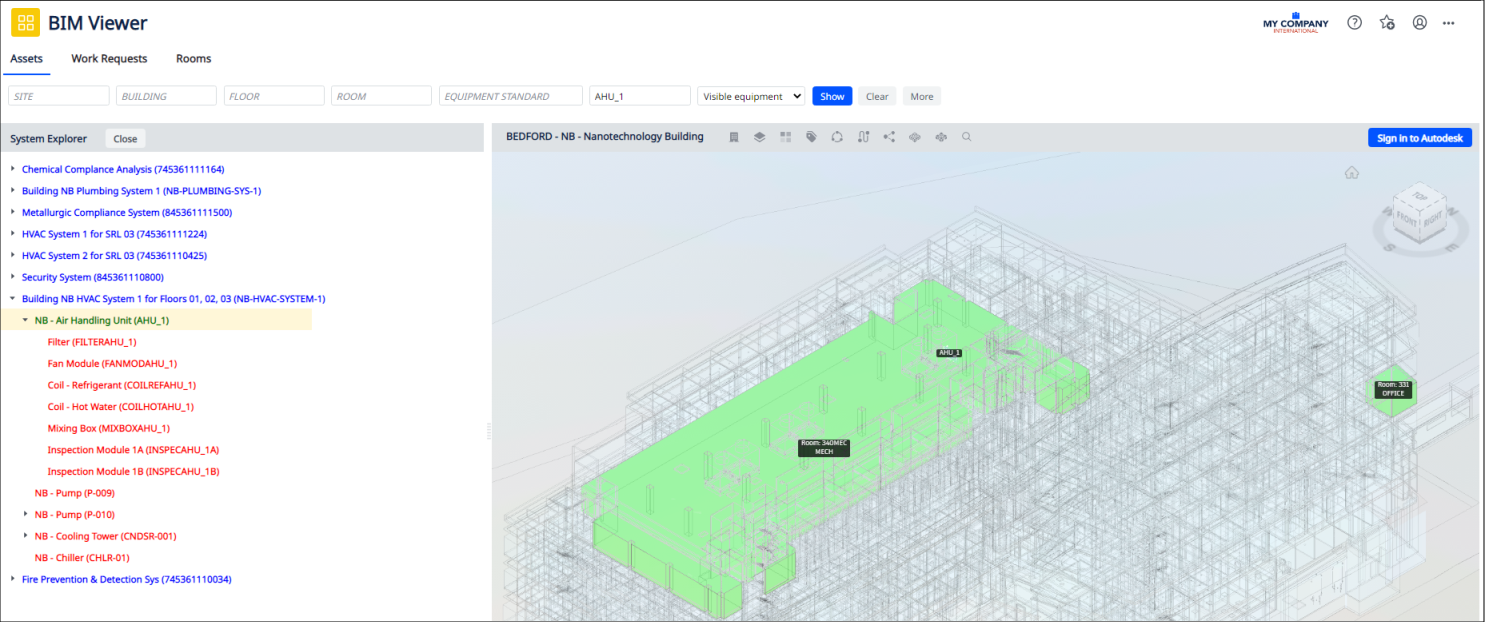
For example, the above image shows that equipment AHU_1 serves rooms 340MEC (the large mechanical room) and 331 (an office room). This relationship was established with the Define Space Served by Equipment task.
Procedure
-
In the left pane, make sure the Assets tab is active and choose Group by Systems. In the left pane, this opens the System Explorer, which presents a list of all systems in the building.
-
In the System Explorer, expand a system by clicking on the chevron-shaped icon to the left of the text. Drill into the system as desired to obtain an alphanumeric listing of the equipment system.
-
For any item displayed in the system tree, click on it to see it in the Viewer. The Viewer zooms into the item.
-
Click on the desired item in the Viewer. In the Trace menu, choose Highlight Rooms Served.
-
For the selected asset, the Highlight Rooms Served command:
-
Zooms out, so that you have a better view of the floor.
-
Displays rooms in the model, if they are not already displayed
-
in the Systems tree, highlights the row for the selected asset in blue
-
In the Viewer, highlight the selected asset in blue. You may need to zoom in to see this.
-
In the Viewer, highlights the rooms served in green.
-
Assign Equipment to a System
Directly from the BIM Viewer, you can assign one or more equipment items to an equipment system using the Assign Equipment command from the Trace drop-down menu (pictured at the top of this topic).
With the Assign Equipment command, you can:
-
assign an unassigned item to an equipment system
-
move an asset that is already assigned to a system to another system
You make these assignments by dragging an asset from the Inventory Tree panel (its current system) or the Unassigned List panel (the equipment item is not assigned to as system) to a position within a system listed in the System Assignments panel. This feature works similarly to assigning an equipment item to a system using the Equipment Systems Console.
Assign an Unassigned Item to an Equipment System
-
Load a model and zoom into it to find the equipment item you wish to assign.
-
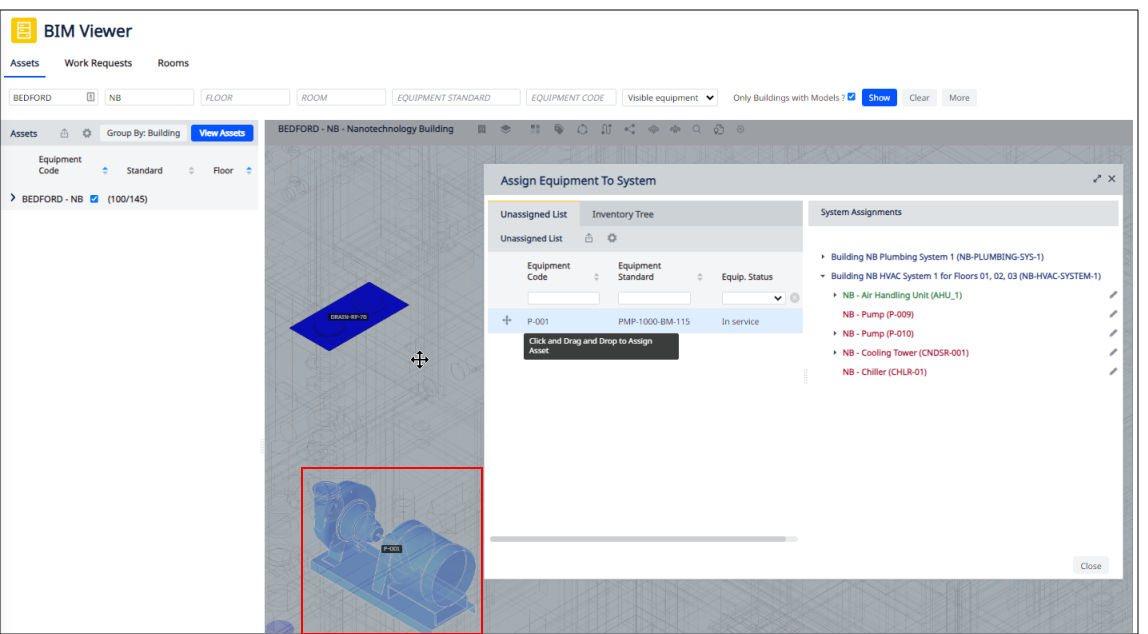
In the Viewer, select the asset and invoke the Assign Equipment command from the Trace menu.
-
The BIM Viewer presents the Assign Equipment to System form.
-
If the asset is not part of an equipment system, it is included in the Unassigned List on the left side of the form. For example, in the above image, the user has selected P-001 in the model, invoked Assign Equipment, and the BIM Viewer lists it in the Unassigned List.
-
If the selected item is part of a system, the Unassigned List will be empty. If you move to the Inventory Tree tab, you will see the item's currently assigned system.
-
-
In the right side of the Assign Equipment to System form, expand the system to which you want to assign this item and drill down to the proper level.
-
You can drag the item from the Unassigned List to the proper position within the hierarchy in the right column.
Move an Asset that is Already Assigned to a System to the Correct System
You may need to fix errors in system definition or edit system assignments. For example, you may need to change the level within a system or assign an item to a new system.
-
Load a model and zoom into it to find the equipment item you wish to assign.
-
In the Viewer, select the asset and invoke the Assign Equipment command from the Trace menu.
-
The BIM Viewer presents the Assign Equipment to System form.
-
If the asset is not part of an equipment system, it is included in the Unassigned List on the left side of the form.
-
If the selected item is part of a system, the Unassigned List will be empty. If you move to the Inventory Tree tab, you will see the item's currently assigned system.
-
-
In the right side of the Assign Equipment to System form, expand the system to which you want to assign this item and drill down to the proper level.
-
Drag the item from the Inventory Tree to the System Assignments tree. As you hover over a valid position in the hierarchy, the drag action changes from red to green to indicate that the item can be added to this position in the hierarchy.
For either procedure, if you make an error click the pencil-shaped icon to access the Edit form and delete the assignment.