Archibus SaaS / Assets
Assets / Enterprise Assets
Assets / Assets
Asset Disposal Console: Overview
The Asset Disposal Console guides you through the process of evaluating whether and how to dispose of assets, marking assets for disposal, and updating your inventory when you do dispose of an asset. You can review historical activities for an asset, such as completed , closed or archived work requests, to help you evaluate the asset, and can assign assets to a disposal process.
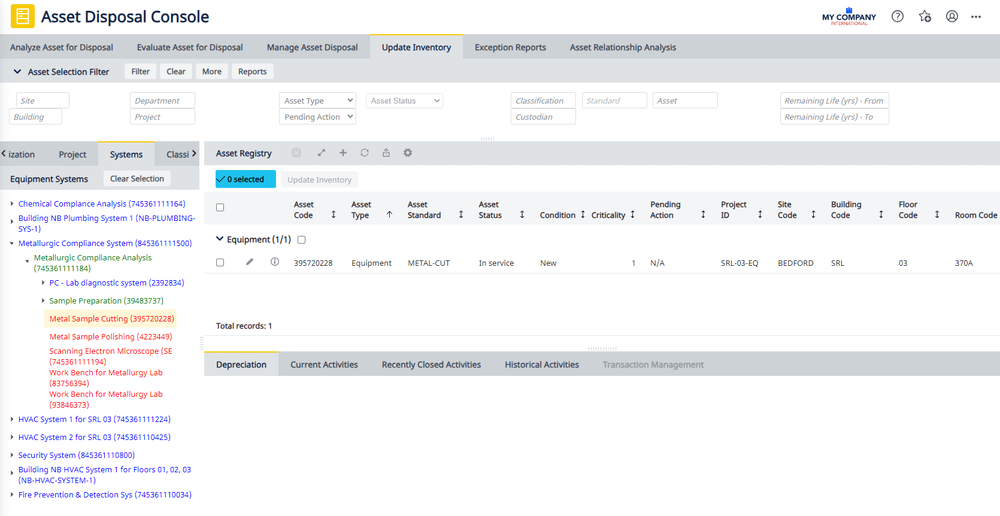
You can access the console's tabs in any order so you can easily work with assets in each stage of the process. However, when getting started, you must first mark some assets for disposal or evaluation in order to work with these assets from the appropriate tabs.
You can edit equipment information from the Asset Registry pane on any of the tabs by clicking on the equipment item in the grid. From the Update Inventory tab, you use the Edit button to access the edit form. See Adding Equipment for a description of the data you can edit.
For information on the Reports accessed from the Reports button, see Reports for Enterprise Assets and Assets.
Access this console
You can access the Asset Disposal Console from the following locations:
- Archibus SaaS / Assets / Asset Manager
- Archibus SaaS / Assets / IT Asset Manager
- Assets / Assets / Asset Manager
- Assets / Assets / IT Asset Manager
- Assets / Enterprise Assets / Finance Asset Manager
- Assets / Enterprise Assets / Department Asset Manager
- Assets / Enterprise Assets / Facility Asset Manager
- Assets / Enterprise Assets / IT Asset Manager
Procedure
The Asset Disposal Console guides you through the steps of evaluating assets for disposal.
- Analyze assets for disposal opportunities. In this step, you determine if the asset or group of assets should remain in the active inventory, be evaluated for disposal or disposed of. Typically, you mark assets for evaluation when you do not have the authority or the information to make the decision. For example, if a piece of equipment is leased and the lease is at the end of its term, a decision needs to be made that will most likely involve the person using the asset. If there is a buyout provision for the lease, the asset owner may or may not want to keep the asset. The asset manager would mark the asset for evaluation, and then contact the asset owner to determine if the asset should be disposed of or kept. This decision might take some time to accomplish.
- Evaluate whether and how to dispose of the asset. As the asset manager, you work through the list of assets that are marked for evaluation, and then either place these assets back in inventory by changing the pending status to NA, or marking the pending action for disposal.
-
Manage asset disposal. You then work from the Manage Asset Disposal tab, and either update the inventory to indicate that the asset is disposed of, or assign the asset to a process for disposal. For example, if the asset has hazardous material in it, then the asset manager would assign it to a waste out disposition task. The manager then uses the update inventory tab to monitor the processes until they are completed, and then updates the inventory record with the disposal information.
- Update inventories.You monitor assets that are assigned to a disposal process from the Update Inventory tab. When the process is completed, you update the inventory record with the disposal information. See Manage asset disposal for a description of how the update action works.
- Generate a PowerPoint presentation based on project data. See Creating Power Point Presentation.
- Generate reports . From the Reports button, you can access informational and analysis reports for property, buildings, equipment, furniture, and projects. The project reports are available for projects of all statuses. For some of these reports, such as View and Edit Equipment Information, you are able to add and edit data, as well as review. See Reports for the Enterprise Assets and Assets Applications.
- Review equipment systems. The Asset Disposal Console includes the Asset Relationship Analysis tab (which is also found on the Equipment Systems Console). Use this tab to track your assets and their interdependencies, so that you can evaluate the effects that one asset has on another, such as during renovations, moves, or maintenance. You can see the equipment on a floor plan or 3D Navigator to review the spaces served by the equipment, and to trace its dependencies. You can also review the support team that services this equipment.
Analyze assets for disposal opportunities
Working from the Analyze Assets for Disposal tab, you mark assets for disposal or evaluation. The assets then appear on the other tabs so you can do further analysis or initiate the disposal process.
To analyze assets for disposal:
- Locate the assets you want to analyze, by entering criteria in the Asset Selection Filter to restrict the assets shown in the Asset Registry. You can enter locations, organizational units, a project, asset or depreciation information. You can also drill-down in the Geo Location, Location, Organization, Project, or equipment systems lists to restrict the Asset Registry by that selection, in addition to the restriction set in the Asset Selection Filter.
- To adjust the list of assets:
- Sort the list by clicking the arrows in the column headers
- Hide or show additional fields by clicking the gear icon and using the Select Fields dialog to make your selections.
- To review details for the asset, select the Profile button in the row for the asset.
- When you have the assets in view that you want to either dispose of or evaluate further, select the check boxes for the assets. You must be taking the same action (evaluation or disposal) for the assets you select.
- Click Mark for Action at the top of the grid.
- In the Mark for Action dialog, select the Pending Action as either Mark for Disposal or Mark for Evaluation.
- Click Save.
The Pending Action field for the asset is updated with the value you selected. The assets appear in either the Evaluate for Disposal or Manage Asset Disposal tab, depending on the action you selected.
Evaluate assets for disposal
If you have marked assets for evaluation, these assets appear on the Evaluate Assets for Disposal tab. The first time you access the tab, click Filter to see these assets. To limit the assets to the specific set you want to work with, set a restriction in the Filter console to avoid an unmanageable number of assets.
As the asset manager, you work through the list of assets that are marked for evaluation, and then either place them back in inventory by changing the pending status to NA, or mark the Pending Action for disposal.
To help you evaluate if and how the asset should be disposed of, you can review the current and historical activities for the asset.
Activities. If an asset has activities associated with it (project actions, moves, assessment items, work requests, or surveys), click Activities in the row for the asset to see details for these actions.
- The form shows active work requests, that is work requests that have a status of Requested, On Hold, Approved, Assigned to Work Order, Issued and in Progress, On Hold for Parts, On Hold for Access, and On Hold for Labor.
- For historical activities, the form shows work requests that are Completed, Closed, Rejected, Stopped, or Canceled. The query to find these requests is performed on the Work Request and Historical Work Request tables. For a description of the statuses that are shown for all activity types, see Reviewing historical activities.
- The following image shows the Activities button in the Asset Registry:

Report. From the Asset Summary list (after clicking Activities), click Reports to view all activities for the selected asset; grouped by Current or Historical in a pop-up window.
Review historical activities
For some assets, like buildings and property, the number of transactions can be quite large. For this reason, the application displays a cross tab report which is a count by transaction type. You can drill down in the cross tab report to a list of transaction records contributing to the summary, and then to details of a selected transaction record.
The historical activities list includes closed or completed transactions for the selected asset. These transactions can come from multiple sources (move, project, work request, activity_log, hactivity_log, hwr).
Following is a list of Historical Asset Activities and the table the data comes from:
| Historical Asset Activity | Table |
|---|---|
| Work Request | wr; where status is Completed or Closed |
| Historical Work Request | hwr |
| Moves | mo_eq where status is Completed or Closed |
| Project Actions | activity_log.project_is is not null active and where status is Completed, Completed Verified or Closed |
| Historical Project Actions | hactivity_log |
| Assessments | activity_log.assessment_id is not null and project_type = ASSESSMENT and where status is Completed, Completed Verified or Closed |
| Historical Assessments | hactivity_log |
| Surveys | eq_audit where survey.status is Completed or Closed |
| Sustainability Assessments | project.project_type =ASSESSMENT - ENVIRONMENTAL or ASSESSMENT – HAZMAT and where status is Completed, Completed Verified or Closed |
| Commissioning | activity_log.asset_id = selected asset and project_id are not null, and activity_log.project_id =project.project_id where project_type = commissioning, and where status is Completed, Completed Verified or Closed. |
| Historical Commissioning | hactivity_log |
| Owner Transactions | ot |
Manage asset disposal
If you have marked assets for disposal, these assets appear on the Manage Asset Disposal tab . The first time you access the tab, click Filter to see these assets. To limit the assets to the specific set you want to work with, set a restriction in the Filter console to avoid an unmanageable number of assets.
From this tab, you can:
- Mark the asset for disposal and update the inventory. This completes the asset disposal.
- Mark the asset for disposal and assign it to a disposal process. One example may be if the asset has hazardous material in it, in which case, you would assign it to a waste disposition task. When you assign an asset to a waste disposal process, you monitor the process from the Update Inventory tab.
- Return an asset to inventory. See Returning an asset to inventory.
- Create an action for the asset.
- use the Profile button in the row for the asset to review details.
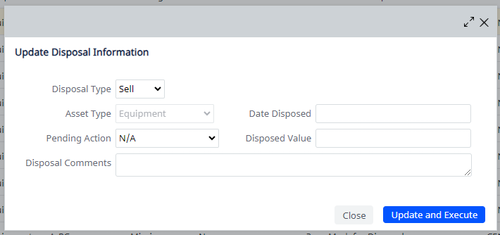
To mark the asset for disposal and update the inventory:
- From the Manage Asset Disposal tab, locate a group of assets that you are ready to dispose of. You must have marked these assets for disposal on the Evaluate Assets for Disposal tab.
- Select the check boxes for the assets, and click Update Disposal Information.
The Update Disposal Information form appears.
Note: You can track the cost of disposal in the Project Proposal that you create for disposal.
- From the Pending Action list, select one of the following:
- Mark for Disposal
- Mark for Donation
- Mark for Evaluation
- Mark for Refurbish
- Mark for Repurpose
- Since you are disposing of the asset, select the Disposal Type from the list (Sell, Donate, Discard, Lost, Stolen)
- Enter the Date Disposed.
- Enter the Disposed Value. if you sold the asset, put in the market value or sales price.
- Click Update and Execute.
When you click Update and Execute, the asset table(s) are updated using the following field mapping:
- For buildings and properties, the Disposed Value is entered into the Selling Price field of the Owner Transaction table
- For equipment, the Disposed Value is saved in the Salvage Value field of the Equipment table
- For furniture, the Disposed Value is saved in the Salvage Value field of the Tagged Furniture table.
If there are active custodians for the selected assets, the action:
- sets the Custodian Status to Inactive
- sets the Custodian End Date to the Date Disposed, or current date if null
- appends the Custodian Notes field with " - Custodian terminated due to asset disposal on xx/xx/xxxx"
- appends the confirmation dialog with "Record(s) Updated. Asset Custodians have been terminated for the disposed assets."
For Buildings and Properties, an Owner Transaction (ot) record is created with a default description (ot.description) of “Disposed on “ + ot.date_sold.
For buildings and properties, the Owner Transaction table is updated with the Disposal Type you enter. The following describes the mapping of your entries to the Owner Transaction table for buildings and properties.
Disposal Type OT Status Sell Sold
Discard Disposed
Donate Donated
Note: You can track the cost of disposal in the Project Proposal that you create for disposal.
To mark the asset for disposal and assign it to a disposal process:
You might need to assign the asset to a disposal process, and then monitor the process to completion before updating the inventory. In this case, you do not update the inventory until the process completes.
- From the Manage Asset Disposal tab, locate a group of assets that you are ready to assign to a disposal process. You must have marked these assets for disposal on the Evaluate Assets for Disposal tab.
- Select the check boxes for the assets that you want to mark for disposal and assign to a disposal process.
- Click Update Disposal Information. The Update Disposal Information form appears.
Note: Disposal costs are manged in a Disposal project.
- Click Assign To.
The Create Action for Asset form appears.
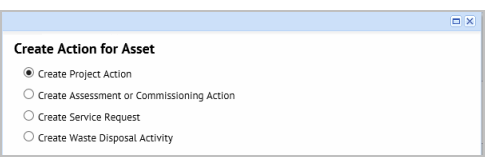
Note: The Create Waste Disposal Activity appears only if the asset is equipment.
- Select the disposal process for the asset. For example, you could assign the asset to a project action, to an assessment or commissioning action, to an Sustainability & Risk waste disposition process, or to a service request.
- Click OK.
Depending on your selection, the form to create the appropriate item appears.
For information on entering project actions, see Adding Actions for Work Packages for a description of the data you can enter. You can associate actions with projects that are Proposed or Requested and for which you are a team member.
For information on adding an assessment action, see Recording the Condition or Sustainability of Equipment and Rooms.
For information on creating a service request, see Generating and Reviewing Service Requests for Actions.
For information on creating details for generated waste, see Track Waste Generation.
After saving the action, the Update Disposal Information form appears.
- Click Save on this form.
You can now manage the disposal process on the Update Inventory tab.
Return an asset to inventory
If you determine that the asset should not be disposed of, you can return it to inventory.
- From the Manage Asset Disposal tab, select the check box for the asset to be returned to inventory.
- Click Update Disposal Information.
- Select N/A from the Lifecycle Status list, and N/A from the Disposal Type list.
- If needed, enter comments that describe your decision in the Disposal Comments field.
- Click Save.
The Asset is returned to inventory and is not disposed of.
Create an action for the asset
Your planning or disposal project, or your analysis of equipment dependencies, might involve the need to:
- survey assets
- create a service request for maintenance or other work that needs to be done
- dispose of waste at a location
For example, if your analysis determines that you should do preventive maintenance for an item that is affected by another asset that needs to be taken off line, you can create the action for that work from the console. To handle situations such as these, you can create the following types of actions for an asset.
If you need to have a license for the application, it is noted below.
- a project action for Proposed or Requested projects for which you are a team member. Note that the list of projects does not include Assessment or Commissioning projects.
- an action for a Proposed or Requested project of the Commissioning or Assessment Project Type for which you are a team member. For this type of action, you need to have a license for the Projects application.
- a service request. For this type of action, you need a license for the Service Desk application.
- a disposition of waste. For this type of action, you need a license for the Waste application.
To create an action for an asset:
- Access the Asset Lifecycle Console, the Asset Disposal Console, or the Equipment Systems Console.
- From the Asset Lifecycle Console, select the Asset Lifecycle tab, and set a filter to restrict the assets that show in the Asset Registry.
- From the Asset Disposition Console, select the Evaluate Assets for Disposal tab, set a restriction to limit the assets that appear, and click Filter.
- From the Equipment Systems Console, select either tab, and select an asset from the Inventory Tree or the System Assignments tree.
- Accessing the form to add an action depends on the console from which you are working.
From the Equipment Systems Console, click the wrench icon in the Equipment Details panel.
From the Asset Lifecycle or Asset Disposal Consoles, click the wrench icon in the row for the asset for which you want to assign an action.
- The Create Action for Asset form appears.
- Select the option button for the action type you want to create, and click OK.
Note: The Create Waste Disposal Activity appears only if the asset is equipment.
- You will be directed to the form for the action you are assigning. The form will be pre-populated with information for the selected asset.
- Complete and save the form with the information you need.
- See Adding Actions for Work Packages for a description of the data you can enter. You can associate actions with projects that are Proposed or Requested and for which you are a team member.
- To add an assessment action, see Recording the Condition or Sustainability of Equipment and Rooms.
- To create a service request, see Generating and Reviewing Service Requests for Actions.
- To create details for generated waste, see Track Waste Generation.
Update your inventory
When you click Update and Execute for a property or building, a record is created in the Ownership Transaction table. The Transaction ID is auto-generated, and the following values are taken from your entries on the Update Disposal Information form:
| Field on the Update Disposal Information form | The Ownership Transaction record is created using these values |
|---|---|
| “The “ + Asset Type + ” was “ + Disposal Type + “ on “ + Date Disposed | Description [ot.description] |
| Disposal Comments | Comments [ot.comments] |
| Asset Code (if Asset Type = Property) | Property Code [ot.pr_id] |
| Asset Code (if Asset Type = Building) | Building Code [ot.bl_id] |
| When you set the Transaction Status to Disposed | Transaction Status [ot.status] = Disposed |
| Date Disposed | Date Sold [ot.date_sold] |
| Disposed Value | Selling Price [ot.cost_selling] |
Updates are made to the Properties, Buildings, Equipment and Furniture tables from your entries on the Update Disposal Information form:
| Update Disposal Information | Property Table |
|---|---|
| Properties table | |
| When any Disposal Type is saved | Pending Action [property.pending_action] = N/A |
| Disposal Type = Sell | Status [property.status] =SOLD |
| Disposal Type = Discard | Status [property.status] = DISPOSED |
| Disposal Type = Donate | Status [property.status] = DONATED |
| Buildings table | |
| When any Disposal Type is saved | Pending Action [bl.pending_action] = N/A |
| Disposal Type = Sell, Discard | Status [building.status] = DISPOSED |
| Disposal Type = Donate | Status [building.status] = DONATED |
| Equipment table | |
| When any Disposal Type is saved | Pending Action [eq.pending_action] = NA |
| Disposal Type = Sell | Status [eq.status] = Sold |
| Disposal Type = Discard | Status [eq.status] = Disposed |
| Disposal Type = Donate | Status [eq.status] = Donated |
| Disposal Type = Stolen | Status [eq.status] = Stolen |
| Disposal Type =Lost | Status [eq.status] Missing |
| Furniture Table | |
| When any Disposal Type is saved | Pending Action [ta.pending_action] = NA |
| Disposal Type = Sell | Status [ta.status] = Sold |
| Disposal Type = Discard | Status [ta.status] = Disposed |
| Disposal Type = Donate | Status [ta.status] = Donated |
| Disposal Type = Stolen | Status [ta.status] = Stolen |
Generate a PowerPoint presentation
Note: To see a floor plan in the generated PowerPoint presentation, the project must have a work package assigned, the floor plan has to have a markup, the markup must be in the doc4 field of the Action Items table (activity_log), and the Action Item record must be assigned to a Work Package
To generate a PowerPoint presentation from your project data:
- Drill down in the Project list to the project, and click the Export button
 .
.A job runs that creates a PowerPoint presentation based on the data entered for the project.
- Select to open the project, or to save the project to your system
See Generating PowerPoint presentations from the Enterprise Assets Consoles.